| NG |  |
| REPAIR OR REPLACE FUEL LEAK POINT |
DTC P0093 Fuel System Leak Detected - Large Leak |
| DTC Detection Drive Pattern | DTC Detection Condition | Trouble Area |
| After idling for 60 seconds, run engine at 2500 rpm for 30 seconds | The fuel pressure decreases greatly when the engine is running. (1 trip detection logic) |
|
| DTC No. | Data List |
| P0093 |
|
| Engine Speed | Fuel Pressure |
| Idling | Approximately 27000 to 45000 kPa |
| 3000 rpm (No engine load) | Approximately 66000 to 100000 kPa |
| Required Sensor | Fuel pressure sensor |
| Frequency of operation | Continuous |
| Duration | 1 second |
| MIL operation | 1 driving cycle |
| 1.CHECK FOR FUEL LEAK (IN HIGH-PRESSURE AREAS) |
Before starting the engine, visually check for fuel leaks from the fuel supply pump, fuel injectors, common rail and the fuel pipes in high-pressure areas.
|
| ||||
| OK | |
 |
| 2.CHECK ANY OTHER DTCS OUTPUT (IN ADDITION TO DTC P0093) |
Connect the intelligent tester to the DLC3.
Turn the ignition switch to ON and turn the tester on.
Enter the following menus: Powertrain / Engine and ECT / DTC.
Read Current DTCs.
| Result | Proceed to |
| P0093 | A |
| P0093 and other Current DTCs output | B |
|
| ||||
| A | |
|
| 3.CHECK FREEZE FRAME DATA (PROCEDURE 3) |
Connect the intelligent tester to the DLC3.
Turn the ignition switch to ON and turn the tester on.
Enter the following menus: Powertrain / Engine and ECT / DTC.
Record the stored DTC and Freeze Frame Data.
| Tester Display (Freeze Frame Data Item) | Measurement Item | Standard (Reference) |
| Target Pump SCV Current | Target value of current flowing to the SCV of fuel supply pump | 800 to 2500 mA |
| Fuel Press | Actual fuel pressure inside the common rail | 27000 to 45000 kPa when idling 66000 to 100000 kPa when maintained at 3000 rpm with no load |
| NEXT | |
|
| 4.CHECK FREEZE FRAME DATA (TARGET PUMP SCV CURRENT) |
Read the value of Target Pump SCV Current in the Freeze Frame Data recorded in Procedure 3.
| Tester Display | Specified Condition |
| Target Pump SCV Current | 800 to 2500 mA |
|
| ||||
| OK | |
|
| 5.CHECK FUEL RECEIVER GAUGE (AMOUNT OF FUEL) |
Check if the fuel level is low.
| Result | Proceed to |
| The indicator (fuel warning light) is illuminated | A |
| The indicator (fuel warning light) is not illuminated | B |
|
| ||||
| A | |
|
| 6.ADD FUEL |
| NEXT | |
|
| 7.CHECK WHETHER DTC OUTPUT RECURS (DTC P0093) |
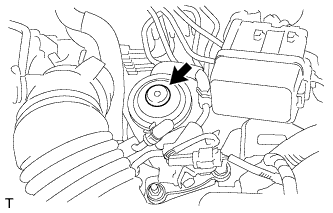 |
Using a hand pump mounted on the fuel filter cap, bleed the air from the fuel system. Continue pumping until the pump resistance increases.
Start the engine.
Turn the ignition switch off.
Connect the intelligent tester to the DLC3.
Turn the ignition switch to ON and turn the tester on.
Clear DTCs.*A
Start the engine.*B
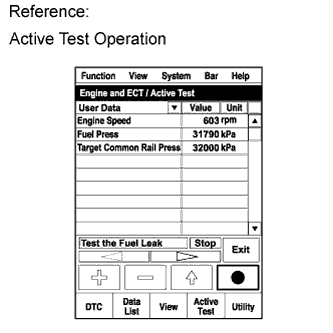 |
Enter the following menus: Powertrain / Engine and ECT / Active Test / Test the Fuel Leak.*C
Perform the following test 5 times with on/off intervals of 10 seconds: Active Test / Test the Fuel Leak.*D
Allow the engine to idle for 3 minutes or more after performing the Active Test.*E
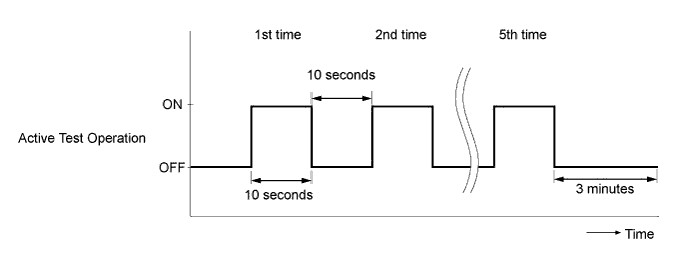
Enter the following menus: Powertrain / Engine and ECT / DTC.
Read Current DTCs.
When no DTCs are output, the air bleeding is completed. Proceed to step *F.
If any DTCs are output, proceed to the next step.
Repeat steps *A to *E.
Clear DTCs.
Start the engine and warm it up.*F
Confirm that the shift lever is in neutral, and apply the parking brake.*G
Fully depress the accelerator pedal for 5 seconds and then release it.*H
Rev the engine to 3000 rpm and fully release the accelerator pedal immediately after the engine reaches 3000 rpm.*I
Repeat the above procedures *H and *I 5 times.
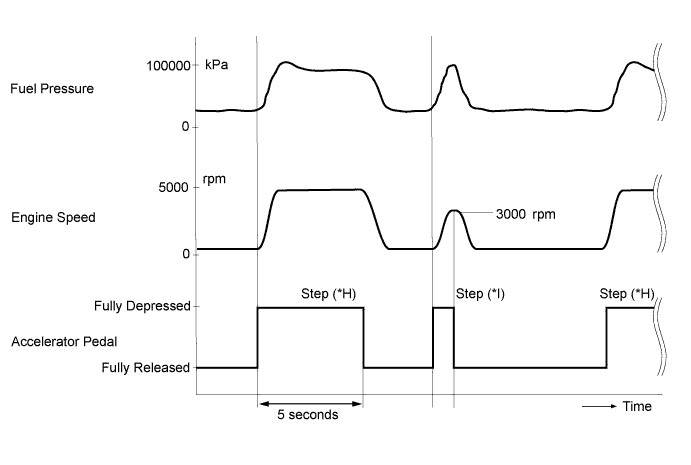
Enter the following menus: Powertrain / Engine and ECT / DTC.
Read Current DTCs.
| Result | Proceed to |
| No output | B |
| DTC output | A |
|
| ||||
| A | |
|
| 8.CLEAR DTC |
Connect the intelligent tester to the DLC3.
Turn the ignition switch to ON and turn the tester on.
Enter the following menus: Powertrain / Engine and ECT / DTC.
Clear the DTC.
| NEXT | |
|
| 9.CHECK ENGINE STARTING CONDITION |
Check whether the engine can be started.
|
| ||||
| OK | |
|
| 10.READ VALUE USING INTELLIGENT TESTER (TARGET PUMP SCV CURRENT) |
Start the engine and warm it up until the engine coolant temperature reaches 75°C (167°F) or higher.
Allow the engine to idle for 1 minute or more.
Connect the intelligent tester to the DLC3.
Turn the tester on.
Enter the following menus: Powertrain / Engine and ECT / Data List / Target Pump SCV Current.
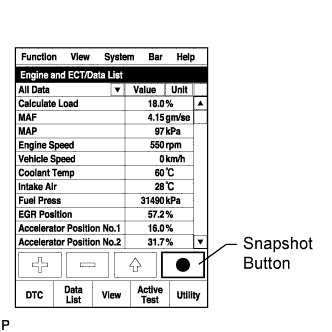 |
Take a snapshot with the intelligent tester.
Read the values when the engine is idling and revved to 3000 rpm 5 times.
| Tester Display | Engine Condition | Specified Condition |
| Target Pump SCV Current | Idling and revving to 3000 rpm 5 times | 800 to 2500 mA |
|
| ||||
| OK | |
|
| 11.CHECK ENGINE OIL CONDITION |
Remove the oil filler cap (and the engine oil level dipstick), and check whether the engine oil smells of diesel fuel.
| Result | Proceed to |
| The engine oil smells of diesel fuel. | B |
| Except above | A |
|
| ||||
| A | |
|
| 12.PERFORM ACTIVE TEST USING INTELLIGENT TESTER (TEST THE FUEL LEAK) |
Connect the intelligent tester to the DLC3.
Turn the ignition switch to ON and turn the tester on.
Enter the following menus: Powertrain / Engine and ECT / Active Test / Test the Fuel Leak / Data List / Fuel Press, Target Common Rail Pressure, and Target Pump SCV Current.
Start the engine.
|
Take a snapshot with the intelligent tester during the Active Test.
Measure the difference between the target fuel pressure (Target Common Rail Pressure) and the actual fuel pressure (Fuel Press) when the "Test the Fuel Leak" Active Test is performed.
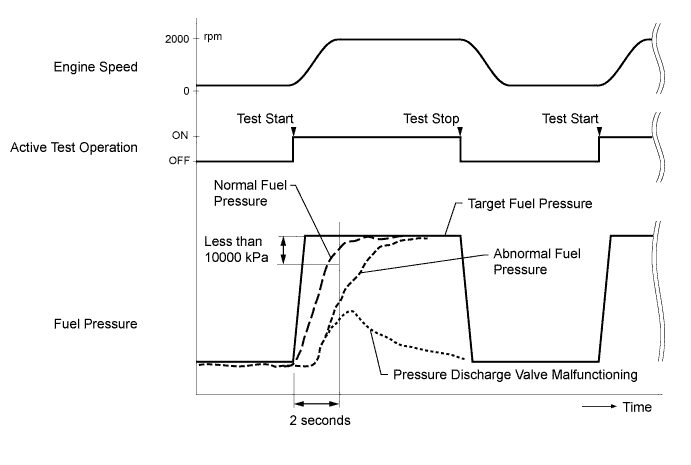
Read the value of Target Pump SCV Current in the Data List when the "Test the Fuel Leak" Active Test is performed.
| Result | Proceed to |
| Difference between target fuel pressure and actual fuel pressure is 10000 kPa or more | B |
| Target Pump SCV Current value is out of standard range | C |
| Both results are within standard range | A |
|
| ||||
|
| ||||
| A | |
|
| 13.INSPECT FUEL TEMPERATURE SENSOR (SENSOR OUTPUT) |
Connect the intelligent tester to the DLC3.
Turn the ignition switch to ON and turn the tester on.
Enter the following menus: Powertrain / Engine and ECT / Data List / Fuel Temperature.
Read the value.
|
| ||||
| OK | |
|
| 14.READ VALUE USING INTELLIGENT TESTER (ENGINE SPEED) |
Connect the intelligent tester to the DLC3.
Turn the ignition switch to ON and turn the tester on.
Enter the following menus: Powertrain / Engine and ECT / Data List / Engine Speed.
Read the value while cranking and idling the engine.
| Tester Display | Engine Condition | Specified Condition |
| Engine Speed | Cranking | 50 to 400 rpm |
| Idling with warm engine | 750 to 850 rpm |
|
| ||||
| OK | |
|
| 15.INSPECT CAMSHAFT POSITION SENSOR (SENSOR RESISTANCE) |
Inspect the camshaft position sensor (Click here).
|
| ||||
| OK | |
|
| 16.CHECK HARNESS AND CONNECTOR (CAMSHAFT POSITION SENSOR - ECM) |
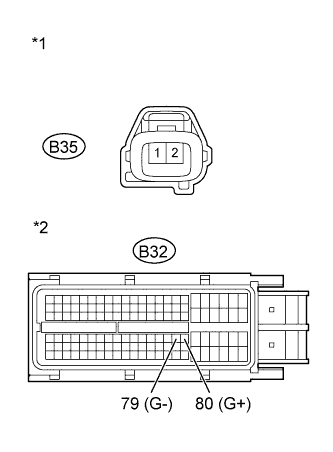 |
Disconnect the camshaft position sensor connector.
Disconnect the ECM connector.
Measure the resistance according to the value(s) in the table below.
| Tester Connection | Condition | Specified Condition |
| B35-1 - B32-80 (G+) | Always | Below 1 Ω |
| B35-2 - B32-79 (G-) | Always | Below 1 Ω |
| Tester Connection | Condition | Specified Condition |
| B35-1 or B32-80 (G+) - Body ground | Always | 10 kΩ or higher |
| B35-2 or B32-79 (G-) - Body ground | Always | 10 kΩ or higher |
| *1 | Front view of wire harness connector (to Camshaft Position Sensor) |
| *2 | Front view of wire harness connector (to ECM) |
Reconnect the camshaft position sensor connector.
Reconnect the ECM connector.
|
| ||||
| OK | |
|
| 17.INSPECT ECM (FUEL PRESSURE SENSOR OUTPUT VOLTAGE) |
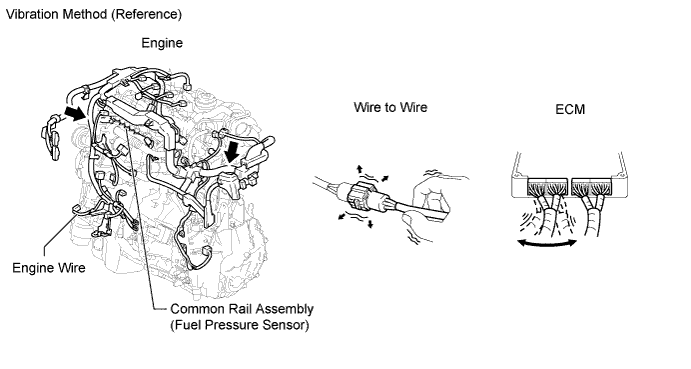
Check if the MIL lights up when vibration is applied to the wire harness and connectors between the fuel pressure sensor and ECM.
| Result | Proceed to |
| MIL comes on | B |
| MIL does not come on | A |
|
| ||||
| A | |
|
| 18.CHECK FOR INTERMITTENT PROBLEMS |
Check for intermittent problems.
|
| ||||
| 19.BLEED AIR FROM FUEL SYSTEM |
Bleed the air from the fuel system .
| NEXT | |
|
| 20.CHECK ENGINE STARTING CONDITION |
Check whether the engine can be started.
|
| ||||
|
| ||||
| 21.CHECK AND REPLACE FUEL INLET LINE |
Check the following items, and repair or replace the malfunctioning part if necessary.
Check for fuel filter clogging.
Check for fuel freezing in the fuel line.
Check for clogging or leaks in the fuel pipe and hose between the fuel tank and fuel supply pump.
| NEXT | |
|
| 22.CHECK ENGINE STARTING CONDITION |
Check whether the engine can be started.
|
| ||||
|
| ||||
| 23.REPLACE FUEL SUPPLY PUMP |
Replace the fuel supply pump (Click here).
| NEXT | |
|
| 24.BLEED AIR FROM FUEL SYSTEM |
Bleed the air from the fuel system .
| NEXT | |
|
| 25.PERFORM FUEL SUPPLY PUMP INITIALIZATION |
Perform fuel supply pump initialization (Click here).
| NEXT | |
|
| 26.CHECK ENGINE STARTING CONDITION |
Check whether the engine can be started.
|
| ||||
|
| ||||
| 27.REPLACE COMMON RAIL |
Replace the common rail (Click here).
| NEXT | |
|
| 28.BLEED AIR FROM FUEL SYSTEM |
Bleed the air from the fuel system .
|
| ||||
| 29.PERFORM ACTIVE TEST USING INTELLIGENT TESTER (FUEL CUT FOR IDENTIFYING) |
Connect the intelligent tester to the DLC3.
Start the engine and turn the intelligent tester on.
Enter the following menus: Powertrain / Engine and ECT / Active Test / Control the Cylinder #1, #2, #3 and #4 Fuel Cut.
Check the four cylinders in sequence to identify any faulty cylinders by performing the power balance inspection.
| NEXT | |
|
| 30.REPLACE FUEL INJECTOR (FUEL INJECTOR OF MALFUNCTIONING CYLINDER) |
Replace the fuel injector of the malfunctioning cylinder.
| NEXT | |
|
| 31.REGISTER INJECTOR COMPENSATION CODE AND PERFORM PILOT QUANTITY LEARNING |
Register the injector compensation code .
Perform the fuel injector pilot quantity learning .
| NEXT | |
|
| 32.BLEED AIR FROM FUEL SYSTEM |
Bleed the air from the fuel system .
| NEXT | |
|
| 33.CHANGE ENGINE OIL |
Remove the oil pan drain plug and drain the engine oil.
Install the oil pan drain plug.
Remove the oil filler cap.
Add fresh oil and install the oil filler cap.
|
| ||||
| 34.REPLACE FUEL SUPPLY PUMP |
Replace the fuel supply pump (Click here).
| NEXT | |
|
| 35.BLEED AIR FROM FUEL SYSTEM |
Bleed the air from the fuel system .
| NEXT | |
|
| 36.PERFORM FUEL SUPPLY PUMP INITIALIZATION |
Perform fuel supply pump initialization (Click here).
| NEXT | |
|
| 37.PERFORM ACTIVE TEST USING INTELLIGENT TESTER (TEST THE FUEL LEAK) |
Connect the intelligent tester to the DLC3.
Turn the ignition switch to ON and turn the tester on.
Enter the following menus: Powertrain / Engine and ECT / Active Test / Test the Fuel Leak / Data List / Fuel Press, Target Common Rail Pressure, and Target Pump SCV Current.
|
Take a snapshot with the intelligent tester during the Active Test.
Measure the difference between the target fuel pressure (Target Common Rail Pressure) and the actual fuel pressure (Fuel Press) when the "Test the Fuel Leak" Active Test is performed.
| Result | Proceed to |
| Difference between target fuel pressure and actual fuel pressure is less than 10000 kPa | B |
| Difference between target fuel pressure and actual fuel pressure is 10000 kPa or more | A |
|
| ||||
| A | |
|
| 38.REPLACE COMMON RAIL |
Replace the common rail (Click here).
| NEXT | |
|
| Go to step 49 |
| 39.BLEED AIR FROM FUEL SYSTEM |
Bleed the air from the fuel system .
|
| ||||
| 40.CHECK HARNESS AND CONNECTOR (ECM - SUCTION CONTROL VALVE) |
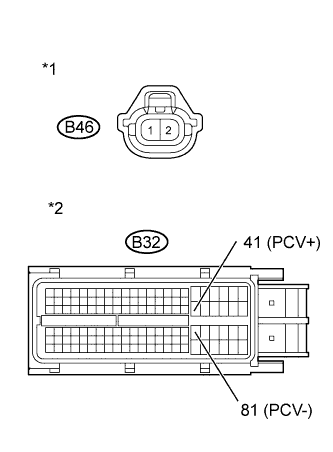 |
Disconnect the suction control valve connector.
Disconnect the ECM connector.
Measure the resistance according to the value(s) in the table below.
| Tester Connection | Condition | Specified Condition |
| B46-1 (+B) - B32-41 (PCV+) | Always | Below 1 Ω |
| B46-2 (PCV) - B32-81 (PCV-) | Always | Below 1 Ω |
| Tester Connection | Condition | Specified Condition |
| B46-1 (+B) or B32-41 (PCV+) - Body ground | Always | 10 kΩ or higher |
| B46-2 (PCV) or B32-81 (PCV-) - Body ground | Always | 10 kΩ or higher |
| *1 | Front view of wire harness connector (to Suction Control Valve) |
| *2 | Front view of wire harness connector (to ECM) |
Reconnect the suction control valve connector.
Reconnect the ECM connector.
|
| ||||
| OK | |
|
| 41.REPLACE FUEL SUPPLY PUMP |
Replace the fuel supply pump (Click here).
| NEXT | |
|
| 42.BLEED AIR FROM FUEL SYSTEM |
Bleed the air from the fuel system .
|
| ||||
| 43.REPAIR OR REPLACE HARNESS OR CONNECTOR (ECM - SUCTION CONTROL VALVE) |
Repair or replace the harness or connector.
|
| ||||
| 44.REPAIR OR REPLACE HARNESS OR CONNECTOR (ECM - FUEL PRESSURE SENSOR) |
Repair or replace the harness or connector.
| NEXT | |
|
| 45.INSPECT ECM (FUEL PRESSURE SENSOR OUTPUT VOLTAGE) |
Check if the MIL lights up when vibration is applied to the wire harness and connectors between the fuel pressure sensor and ECM.
| Result | Proceed to |
| MIL comes on | A |
| MIL does not come on | B |
|
| ||||
| A | |
|
| 46.REPLACE COMMON RAIL ASSEMBLY |
Replace the common rail (Click here).
| NEXT | |
|
| 47.BLEED AIR FROM FUEL SYSTEM |
Bleed the air from the fuel system .
| NEXT | |
|
| 48.PERFORM FUEL SUPPLY PUMP INITIALIZATION |
Perform fuel supply pump initialization (Click here).
|
| ||||
| 49.REPLACE FUEL SUPPLY PUMP (FUEL TEMPERATURE SENSOR) |
Replace the fuel supply pump (Click here).
|
| ||||
| 50.REPLACE CRANKSHAFT POSITION SENSOR |
Replace the crankshaft position sensor (Click here).
|
| ||||
| 51.REPLACE CAMSHAFT POSITION SENSOR |
Replace the camshaft position sensor (Click here).
|
| ||||
| 52.REPAIR OR REPLACE HARNESS OR CONNECTOR (ECM - CAMSHAFT POSITION) |
Repair or replace the harness or connector.
| NEXT | |
|
| 53.CHECK WHETHER DTC OUTPUT RECURS (DTC P0093) |
Connect the intelligent tester to the DLC3.
Turn the ignition switch to ON and turn the tester on.
Enter the following menus: Powertrain / Engine and ECT / DTC.
Clear DTCs.
Start the engine and warm it up.
Confirm that the shift lever is in neutral, and apply the parking brake.
Fully depress the accelerator pedal for 5 seconds and then release it.*A
Rev the engine to 3000 rpm and fully release the accelerator pedal immediately after the engine reaches 3000 rpm.*B
Repeat the above procedures *A and *B 5 times.
Enter the following menus: Powertrain / Engine and ECT / DTC.
Confirm that the DTC is not output again.
| NEXT | ||
 | ||
| ||
