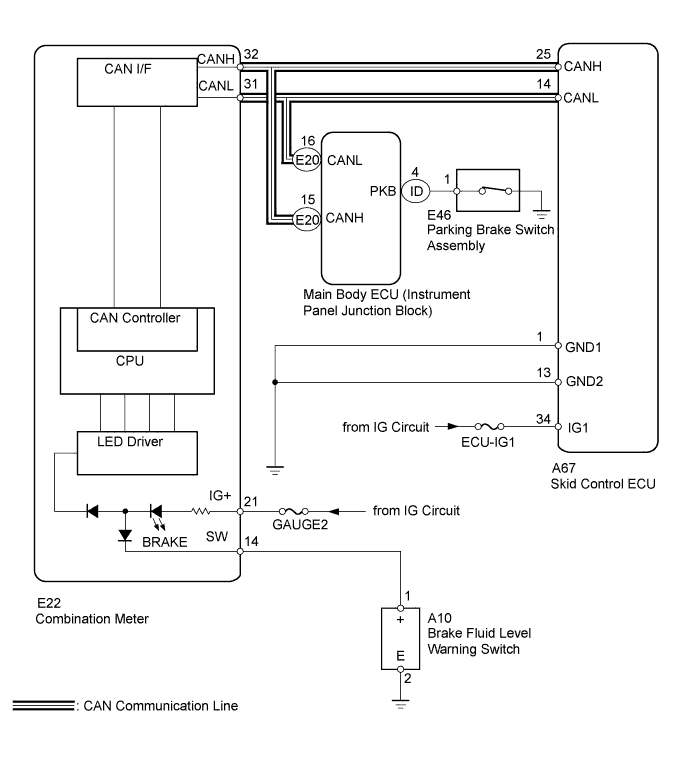
VEHICLE STABILITY CONTROL SYSTEM > Brake Warning Light Remains ON |
| 1.PREPARE FOR INSPECTION |
Check that both of the following conditions are satisfied.
| NEXT | |
 |
| 2.CHECK DTC FOR ABS |
Check if any ABS DTCs are output (Click here).
| Result | Proceed to |
| DTC is not output. | A |
| DTC is output. | B |
|
| ||||
| A | |
|
| 3.CHECK CAN COMMUNICATION SYSTEM |
Check if a CAN communication system DTC is output (Click here).
| Result | Proceed to |
| DTC is not output. | A |
| DTC is output. | B |
|
| ||||
| A | |
|
| 4.INSPECT SKID CONTROL ECU CONNECTOR |
Check if the skid control ECU connector is properly installed.
|
| ||||
| OK | |
|
| 5.CHECK HARNESS AND CONNECTOR (SKID CONTROL ECU - BATTERY AND BODY GROUND) |
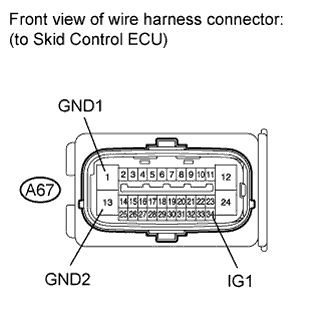 |
Disconnect the skid control ECU connector.
Measure the resistance according to the value(s) in the table below.
| Tester Connection | Condition | Specified Condition |
| A67-1 (GND1) - Body ground | Always | Below 1 Ω |
| A67-13 (GND2) - Body ground | Always | Below 1 Ω |
Measure the voltage according to the value(s) in the table below.
| Tester Connection | Switch Condition | Specified Condition |
| A67-34 (IG1) - Body ground | Ignition switch ON | 11 to 14 V |
|
| ||||
| OK | |
|
| 6.READ VALUE USING INTELLIGENT TESTER (PARKING BRAKE SWITCH) |
Using the Data List, check for proper functioning of the parking brake switch.
| Tester Display | Measurement Item/Range | Normal Condition | Diagnostic Note |
| Parking Brake SW | Parking brake switch / ON or OFF | ON: Parking brake applied OFF: Parking brake released | - |
|
| ||||
| OK | |
|
| 7.INSPECT BRAKE FLUID LEVEL WARNING SWITCH |
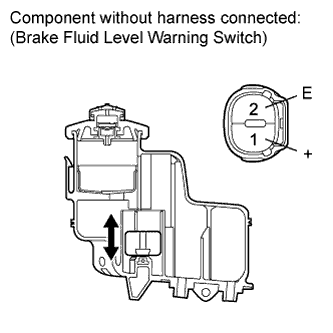 |
Remove the reservoir tank cap and strainer.
Disconnect the brake fluid level warning switch connector.
Measure the resistance according to the value(s) in the table below.
| Tester Connection | Condition | Specified Condition |
| 1 (+) - 2 (E) | Float up (Switch off) | 10 kΩ or higher |
| 1 (+) - 2 (E) | Float down (Switch on) | Below 1 Ω |
| Result | Proceed to | |
| OK | A | |
| NG | for LHD | B |
| for RHD | C | |
|
| ||||
|
| ||||
| A | |
|
| 8.CHECK HARNESS AND CONNECTOR (BRAKE FLUID LEVEL WARNING SW - COMBINATION METER/BODY GROUND) |
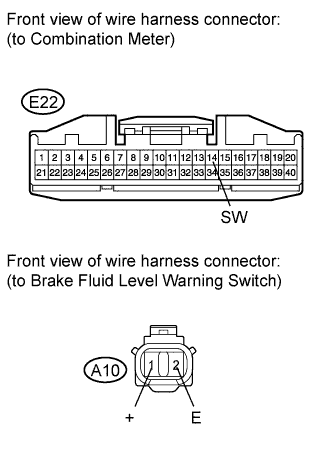 |
Disconnect the combination meter connector.
Disconnect the brake fluid level warning switch connector.
Measure the resistance according to the value(s) in the table below.
| Tester Connection | Condition | Specified Condition |
| E22-14 (SW) - A10-1 (+) | Always | Below 1 Ω |
| E22-14 (SW) - Body ground | Always | 10 kΩ or higher |
| A10-2 (E) - Body ground | Always | Below 1 Ω |
|
| ||||
| OK | |
|
| 9.INSPECT COMBINATION METER ASSEMBLY |
Inspect the combination meter (Click here).
|
| ||||
| OK | ||
 | ||
| ||
| 10.INSPECT PARKING BRAKE SWITCH ASSEMBLY |
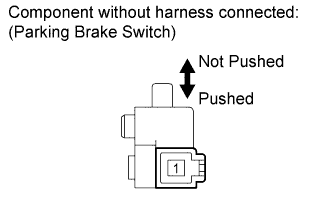 |
Remove the parking brake switch (Click here).
Measure the resistance according to the value(s) in the table below.
| Tester Connection | Switch Condition | Specified Condition |
| 1 - Body ground | Parking brake switch on (Switch pin not pushed) | Below 1 Ω |
| Parking brake switch off (Switch pin pushed) | 10 kΩ or higher |
|
| ||||
| OK | |
|
| 11.CHECK HARNESS AND CONNECTOR (PARKING BRAKE SWITCH - JUNCTION BLOCK/BODY GROUND) |
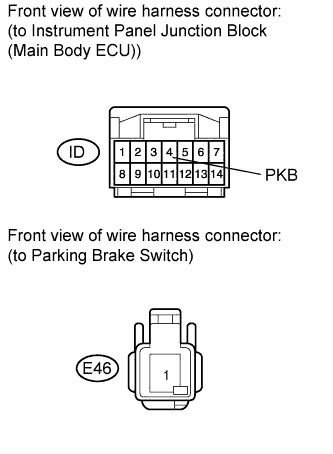 |
Disconnect the junction block connector.
Disconnect the parking brake switch connector.
Measure the resistance according to the value(s) in the table below.
| Tester Connection | Condition | Specified Condition |
| ID-4 (PKB) - E46-1 | Always | Below 1 Ω |
| ID-4 (PKB) - Body ground | Always | 10 kΩ or higher |
|
| ||||
| OK | ||
| ||
| ||

