SFI SYSTEM > ACIS Control Circuit |
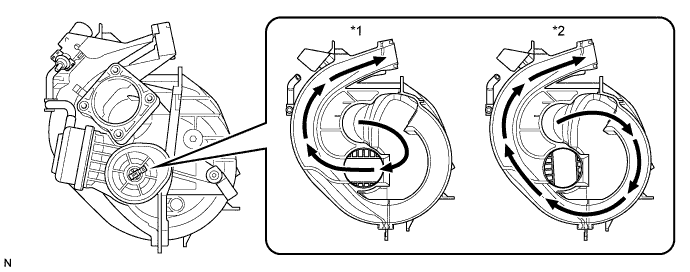
| *1 | Intake Air Control Valve Open | *2 | Intake Air Control Valve Closed |
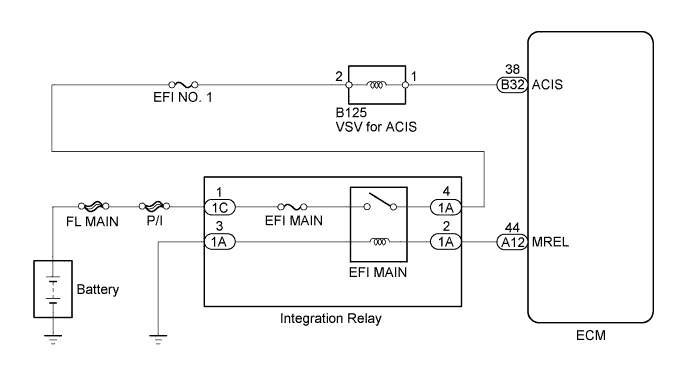
| 1.PERFORM ACTIVE TEST USING INTELLIGENT TESTER (OPERATE VSV FOR ACIS) |
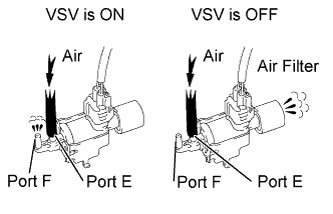 |
Disconnect the vacuum hose from port F of the vacuum switching valve (for ACIS).
Connect the intelligent tester to the DLC3.
Start the engine.
Enter the following menus: Powertrain / Engine and ECT / Active Test / Active the VSV for Intake Control.
Operate the VSV for ACIS.
Check the VSV air flow when switching the VSV on and off.
| Test Condition | Specified Condition |
| VSV is ON | Air from port E flows out through port F |
| VSV is OFF | Air from port E flows out through air filter |
|
| ||||
| OK | |
 |
| 2.CHECK VACUUM HOSES (VACUUM SWITCHING VALVE - INTAKE AIR CONTROL VALVE, INTAKE MANIFOLD) |
Check the vacuum hoses .
|
| ||||
| OK | |
|
| 3.INSPECT INTAKE MANIFOLD (INTAKE AIR CONTROL VALVE) |
Inspect the intake air control valve .
|
| ||||
| OK | ||
 | ||
| ||
| 4.INSPECT VACUUM SWITCHING VALVE (for ACIS) |
Inspect the vacuum switching valve (for ACIS) .
|
| ||||
| OK | |
|
| 5.CHECK HARNESS AND CONNECTOR (VACUUM SWITCHING VALVE - ECM AND INTEGRATION RELAY) |
 |
Disconnect the intake air control valve connector.
Disconnect the ECM connector.
Remove the integration relay from the engine room No. 1 relay block.
Disconnect the integration relay connector.
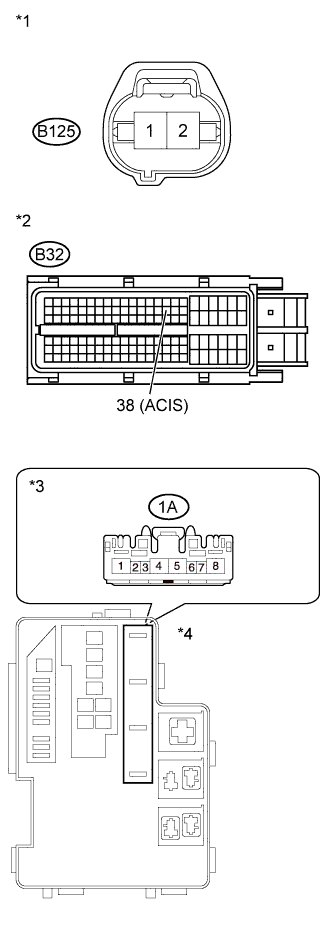
Measure the resistance according to the value(s) in the table below.
| Tester Connection | Condition | Specified Condition |
| B125-1 - B32-38 (ACIS) | Always | Below 1 Ω |
| B125-2 - 1A-4 | Always | Below 1 Ω |
| Tester Connection | Condition | Specified Condition |
| B125-1 or B32-38 (ACIS) - Body ground | Always | 10 kΩ or higher |
| B125-2 or 1A-4 - Body ground | Always | 10 kΩ or higher |
| *1 | Front view of wire harness connector (to VSV for ACIS) |
| *2 | Front view of wire harness connector (to ECM) |
| *3 | Front view of wire harness connector (to Integration Relay) |
| *4 | Engine Room No. 1 Relay Block |
Reconnect the intake air control valve connector.
Reconnect the ECM connector.
Reconnect the integration relay connector.
Install the integration relay.
|
| ||||
| OK | |
|
| 6.CHECK ECM POWER SOURCE CIRCUIT |
Check the ECM power source circuit (Click here).
|
| ||||
| OK | ||
| ||
| ||

