2AD-FTV ENGINE MECHANICAL REAR CRANKSHAFT OIL SEAL REMOVAL
PROCEDURE

 1. PRECAUTION
- NOTICE:
-
After turning the ignition switch off, waiting time may be required before disconnecting the cable from the battery terminal. Therefore, make sure to read the disconnecting the cable from the battery terminal notice before proceeding with work.
-
Click hereGeneral>INTRODUCTION>REPAIR INSTRUCTION>PRECAUTION
2.DISCONNECT CABLE FROM NEGATIVE BATTERY TERMINAL
- NOTICE:
-
When disconnecting the cable, some systems need to be initialized after the cable is reconnected.
-
Click hereGeneral>INTRODUCTION>REPAIR INSTRUCTION>INITIALIZATION
30300
3.REMOVE MANUAL TRANSAXLE ASSEMBLY (for Manual Transaxle)
30500
4.REMOVE AUTOMATIC TRANSAXLE ASSEMBLY (for Automatic Transaxle)
31210
5.REMOVE CLUTCH COVER ASSEMBLY (for Manual Transaxle)
31250
6.REMOVE CLUTCH DISC ASSEMBLY (for Manual Transaxle)
13450
7.REMOVE FLYWHEEL WITH DAMPER ASSEMBLY (for Manual Transaxle)
32101
8.REMOVE DRIVE PLATE AND RING GEAR SUB-ASSEMBLY (for Automatic Transaxle)
11401L
9.REMOVE REAR ENGINE OIL SEAL
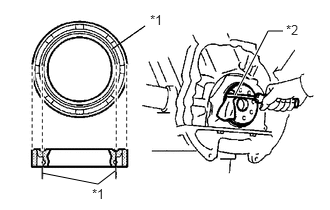
| *1 | Cut Position |
| *2 | Protective Tape |
Using a knife, cut off the lip of the rear engine oil seal.
Using a screwdriver, pry out the rear engine oil seal.
- NOTICE:
- ·
Do not damage the surface of the engine rear oil seal press fit hole or the crankshaft.
·After removing the engine rear oil seal, check the crankshaft for damage. If damaged, smooth the surface with 400-grit sandpaper.
- HINT:
-
Tape the screwdriver tip before use.