2AR-FE ENGINE MECHANICAL CAMSHAFT INSTALLATION
CAUTION / NOTICE / HINT
- HINT:
-
Perform "Inspection After Repairs" after replacing the camshaft, No. 2 camshaft, camshaft timing gear assembly and camshaft timing exhaust gear assembly.
- ·
w/ Canister Pump Module
Click hereEngine / Hybrid System>2AR-FE ENGINE CONTROL>SFI SYSTEM(w/ Canister Pump Module)>INITIALIZATION
·w/o Canister Pump Module
Click hereEngine / Hybrid System>2AR-FE ENGINE CONTROL>SFI SYSTEM(w/o Canister Pump Module)>INITIALIZATION
PROCEDURE

 11821
1.INSTALL NO. 2 CAMSHAFT BEARING
11811
2.INSTALL NO. 1 CAMSHAFT BEARING
15678A
3.INSTALL OIL CONTROL VALVE FILTER
13070A
4.INSTALL CAMSHAFT TIMING EXHAUST GEAR ASSEMBLY
- HINT:
-
Perform "Inspection After Repairs" after replacing the camshaft timing exhaust gear assembly.
- ·
w/ Canister Pump Module
Click hereEngine / Hybrid System>2AR-FE ENGINE CONTROL>SFI SYSTEM(w/ Canister Pump Module)>INITIALIZATION
·w/o Canister Pump Module
Click hereEngine / Hybrid System>2AR-FE ENGINE CONTROL>SFI SYSTEM(w/o Canister Pump Module)>INITIALIZATION
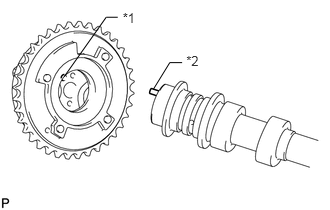
| *1 | Knock Pin Hole |
| *2 | Knock Pin |
Align and attach the knock pin of the No. 2 camshaft with the knock pin hole of the camshaft timing exhaust gear assembly.
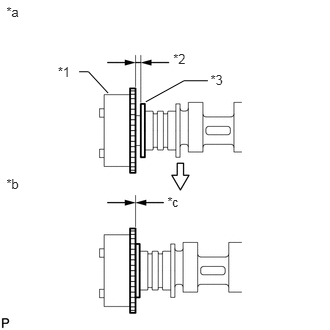
| *1 | Camshaft Timing Exhaust Gear |
| *2 | Clearance |
| *3 | Camshaft Flange |
| *a | INCORRECT |
| *b | CORRECT |
| *c | No Clearance |
Check that there is no clearance between the camshaft timing exhaust gear assembly and camshaft flange.
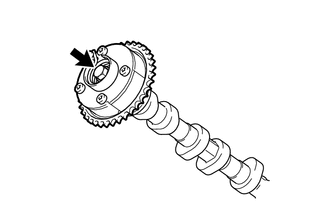
Fix the camshaft timing exhaust gear assembly with the bolt.
- Torque:
- 85 N*m (867 kgf*cm, 63 ft.*lbf)
- NOTICE:
-
Do not disassemble the camshaft timing exhaust gear.
5.SET NO. 1 CYLINDER TO TDC/COMPRESSION
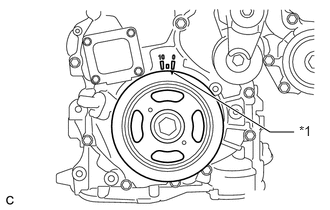
| *1 | Timing Notch (Groove) |
Turn the crankshaft pulley until its timing notch (groove) and the timing mark "0" of the timing chain cover are aligned.
13512
6.INSTALL NO. 2 CAMSHAFT
- HINT:
-
Perform "Inspection After Repairs" after replacing the No. 2 camshaft.
- ·
w/ Canister Pump Module
Click hereEngine / Hybrid System>2AR-FE ENGINE CONTROL>SFI SYSTEM(w/ Canister Pump Module)>INITIALIZATION
·w/o Canister Pump Module
Click hereEngine / Hybrid System>2AR-FE ENGINE CONTROL>SFI SYSTEM(w/o Canister Pump Module)>INITIALIZATION
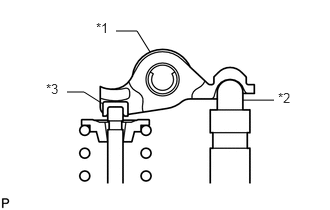
| *1 | Valve Rocker Arm |
| *2 | Valve Lash Adjuster |
| *3 | Valve Stem Cap |
Make sure that the valve rocker arms are installed as shown in the illustration.
Clean the camshaft journals.
Apply a light coat of engine oil to the camshaft journals, camshaft housings and camshaft bearing caps.
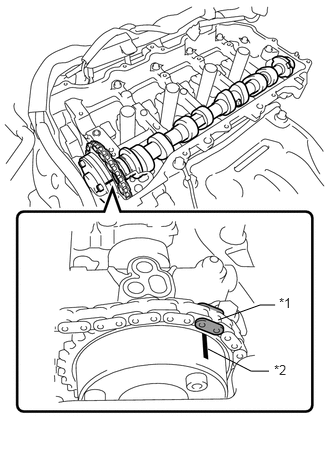
| *1 | Paint Mark |
| *2 | Matchmark |
Hold up the chain and align the matchmark and the paint mark and install the No. 2 camshaft.
13511
7.INSTALL CAMSHAFT
- HINT:
-
Perform "Inspection After Repairs" after replacing the camshaft.
- ·
w/ Canister Pump Module
Click hereEngine / Hybrid System>2AR-FE ENGINE CONTROL>SFI SYSTEM(w/ Canister Pump Module)>INITIALIZATION
·w/o Canister Pump Module
Click hereEngine / Hybrid System>2AR-FE ENGINE CONTROL>SFI SYSTEM(w/o Canister Pump Module)>INITIALIZATION
| *1 | Valve Rocker Arm |
| *2 | Valve Lash Adjuster |
| *3 | Valve Stem Cap |
Make sure that the valve rocker arms are installed as shown in the illustration.
Clean the camshaft journals.
Apply a light coat of engine oil to the camshaft journals, camshaft housings and camshaft bearing caps.
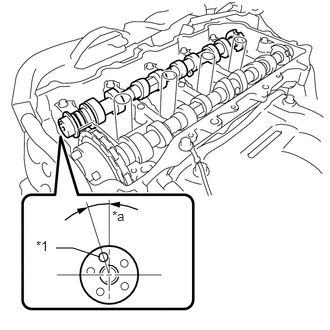
| *1 | Knock Pin |
| *a | Approximately 17° |
Install the camshaft to the camshaft housing as shown in the illustration.
8.INSTALL CAMSHAFT BEARING CAP
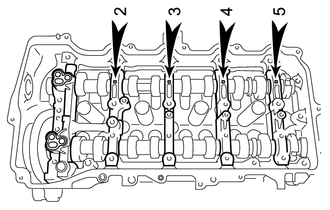
Confirm the marks and numbers on the camshaft bearing caps and place them in their proper positions and directions.
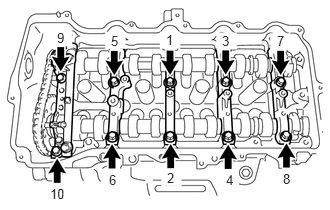
Using several steps, uniformly tighten the 10 bearing cap bolts in the sequence shown in the illustration.
- Torque:
- 27 N*m (275 kgf*cm, 20 ft.*lbf)
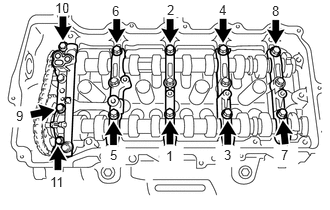
Using several steps, uniformly tighten the 11 bearing cap bolts in the sequence shown in the illustration.
- Torque:
- 16 N*m (163 kgf*cm, 12 ft.*lbf)
Check the torque of each bearing cap bolt again.
13050
9.INSTALL CAMSHAFT TIMING GEAR ASSEMBLY
- HINT:
-
Perform "Inspection After Repairs" after replacing the camshaft timing gear assembly.
- ·
w/ Canister Pump Module
Click hereEngine / Hybrid System>2AR-FE ENGINE CONTROL>SFI SYSTEM(w/ Canister Pump Module)>INITIALIZATION
·w/o Canister Pump Module
Click hereEngine / Hybrid System>2AR-FE ENGINE CONTROL>SFI SYSTEM(w/o Canister Pump Module)>INITIALIZATION
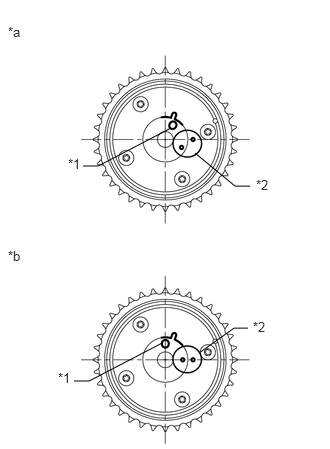
| *1 | Knock Pin Hole |
| *2 | Alignment Mark |
| *a | Advanced Position |
| *b | Retarded Position |
Check the camshaft timing gear position.
- NOTICE:
- ·
If the camshaft timing gear is set to the advanced position, do not let the camshaft timing gear rotate clockwise during installation.
·If the camshaft timing gear has rotated to the most retarded position, make sure to release the lock pin and set the camshaft timing gear to the most advanced position before tightening the camshaft timing gear.
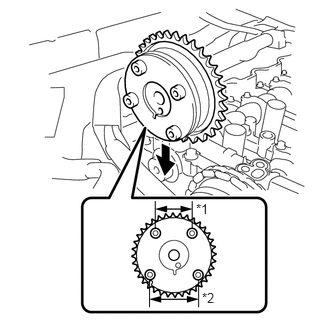
| *1 | Narrow |
| *2 | Wide |
Install the camshaft timing gear as shown in the illustration.
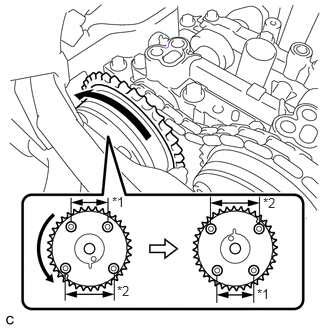
| *1 | Narrow |
| *2 | Wide |
Turn the camshaft timing gear approximately 180° counterclockwise.
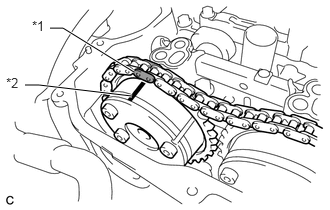
| *1 | Paint Mark |
| *2 | Matchmark |
Align the paint mark with the matchmark to install the chain.
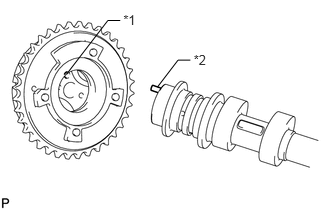
| *1 | Knock Pin Hole |
| *2 | Knock Pin |
Align and attach the knock pin of the camshaft with the knock pin hole of the camshaft timing gear.
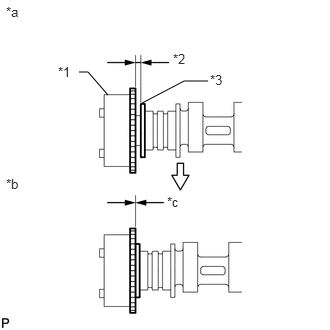
| *1 | Camshaft Timing Gear |
| *2 | Clearance |
| *3 | Camshaft Flange |
| *a | INCORRECT |
| *b | CORRECT |
| *c | No Clearance |
Check that there is no clearance between the camshaft timing gear and camshaft flange.
Secure the camshaft in place by hand, and then install the installation bolt of the camshaft timing gear by hand.
- NOTICE:
-
Do not use any tools to install the bolt. If the bolt is installed using a tool, the lock pin will be damaged.
If the lock pin has not been released, release it.
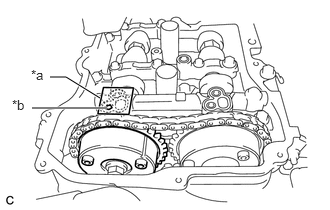
| *a | Adhesive Tape Sealing Area |
| *b | Make a Hole |
After cleaning and degreasing the intake side VVT oil hole on the camshaft bearing cap, completely seal the oil hole with adhesive tape or equivalent as shown in the illustration to prevent air from leaking.
- NOTICE:
-
Be sure to seal the oil hole completely because air leaks due to insufficient sealing will prevent the lock pin from being released.
Make a hole in the adhesive tape covering the oil hole as shown in the illustration. (Procedure A)
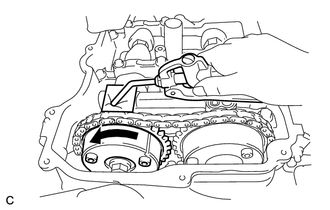
Apply approximately 200 kPa (2.0 kgf/ cm2, 29 psi) of air pressure to the hole made in procedure A to release the lock pin.
- NOTICE:
- ·
If air leaks out, reattach the adhesive tape.
·Cover the oil hole with a piece of cloth when applying air pressure to prevent oil from spraying.
Forcibly turn the camshaft timing gear in the advance direction (counterclockwise).
- HINT:
-
Depending on the air pressure applied, the camshaft timing gear may turn in the advance direction without assistance by hand.
Remove the adhesive tape from the camshaft bearing cap.
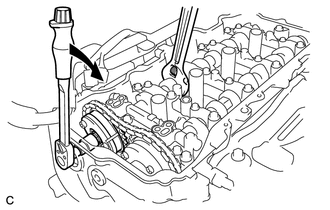
Using a wrench to hold the hexagonal portion of the camshaft, install the bolt.
- Torque:
- 85 N*m (867 kgf*cm, 63 ft.*lbf)
- NOTICE:
-
Be careful not to damage the cylinder head or spark plug tube with the wrench.
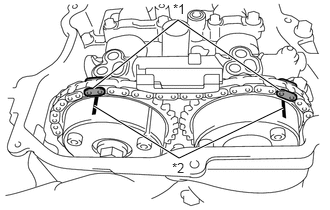
| *1 | Paint Mark |
| *2 | Matchmark |
Check that each matchmark of the camshaft timing gear and camshaft timing exhaust gear are aligned with each matchmark located as shown in the illustration.
10.ADD ENGINE OIL
13566B
11.INSTALL TIMING CHAIN GUIDE
13540
12.INSTALL NO. 1 CHAIN TENSIONER ASSEMBLY
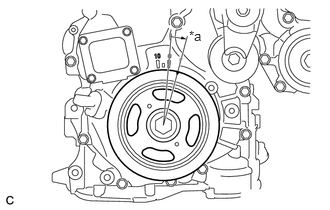
| *a | Approximately 10° |
Turn the crankshaft approximately 10° clockwise.
Install a new gasket and the No. 1 chain tensioner with the 2 bolts.
- Torque:
- 10 N*m (102 kgf*cm, 7 ft.*lbf)
- NOTICE:
-
Make sure not to drop the gasket inside the timing chain cover.
Remove the pin from the stopper plate.
13.CHECK NO. 1 CYLINDER TO TDC/COMPRESSION
Turn the crankshaft pulley until its timing notch (groove) and the timing mark "0" of the timing chain cover are aligned.
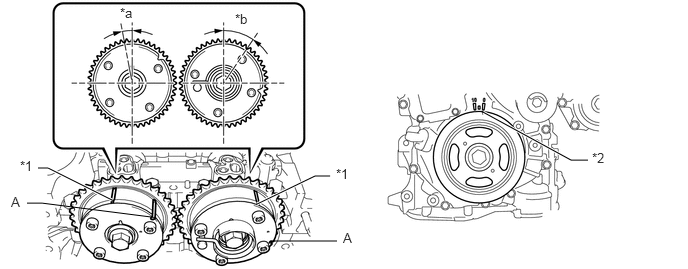
| *1 | Timing Mark | *2 | Timing Notch (Groove) |
| *a | Approximately 7° | *b | Approximately 32° |
Check that the timing marks of the camshaft timing gears are as shown in the illustration. If not, turn the crankshaft 1 revolution (360°) to align the timing marks as shown in the illustration.
- HINT:
-
"A" is not a timing mark.
11324
14.INSTALL TIMING CHAIN COVER PLATE
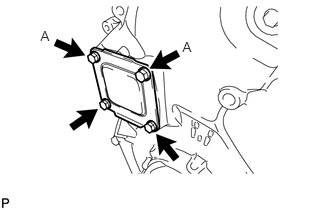
Install a new gasket and the timing chain cover plate with the 4 bolts.
- Torque:
- 10 N*m (102 kgf*cm, 7 ft.*lbf)
- NOTICE:
-
Using a 10 mm union nut wrench, tighten the A bolts. Use the torque value compensation formula to calculate the torque value for use when a torque wrench is combined with a tool such as a union nut wrench.
-
Click hereGeneral>INTRODUCTION>REPAIR INSTRUCTION>PRECAUTION
15.INSTALL TIMING CHAIN COVER TIGHT PLUG
11201
16.INSTALL CYLINDER HEAD COVER SUB-ASSEMBLY
11301K
17.INSTALL CRANKSHAFT POSITION SENSOR
19500
18.INSTALL IGNITION COIL ASSEMBLY
82121
19.CONNECT ENGINE WIRE
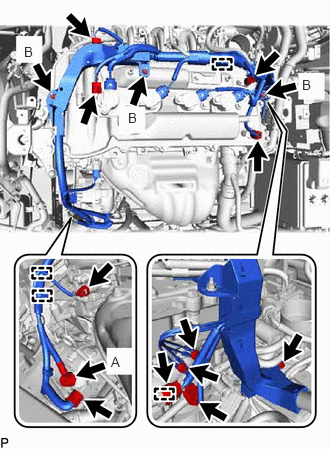
Connect the connectors and clamps, and install the engine wire to the engine with the bolts and nuts.
- Torque:
- Nut A : 9.8 N*m (100 kgf*cm, 87 in.*lbf)
- Nut B : 7.7 N*m (79 kgf*cm, 68 in.*lbf)
- Bolt : 10 N*m (102 kgf*cm, 7 ft.*lbf)
16470
20.CONNECT RADIATOR RESERVOIR ASSEMBLY
21.INSTALL AIR CLEANER CASE
17705
22.INSTALL AIR CLEANER CAP SUB-ASSEMBLY
23.CONNECT CABLE TO NEGATIVE BATTERY TERMINAL
- NOTICE:
-
When disconnecting the cable, some systems need to be initialized after the cable is reconnected.
-
Click hereGeneral>INTRODUCTION>REPAIR INSTRUCTION>INITIALIZATION
24.INSPECT FOR OIL LEAK
51443
25.INSTALL REAR ENGINE UNDER COVER RH
12601B
26.INSTALL NO. 1 ENGINE COVER SUB-ASSEMBLY