K111 MULTIDRIVE / CVT CONTINUOUSLY VARIABLE TRANSAXLE ASSEMBLY INSTALLATION
PROCEDURE

 30400E
1.INSTALL CVT OIL PUMP TYPE T OIL SEAL
Ensure that there is no dirt or foreign matter on your hands, and then apply MP grease to the entire periphery of the lip of a new CVT oil pump type T oil seal.
Temporarily attach a new CVT oil pump type T oil seal by pressing it onto the installation surface of the oil pump housing manually.
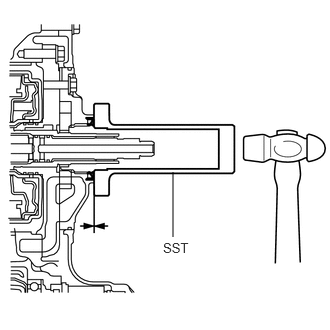
Clean the oil seal contact section of SST and the area around it.
Using SST, drive the CVT oil pump type T oil seal in evenly, as far as the side surface of the oil pump housing.
- SST
- 09309-36010
- NOTICE:
- ·
Drive the oil seal in gradually, while visually checking the parallelism.
·After the installation, confirm that the oil seal has been driven in as far as the side surface of the oil pump housing.
·Wipe off any grease that has oozed out with your hand.
- HINT:
-
The oil seal should be driven in between 0 and 0.5 mm (0 and 0.0196 in.) as measured from the side surface of the oil pump housing.
32000A
2.INSTALL TORQUE CONVERTER ASSEMBLY
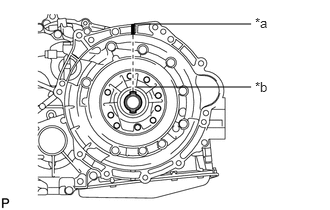
| *a | Matchmark |
| *b | Groove |
Turn the front oil pump drive gear so that the groove is at the top and put a matchmark on the housing.
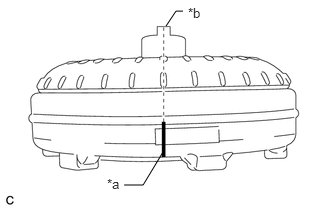
| *a | Key |
| *b | Matchmark |
Put a matchmark on the torque converter so that the position of its key is clearly indicated
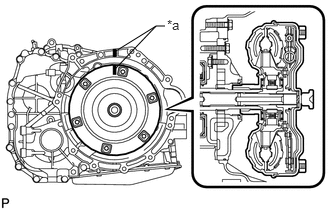
| *a | Matchmark |
Align the matchmark on the housing with the one on the torque converter and mesh the splines of the input shaft with the turbine runner splines.
- NOTICE:
-
Install the torque converter horizontally to the input shaft.
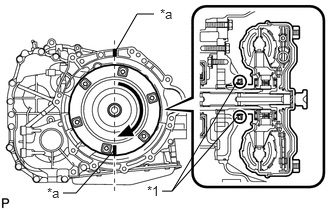
| *1 | CVT Oil Pump Type T Oil Seal |
| *a | Matchmark |
Rotate the torque converter and mesh the splines of the stator shaft with the stator splines.
- NOTICE:
- ·
Do not damage the oil seal.
·Install the torque converter horizontally to the input shaft.
- HINT:
-
Rotate the torque converter approximately 180°.
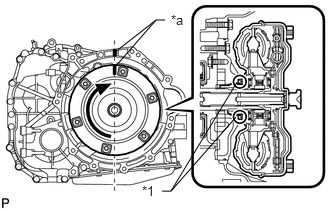
| *1 | CVT Oil Pump Type T Oil Seal |
| *a | Matchmark |
Rotate the torque converter again, align the matchmark on the housing with the one on the torque converter and fit the key of the torque converter into the groove of the oil pump drive gear.
- NOTICE:
- ·
Do not push the torque converter excessively when rotating it.
·Do not damage the oil seal.
·Install the torque converter horizontally to the input shaft.
Clean the torque converter set bolt holes.
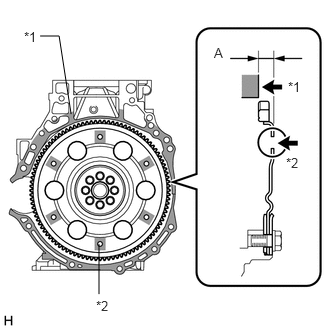
| *1 | Engine Surface |
| *2 | Drive Plate Surface |
Using a vernier caliper and straightedge, measure dimension "A" between the transaxle fitting surface of the engine*1 and the torque converter fitting surface of the drive plate*2. (#)
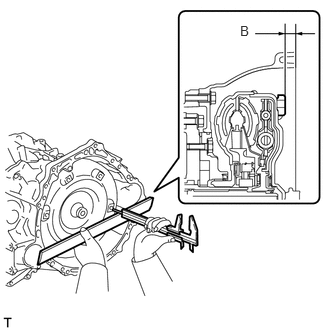
Using a vernier caliper and straightedge, measure dimension "B" shown in the illustration and check that dimension "B" is greater than dimension "A" (which was measured in step (#)).
- Standard:
A + 1 mm (0.0394 in.) or more
- NOTICE:
-
Subtract the thickness of the straightedge from the measured value to gain dimension "B".
3.INSTALL WIRE HARNESS CLAMP BRACKET AND TRANSMISSION CONTROL CABLE SUPPORT
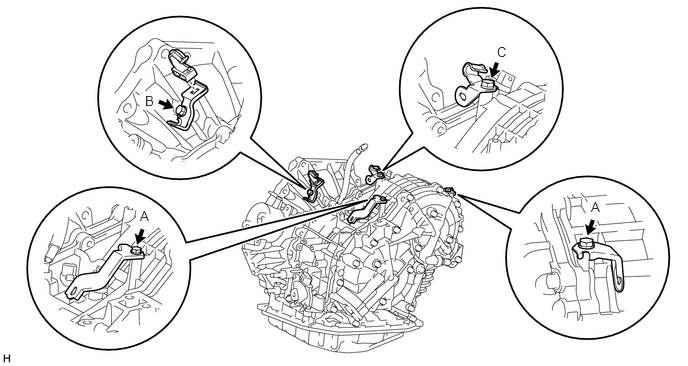
Install the 3 wire harness clamp brackets and transmission control cable support to the continuously variable transaxle assembly with the 4 bolts.
- Torque:
- for Bolt A : 8.4 N*m (86 kgf*cm, 74 in.*lbf)
- for Bolt B : 10 N*m (102 kgf*cm, 7 ft.*lbf)
- for Bolt C : 5.0 N*m (51 kgf*cm, 44 in.*lbf)
Attach the water by-pass hose clamp to the wire harness clamp bracket.
33823
4.INSTALL NO. 1 TRANSMISSION CONTROL CABLE BRACKET
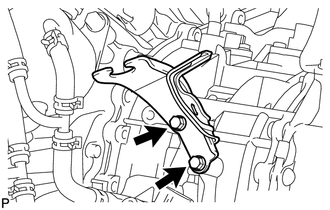
Install the No. 1 transmission control cable bracket to the continuously variable transaxle assembly with the 2 bolts.
- Torque:
- 12 N*m (122 kgf*cm, 9 ft.*lbf)
30400
5.INSTALL CONTINUOUSLY VARIABLE TRANSAXLE ASSEMBLY
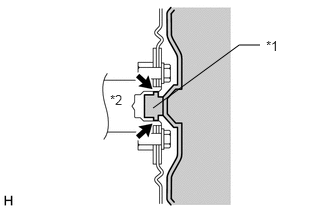
| *1 | Torque Converter Assembly Centerpiece |
| *2 | Crankshaft |
Apply clutch spline grease to the surface of the crankshaft that contacts the torque converter assembly centerpiece.
- Clutch spline grease:
Toyota Genuine Clutch Spline Grease or equivalent
- Maximum spread:
About 1 g (0.0353 oz.)
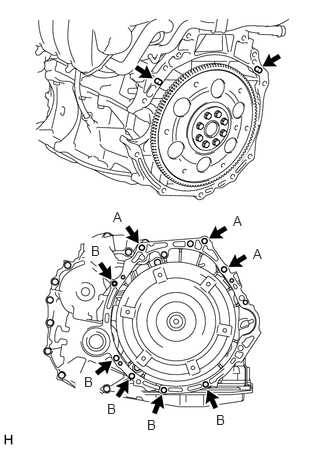
Confirm that 2 knock pins are on the transaxle contact surface of the engine cylinder block before transaxle installation.
Maintain the engine and continuously variable transaxle assembly in a horizontal position, align the knock pins with each hole on the continuously variable transaxle assembly and install the continuously variable transaxle assembly with the 8 bolts shown in the illustration.
- Torque:
- for bolt A : 38 N*m (387 kgf*cm, 28 ft.*lbf)
- for bolt B : 40 N*m (408 kgf*cm, 30 ft.*lbf)
- HINT:
-
Bolt A: Install from transaxle side
-
Bolt B: Install from engine side
- NOTICE:
- ·
Do not forcibly pry the continuously variable transaxle assembly.
·Make sure that the torque converter rotates.
32101A
6.INSTALL DRIVE PLATE AND TORQUE CONVERTER ASSEMBLY SETTING BOLT
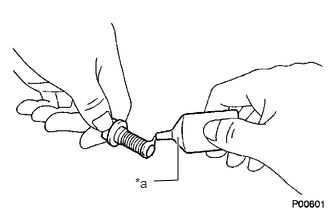
| *a | Adhesive |
Apply a few drops of adhesive to 2 or 3 threads at the tips of each of the 6 drive plate and torque converter assembly setting bolts.
- Adhesive:
Toyota Genuine Adhesive 1324,
Three Bond 1324 or equivalent
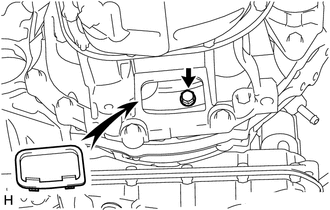
Turn the crankshaft to gain access to the installation locations of the 6 torque converter assembly setting bolts and install each bolt while holding the crankshaft pulley bolt with a wrench.
- Torque:
- 41 N*m (418 kgf*cm, 30 ft.*lbf)
- NOTICE:
-
Install the black bolt first, and then the remaining 5 silver bolts.
Install the flywheel housing under cover.
7.INSTALL ENGINE WIRE
for Front Side:
Attach the 3 wire harness clamps and connect the 3 revolution sensor connectors, park/neutral position sensor connector and transmission wire connector to the continuously variable transaxle assembly.
for Rear Side:
Attach the 2 wire harness clamps and connect the oil pressure sensor connector to the continuously variable transaxle assembly.
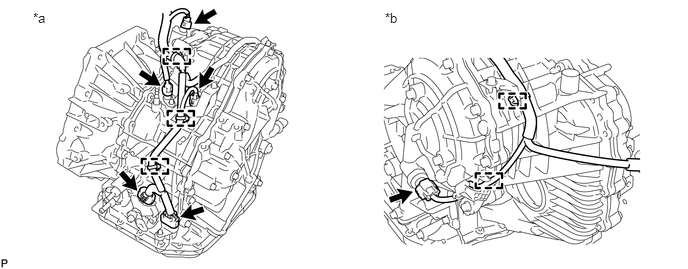
| *a | for Front Side | *b | for Rear Side |
8.INSTALL GROUND CABLE
Install the ground cable to the continuously variable transaxle assembly with the bolt and attach the clamp.
- Torque:
- 8.4 N*m (86 kgf*cm, 74 in.*lbf)
12321A
9.INSTALL REAR ENGINE MOUNTING BRACKET
Install the rear engine mounting bracket to the continuously variable transaxle assembly with the 3 bolts.
- Torque:
- 45 N*m (459 kgf*cm, 33 ft.*lbf)
Attach the wire harness clamp to the rear engine mounting bracket.
12311A
10.INSTALL FRONT ENGINE MOUNTING BRACKET
Install the front engine mounting bracket to the continuously variable transaxle assembly with the 3 bolts.
- Torque:
- 64 N*m (653 kgf*cm, 47 ft.*lbf)
12325A
11.INSTALL ENGINE MOUNTING BRACKET LH
Install the engine mounting bracket LH to the continuously variable transaxle assembly with the 3 bolts.
- Torque:
- 64 N*m (653 kgf*cm, 47 ft.*lbf)
28100
12.INSTALL STARTER ASSEMBLY
for 1.0 kW Type:
Click hereEngine / Hybrid System>3ZR-FE STARTING>STARTER(for 1.0 kW Type)>INSTALLATION
for 1.3 kW Type:
Click hereEngine / Hybrid System>3ZR-FE STARTING>STARTER(for 1.3 kW Type)>INSTALLATION
16282
13.CONNECT WATER BY-PASS HOSE
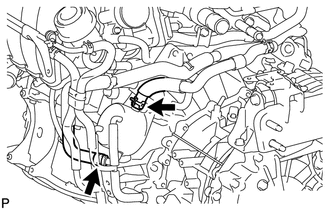
Connect the 2 water by-pass hoses to the oil cooler, and slide the clamp to secure it.
14.INSTALL ENGINE ASSEMBLY WITH TRANSAXLE
15.RESET MEMORY