K111 MULTIDRIVE / CVT OIL COOLER INSTALLATION
PROCEDURE

 33493B
1.INSTALL OIL COOLER
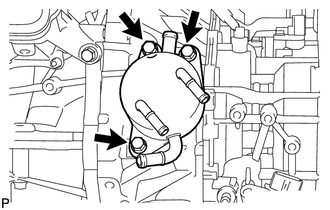
Install the oil cooler to the continuously variable transaxle assembly with the 3 bolts.
- Torque:
- 13.5 N*m (138 kgf*cm, 10 ft.*lbf)
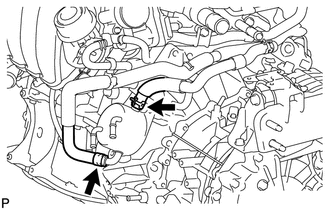
Connect the 2 water by-pass hoses to the oil cooler, and slide the 2 clamps to secure it.
- NOTICE:
-
Push on the 2 water by-pass hoses to the second rib on each oil cooler pipe.
32907F
2.INSTALL OIL COOLER TUBE SUB-ASSEMBLY
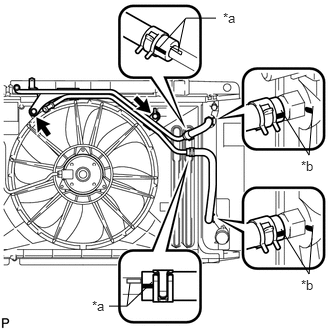
| *a | White Paint Mark |
| *b | Yellow Paint Mark |
Install the oil cooler tube sub-assembly with the 2 bolts.
- Torque:
- 5.5 N*m (56 kgf*cm, 49 in.*lbf)
Connect the No. 3 oil cooler inlet hose and No. 3 oil cooler outlet hose to the oil cooler tube and radiator, and slide the 4 clamps to secure it.
- NOTICE:
-
Make sure the pinching portion of each clip is facing the direction shown in the illustration and the paint marks are aligned as shown in the illustration.
32930A
3.INSTALL TRANSMISSION OIL COOLER HOSE ASSEMBLY
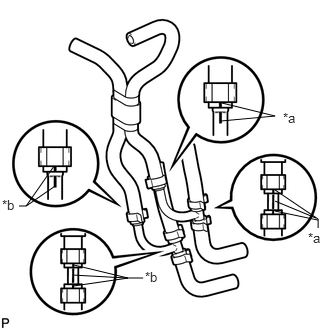
| *a | White Paint Mark |
| *b | Yellow Paint Mark |
Connect the 2 oil cooler inlet hoses and 2 oil cooler outlet hoses to the oil cooler inlet tube and oil cooler outlet tube, and slide the 4 clamps to secure it.
- NOTICE:
-
Make sure the pinching portion of each clip is facing the direction shown in the illustration and the paint marks are aligned as shown in the illustration.
Connect the oil cooler inlet tube and oil cooler outlet tube to the transmission oil cooler hose assembly, and slide the 2 clamps to secure it.
- NOTICE:
-
Make sure the pinching portion of each clip is facing the direction shown in the illustration and the paint marks are aligned as shown in the illustration.
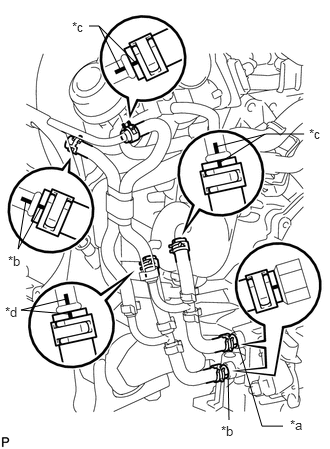
| *a | Yellow Paint Mark |
| *b | White Paint Mark |
| *c | Blue Paint Mark |
| *d | Green Paint Mark |
Connect the 2 transmission oil cooler hoses to the oil cooler tube, and slide the 2 clamps to secure it.
- NOTICE:
-
Make sure the pinching portion of each clip is facing the direction shown in the illustration and the paint marks are aligned as shown in the illustration.
Connect the 2 oil cooler inlet hoses and 2 oil cooler outlet hoses to the transaxle and oil cooler, and slide the 4 clamps to secure it.
- NOTICE:
-
Make sure the pinching portion of each clip is facing the direction shown in the illustration and the paint marks are aligned as shown in the illustration.
74414B
4.INSTALL BATTERY BRACKET REINFORCEMENT
74411B
5.INSTALL FRONT BATTERY BRACKET
16057
6.CONNECT RADIATOR HOSE SUB-ASSEMBLY
74431
7.INSTALL BATTERY TRAY
28800
8.INSTALL BATTERY
74404A
9.INSTALL BATTERY CLAMP SUB-ASSEMBLY
10.CONNECT CABLE TO POSITIVE BATTERY TERMINAL
11.CONNECT CABLE TO NEGATIVE BATTERY TERMINAL
- NOTICE:
-
When disconnecting the cable, some systems need to be initialized after the cable is reconnected (See page General>INTRODUCTION>REPAIR INSTRUCTION>INITIALIZATION).
12.ADD ENGINE COOLANT
13.ADD CONTINUOUSLY VARIABLE TRANSAXLE FLUID
14.INSPECT FOR COOLANT LEAK
51444C
15.INSTALL REAR ENGINE UNDER COVER LH
51441
16.INSTALL NO. 1 ENGINE UNDER COVER