2AD-FTV ENGINE CONTROL ECD SYSTEM(for CCo) Fuel Injection System
CAUTION / NOTICE / HINT
- NOTICE:
- ·
After replacing the ECM, the new ECM needs registration (Click here Engine / Hybrid System>2AD-FTV ENGINE CONTROL>ECD SYSTEM(for CCo)>REGISTRATION) and initialization (Click here Engine / Hybrid System>2AD-FTV ENGINE CONTROL>ECD SYSTEM(for CCo)>INITIALIZATION).
·After replacing the fuel supply pump assembly, the ECM needs initialization (Click here Engine / Hybrid System>2AD-FTV ENGINE CONTROL>ECD SYSTEM(for CCo)>INITIALIZATION).
·After replacing an injector assembly, the ECM needs registration (Click here Engine / Hybrid System>2AD-FTV ENGINE CONTROL>ECD SYSTEM(for CCo)>REGISTRATION).
PROCEDURE
Check the injector compensation codes.
Click hereEngine / Hybrid System>2AD-FTV ENGINE CONTROL>ECD SYSTEM(for CCo)>REGISTRATION
- Result:
Result Proceed to Except below A Compensation codes of the installed injector assemblies are the same as the compensation codes registered in the ECM B
A
B
Register the injector compensation codes.
Click hereEngine / Hybrid System>2AD-FTV ENGINE CONTROL>ECD SYSTEM(for CCo)>REGISTRATION
Perform the pilot quantity learning.
Click hereEngine / Hybrid System>2AD-FTV ENGINE CONTROL>ECD SYSTEM(for CCo)>REGISTRATION
- Result:
Proceed to NEXT
NEXT
Connect the GTS to the DLC3.
Start the engine and turn the GTS on.
Enter the following menus: Powertrain / Engine and ECT / Data List / All Data.
Take a snapshot of the following Data List items.
- HINT:
- ·
A snapshot can be used to compare vehicle data from the time of the malfunction to normal data and is very useful for troubleshooting. The data in the list below is that of a normal vehicle, but as the data varies between individual vehicles, this data should only be used for reference.
·Check the Data List at idling and at 4000 rpm with no load after the engine is warmed up.
- Result:
Proceed to NEXT
NEXT
Check Injection Feedback Val #1 to #4 and Injection Volume in the snapshot taken in procedure 3 when the engine was idling and at 4000 rpm with no load.
- Result:
Result Proceed to Injection Feedback Val for at least one cylinder is more than 3.0 mm3/st A Injection Volume is 5 mm3/st or less at 4000 rpm B Except above C
- HINT:
- ·
When there is a problem with the operation of an injector assembly due to foreign matter in the inside of the injector assembly, etc., the fuel injection volume decreases. As a result, the ECM gives instructions to increase the fuel injection volume, which causes Injection Feedback Val to increase.
·The ECM controls the system so that the sum of Injection Feedback Val for all of the cylinders is approximately 0 mm3/st. Even if the value of Injection Feedback Val for a cylinder is less than -3.0 mm3/st (-3.0 mm3/st is the lowest normal value), as long as the value of Injection Feedback Val for each of the other cylinders is 3.0 mm3/st or less, the injector assemblies are not malfunctioning.
A
B
C
- HINT:
-
Use this Active Test to help determine whether a cylinder has compression loss or not.
Connect the GTS to the DLC3.
Start the engine and turn the GTS on.
Enter the following menus: Powertrain / Engine and ECT / Active Test / Check the Cylinder Compression / Compression / Engine Speed of Cyl #1 to #4.
- Powertrain > Engine > Active Test
-
Tester Display Check the Cylinder Compression - 50004 61 111
Check the engine speed during the Active Test.
- Result:
Result Proceed to Except below A The values of Engine Speed Cyl #1 to #4 are within +/-10 rpm of each other. B
- HINT:
-
When cranking, if the speed of a cylinder is approximately 100 rpm higher than the other cylinders, there is probably a complete loss of compression in that cylinder.
A
B
Check the cylinder compression pressure.
Click hereEngine / Hybrid System>2AD-FTV ENGINE MECHANICAL>ENGINE>ON-VEHICLE INSPECTION
- HINT:
-
When compression is low, there may be cracks in the piston or the injector assembly may be installed improperly.
- Result:
Proceed to OK NG
OK
NG
Perform the pilot quantity learning (detail).
Click hereEngine / Hybrid System>2AD-FTV ENGINE CONTROL>ECD SYSTEM(for CCo)>REGISTRATION
- Result:
Proceed to NEXT
NEXT
Connect the GTS to the DLC3.
Turn the ignition switch to ON and turn the GTS on.
Start the engine and warm it up.
Enter the following menus: Powertrain / Engine and ECT / Data List / Injection Feedback Val #1 to #4.
- Powertrain > Engine > Data List
-
Tester Display Injection Feedback Val #1 Injection Feedback Val #2 Injection Feedback Val #3 Injection Feedback Val #4 - 50003 61 368,369,370,371
Read the values.
- Standard:
GTS Display Engine Condition* Normal Value Injection Feedback Val #1
Injection Feedback Val #2
Injection Feedback Val #3
Injection Feedback Val #4Idling -3.0 mm3/st to 3.0 mm3/st
- HINT:
-
*: The A/C switch and all accessory switches should be off, the engine coolant temperature should be 75°C (167°F) or higher and the engine should be idled for 1 minute or more.
- Result:
Result Proceed to Injection Feedback Val for at least one cylinder is more than 3.0 mm3/st A Except above B
- HINT:
- ·
When there is a problem with the operation of an injector assembly due to foreign matter in the inside of the injector assembly, etc., the fuel injection volume decreases. As a result, the ECM gives instructions to increase the fuel injection volume, which causes Injection Feedback Val to increase.
·The ECM controls the system so that the sum of Injection Feedback Val for all of the cylinders is approximately 0 mm3/st. Even if the value of Injection Feedback Val for a cylinder is less than -3.0 mm3/st (-3.0 mm3/st is the lowest normal value), as long as the value of Injection Feedback Val for each of the other cylinders is 3.0 mm3/st or less, the injector assemblies are not malfunctioning.
A
B
Replace the injector assembly of the malfunctioning cylinder.
Click hereEngine / Hybrid System>2AD-FTV FUEL>FUEL INJECTOR>REMOVAL
- NOTICE:
- ·
When replacing the injector assembly for a cylinder, always be sure to use a new injection pipe.
·Follow the procedure in the repair manual and temporarily install the injection pipes and nozzle leakage pipe, and then correctly position the injector assemblies. After that, tighten parts according to the torque specifications.
·If the installation procedure is not performed correctly, injector assemblies may become out of position, which may cause the injector assemblies to deteriorate, resulting in malfunctions.
·If an injector assembly deteriorates and malfunctions, other problems such as knocking, rough idle, etc. may occur.
·If an injector assembly becomes out of position, it is possible that the seal between the injector assembly and injection pipe may become incomplete, resulting in a fuel leak.
- Result:
Proceed to NEXT
NEXT
Check and replace the engine assembly.
- Result:
Proceed to NEXT
NEXT
Connect the GTS to the DLC3.
Turn the ignition switch to ON and turn the GTS on.
Enter the following menus: Powertrain / Engine and ECT / Active Test / Test the Fuel Leak / Data List / Fuel Press, Target Common Rail Pressure, and Target Pump SCV Current.
- Powertrain > Engine > Active Test
-
Active Test Display Test the Fuel Leak -
Data List Display Target Common Rail Pressure Fuel Press Target Pump SCV Current - 50004 61 90 706,54,408
Start the engine.
Take a snapshot with the GTS during the Active Test.
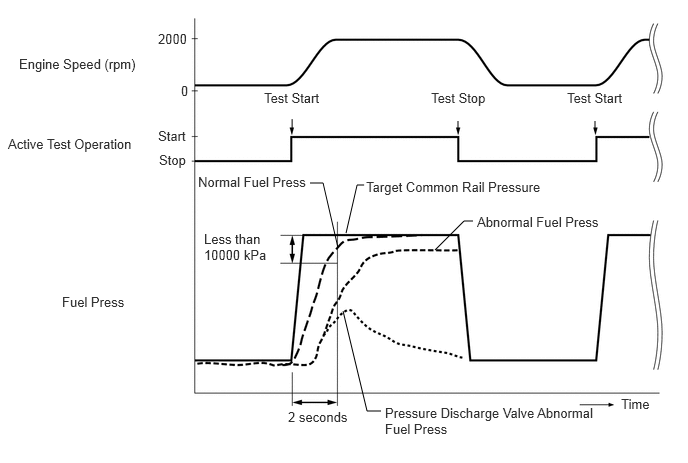
Measure the difference between the target fuel pressure (Target Common Rail Pressure) and the actual fuel pressure (Fuel Press) when the "Test the Fuel Leak" Active Test is performed.
- HINT:
-
In order to obtain an exact measurement, perform the Active Test 5 times and measure the difference once each time the Active Test is performed.
- OK:
The difference between the target fuel pressure and the actual fuel pressure 2 seconds after the Active Test starts is less than 10000 kPa (102.0 kgf/cm2, 1451 psi).
- Result:
Proceed to NG OK*
- NOTICE:
-
*: Even when the results of the Active Test are normal, take a snapshot of vehicle data when the vehicle is accelerating. If "Fuel Press" does not follow "Target Common Rail Pressure", proceed to step 12.
-
If "Fuel Press" does not follow "Target Common Rail Pressure", the fuel filter may be clogged.
- HINT:
- ·
"Target Common Rail Pressure" means target fuel pressure controlled by the ECM.
·"Fuel Press" means actual fuel pressure in common rail assembly.
·If the pressure discharge valve mounted on the common rail assembly is malfunctioning, the actual fuel pressure may change as indicated by "Pressure Discharge Valve Malfunctioning" in the illustration.
·The pressure discharge valve operates to discharge fuel pressure when the internal pressure of the common rail exceeds the target fuel pressure.
·There are 2 fuel pressure sensor circuits and both of them display the same value. If the difference between Common Rail Pressure and Common Rail Press Sens 2 exceeds 10000 kPa (102 kgf/cm2, 1451 psi) for 2 seconds or more, it is necessary to inspect or repair the wiring for the fuel pressure sensor.
NG
OK*
Connect the GTS to the DLC3.
Start the engine.
Turn the GTS on.
Enter the following menus: Powertrain / Engine and ECT / Utility / Pressure Discharge Valve Check.
- Powertrain > Engine > Utility
-
Tester Display Pressure Discharge Valve Check - 50005 61 2109
Select "Always Closed Check".
Press "Next".
Read the Value of fuel pressure values.
- OK:
Fuel pressure is properly maintained.
- HINT:
- ·
If the fuel pressure cannot be maintained, the pressure discharge valve may not have a tight seal.
·If the fuel pressure is being properly maintained, there are no problems with the sealing properties of the high-pressure fuel system. Therefore, an insufficient supply of fuel due to the fuel filter being clogged, or squashed or blocked low-pressure fuel pipes or hoses may be causing the reduction in common rail pressure.
- Result:
Proceed to OK NG
OK
NG
Connect the GTS to the DLC3.
Start the engine and turn the GTS on.
Enter the following menus: Powertrain / Engine and ECT / Data List / Common Rail (All).
With no load after the engine is warmed up, take a snapshot when idling and vehicle was accelerating with the accelerator pedal fully depressed in 2nd gear.
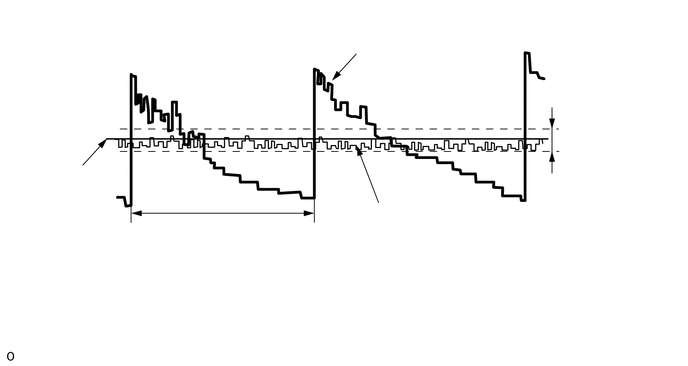
Check the Target Common Rail Pressure and Fuel Press value.
- Result:
Result Proceed to While idling the vehicle, "Fuel Press" deviates from the normal range and varies periodically with a period of approximately 2 seconds or more*1 A "Fuel Press" is normal while idling the vehicle, but "Fuel Press" does not follow "Target Common Rail Pressure" when the accelerator pedal is fully depressed in 2nd gear*2 Except above B
- NOTICE:
- ·
*1: The cause may be a squashed or blocked fuel pipe or hose.
·*2: The cause may be a clogged fuel filter element assembly.
A
B
Repair or replace the clogged (including frozen fuel) fuel pipe.
Replace the fuel filter element assembly.
- HINT:
-
If "Common Rail Pressure" does not follow "Target Common Rail Pressure" when the accelerator pedal is fully depressed in 2nd gear, replace the fuel filter element assembly.
- Result:
Proceed to NEXT
NEXT
Replace the common rail assembly.
Click hereEngine / Hybrid System>2AD-FTV FUEL>COMMON RAIL>REMOVAL
- Result:
Proceed to NEXT
NEXT
Bleed the air from the fuel system.
Click hereEngine / Hybrid System>2AD-FTV FUEL>FUEL SYSTEM>ON-VEHICLE INSPECTION
- Result:
Proceed to NEXT
NEXT
Check Fuel Press and Target Common Rail Pressure in the snapshot taken in procedure 3 when the engine was idling.
- Result:
Result Proceed to Except above A Difference between Fuel Press and Target Common Rail Pressure is 5000 kPa (51.0 kgf/cm2, 725 psi) or more B
A
B
Replace the suction control valve.
Click hereEngine / Hybrid System>2AD-FTV FUEL>SUCTION CONTROL VALVE>REMOVAL
- Result:
Proceed to NEXT
NEXT
Bleed the air from the fuel system.
Click hereEngine / Hybrid System>2AD-FTV FUEL>FUEL SYSTEM>ON-VEHICLE INSPECTION
- Result:
Proceed to NEXT
NEXT
Perform supply pump initialization.
Click hereEngine / Hybrid System>2AD-FTV ENGINE CONTROL>ECD SYSTEM(for CCo)>INITIALIZATION
- Result:
Proceed to NEXT
NEXT
- Result:
Proceed to NEXT
NEXT
Check Injection Volume in the snapshot taken in procedure 3 when the engine was idling.
- Result:
Result Proceed to Injection Volume while idling after engine warm up is 15 mm3/st or more A Except above B
A
B
Replace the injector assemblies of all cylinders.
Click hereEngine / Hybrid System>2AD-FTV FUEL>FUEL INJECTOR>REMOVAL
- NOTICE:
- ·
When replacing the injector assembly for a cylinder, always be sure to use a new injection pipe. When replacing the injector assembly for a cylinder, always be sure to use a new injection pipe.
·Follow the procedure in the repair manual and temporarily install the injection pipes and nozzle leakage pipe, and then correctly position the injector assemblies. After that, tighten parts according to the torque specifications.
·If the installation procedure is not performed correctly, injector assemblies may become out of position, which may cause the injector assemblies to deteriorate, resulting in malfunctions.
·If an injector assembly deteriorates and malfunctions, other problems such as knocking, rough idle, etc. may occur.
·If an injector assembly becomes out of position, it is possible that the seal between the injector assembly and injection pipe may become incomplete, resulting in a fuel leak.
- Result:
Proceed to NEXT
NEXT
Replace the fuel filter element assembly.
Click hereEngine / Hybrid System>2AD-FTV FUEL>FUEL FILTER>REPLACEMENT
- Result:
Proceed to NEXT
NEXT
Bleed the air from the fuel system.
Click hereEngine / Hybrid System>2AD-FTV FUEL>FUEL SYSTEM>ON-VEHICLE INSPECTION
- Result:
Proceed to NEXT
NEXT
Register the injector compensation codes.
Click hereEngine / Hybrid System>2AD-FTV ENGINE CONTROL>ECD SYSTEM(for CCo)>REGISTRATION
Perform the pilot quantity learning.
Click hereEngine / Hybrid System>2AD-FTV ENGINE CONTROL>ECD SYSTEM(for CCo)>REGISTRATION
- Result:
Proceed to NEXT
NEXT