SEAT FRONT SEAT ASSEMBLY(for Manual Seat) REASSEMBLY
CAUTION / NOTICE / HINT
- CAUTION:
-
Wear protective gloves. Sharp areas on the parts may injure your hands.
- HINT:
- ·
Use the same procedure for RHD and LHD vehicles.
·The procedure listed below is for LHD vehicles.
·Use the same procedure for the RH and LH sides.
·The procedure listed below is for the LH side.
·A bolt without a torque specification is shown in the standard bolt chart.
Click hereGeneral>SPECIFICATIONS>STANDARD BOLT>SPECIFIED TORQUE FOR STANDARD BOLTS
PROCEDURE

 71849C
1.INSTALL SEAT ADJUSTER COVER CAP
Install the 2 seat adjuster cover caps to the separate type front seat cushion spring assembly LH.
72211
2.INSTALL SEAT TRACK ADJUSTING HANDLE
Attach the 2 hooks to install the seat track adjusting handle in the direction indicated by the arrow in the illustration.
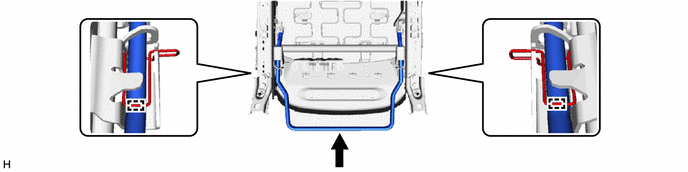
71537D
3.INSTALL FRONT OUTER SEAT CUSHION EDGE PROTECTOR LH
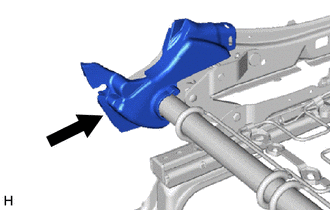
Install the front outer seat cushion edge protector LH in the direction indicated by the arrow in the illustration.
71538B
4.INSTALL FRONT INNER SEAT CUSHION EDGE PROTECTOR LH
- HINT:
-
Use the same procedure described for the front outer seat cushion edge protector LH.
71874
5.INSTALL FRONT LOWER SEAT CUSHION SHIELD LH
Attach the clip to install the front lower seat cushion shield LH.
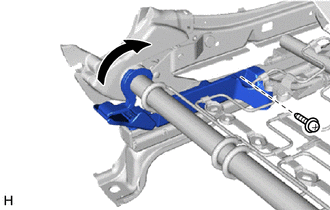
Attach the hook in the direction indicated by the arrow in the illustration.
Install the screw.
71873
6.INSTALL FRONT LOWER SEAT CUSHION SHIELD RH
- HINT:
-
Use the same procedure described for the front lower seat cushion shield LH.
71537C
7.INSTALL FRONT OUTER SEAT CUSHION EDGE PROTECTOR RH (for Front Passenger Side)
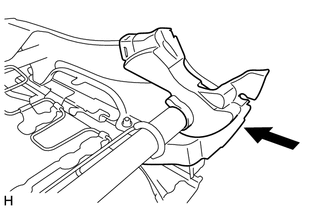
Install the front outer seat cushion edge protector RH in the direction indicated by the arrow in the illustration.
71538A
8.INSTALL FRONT INNER SEAT CUSHION EDGE PROTECTOR RH (for Front Passenger Side)
- HINT:
-
Use the same procedure described for the front outer seat cushion edge protector RH.
89952
9.INSTALL OCCUPANT DETECTION ECU (for Front Passenger Side, w/ Occupant Classification System)
82191
10.INSTALL FRONT SEAT WIRE RH (for Front Passenger Side, w/ Occupant Classification System)
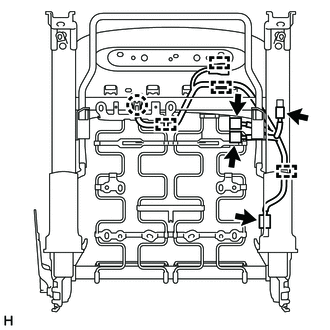
Attach the 4 clamps to install the front seat wire RH.
Connect the 4 connectors.
Attach the claw to connect the connector.
73240
11.INSTALL FRONT SEAT INNER BELT ASSEMBLY LH (for Driver Side)
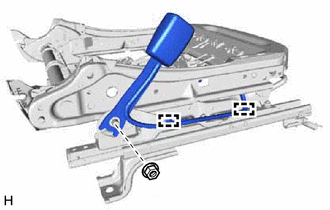
Install the front seat inner belt assembly LH with the nut.
- Torque:
- 42 N*m (428 kgf*cm, 31 ft.*lbf)
Attach the 2 clamps.
for Type A:
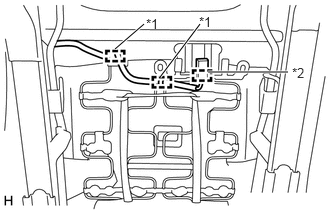
| *1 | Wire Harness Clamp |
| *2 | Connector Clamp |
Attach the 2 wire harness clamps and connector clamp.
for Type B:
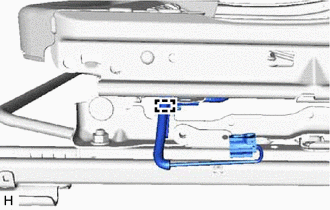
Attach the wire harness clamp.
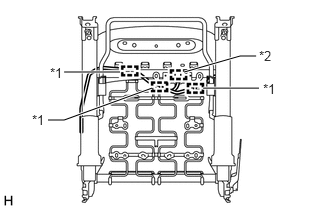
| *1 | Wire Harness Clamp |
| *2 | Connector Clamp |
Attach the 3 wire harness clamps and connector clamp.
73230
12.INSTALL FRONT SEAT INNER BELT ASSEMBLY RH (for Front Passenger Side)
for Type A:
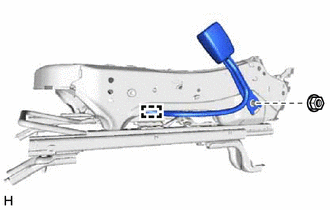
Install the front seat inner belt assembly RH with the nut.
- Torque:
- 42 N*m (428 kgf*cm, 31 ft.*lbf)
Attach the clamp.
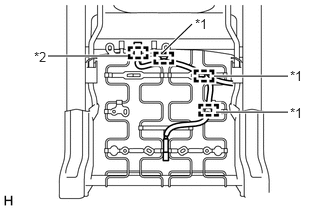
| *1 | Wire Harness Clamp |
| *2 | Connector Clamp |
Attach the 3 wire harness clamps and connector clamp.
for Type B:
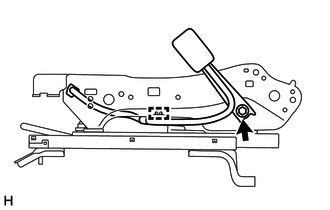
Install the front seat inner belt assembly RH with the nut.
- Torque:
- 42 N*m (428 kgf*cm, 31 ft.*lbf)
Attach the clamp.
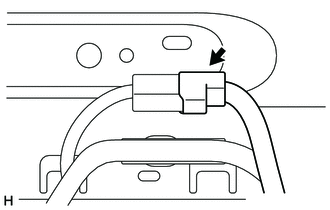
Connect the connector.
73905
13.INSTALL FRONT SEAT AIRBAG SUB-ASSEMBLY RH (for Front Passenger Side, w/ Occupant Classification System)
89178A
14.INSTALL SEAT POSITION AIRBAG SENSOR (w/ Occupant Classification System)
87510L
15.INSTALL FRONT SEAT CUSHION HEATER ASSEMBLY LH (w/ Seat Heater System)
71072S
16.INSTALL SEPARATE TYPE FRONT SEAT CUSHION COVER
Set the separate type front seat cushion cover in place.
Using hog ring pliers, install the separate type front seat cushion cover to the separate type front seat cushion pad with 21 new hog rings as shown in the illustration.
- NOTICE:
- ·
Be careful not to damage the separate type front seat cushion cover.
·Be sure to securely install the hog rings as shown in the illustration while preventing wrinkles from forming on the separate type front seat cushion cover.
- HINT:
-
Install the hog rings at the cutouts if they are there.
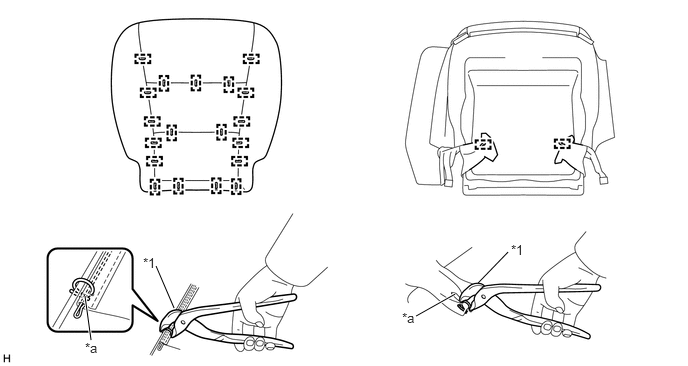
| *1 | Hog Ring Pliers | - | - |
| *a | Cutout | - | - |
17.INSTALL SEPARATE TYPE FRONT SEAT CUSHION COVER WITH PAD
for Driver Side:
Attach the 12 hooks to install the separate type front seat cushion cover with pad.
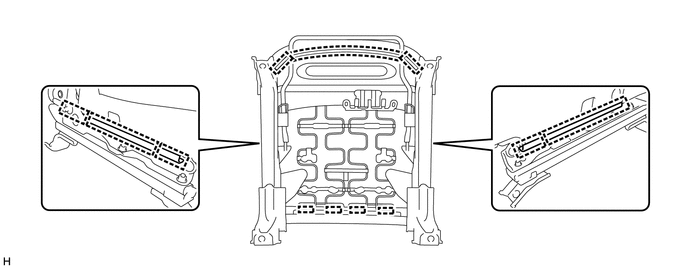
for Front Passenger Side:
Attach the 11 hooks to install the separate type front seat cushion cover with pad.
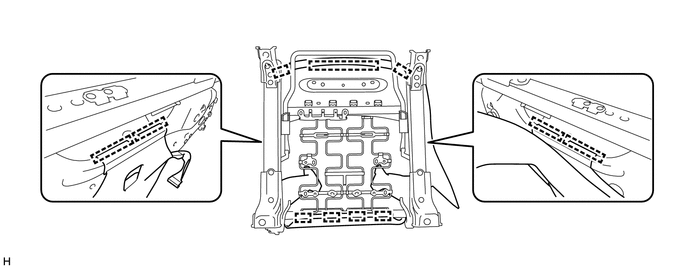
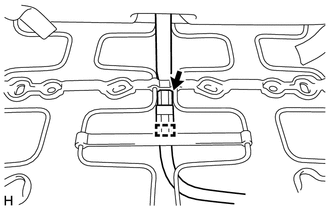
w/ Occupant Detection Sensor:
Attach the clamp and connect the connector.
w/ Seat Heater System:
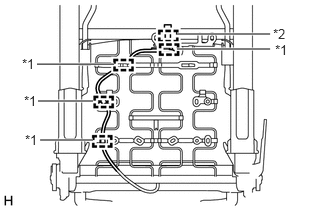
| *1 | Wire Harness Clamp |
| *2 | Connector Clamp |
Attach the connector clamp and 4 wire harness clamps to connect the wire harness of the front seat cushion heater.
73920A
18.INSTALL FRONT SEAT AIRBAG ASSEMBLY LH (w/ Front Seat Side Airbag)
79977A
19.INSTALL SEATBACK FELT
Install the seatback felt to the separate type front seatback spring assembly LH.
71552S
20.INSTALL SEPARATE TYPE FRONT SEATBACK PAD
Install the separate type front seatback pad to the separate type front seatback spring assembly LH.
87510N
21.INSTALL FRONT SEATBACK HEATER ASSEMBLY LH (w/ Seat Heater System)
71074S
22.INSTALL SEPARATE TYPE FRONT SEATBACK COVER
Set the separate type front seatback cover in place.
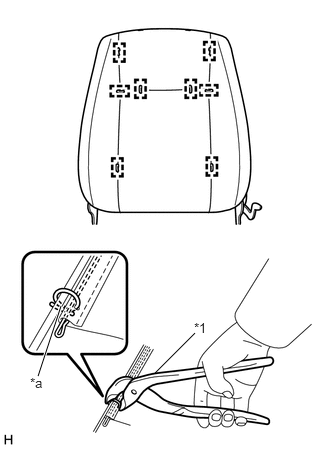
| *1 | Hog Ring Pliers |
| *a | Cutout |
Using hog ring pliers, install the separate type front seatback cover to the separate type front seatback pad with 8 new hog rings as shown in the illustration.
- NOTICE:
- ·
Be careful not to damage the separate type front seatback cover.
·Be sure to securely install the hog rings as shown in the illustration while preventing wrinkles from forming on the separate type front seatback cover.
- HINT:
-
Install the hog rings at the cutouts if they are there.
w/ Front Seat Side Airbag:
Pass the separate type front seatback cover bracket through the separate type front seatback pad.
for Dual Type:
Install the 2 nuts.
- Torque:
- 5.5 N*m (56 kgf*cm, 49 in.*lbf)
for Single Type:
Install the nut.
- Torque:
- 5.5 N*m (56 kgf*cm, 49 in.*lbf)
for Sports Seat Type:
Close the 2 fasteners.
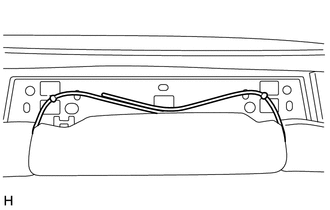
Pull the straps to tighten them and confirm that there is a protrusion visible on each side.
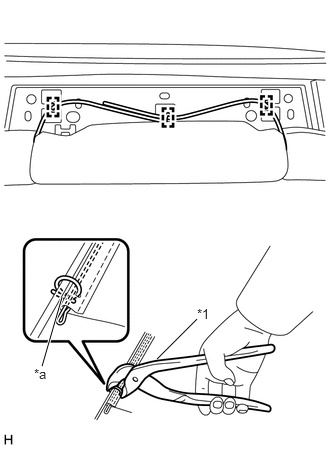
| *1 | Hog Ring Pliers |
| *a | Cutout |
Using hog ring pliers, connect the straps of the separate type front seatback cover to the separate type front seatback frame sub-assembly LH with 3 new hog rings as shown in the illustration.
- NOTICE:
- ·
Be careful not to damage the separate type front seatback cover.
·Be sure to securely install the hog rings as shown in the illustration while preventing wrinkles from forming on the straps of the separate type front seatback cover.
- HINT:
-
Install the hog rings at the cutouts if they are there.
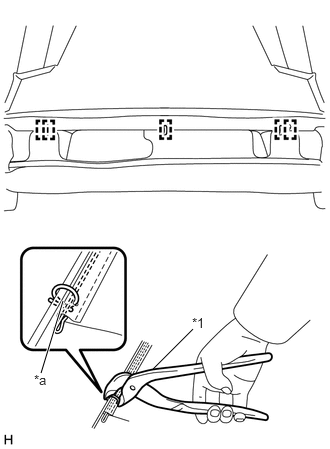
| *1 | Hog Ring Pliers |
| *a | Cutout |
Using hog ring pliers, install the separate type front seatback cover to the separate type front seatback frame sub-assembly LH with 5 new hog rings as shown in the illustration.
- NOTICE:
- ·
Be careful not to damage the separate type front seatback cover.
·Be sure to securely install the hog rings as shown in the illustration while preventing wrinkles from forming on the separate type front seatback cover.
- HINT:
-
Install the hog rings at the cutouts if they are there.
71931
23.INSTALL FRONT SEAT HEADREST SUPPORT
Attach the 4 claws to install the 2 front seat headrest supports.
24.INSTALL SEPARATE TYPE FRONT SEATBACK ASSEMBLY
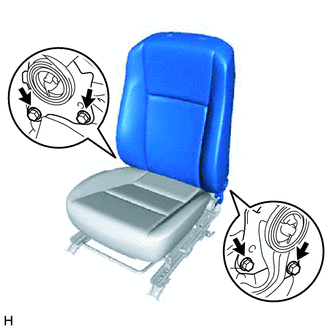
Install the separate type front seatback assembly with the 4 bolts.
- Torque:
- 42 N*m (428 kgf*cm, 31 ft.*lbf)
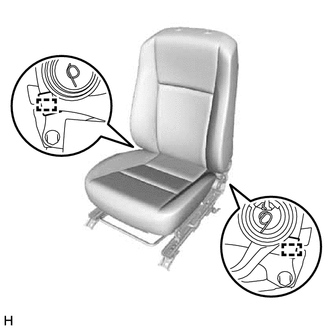
Attach the 2 hooks.
w/ Front Seat Side Airbag:
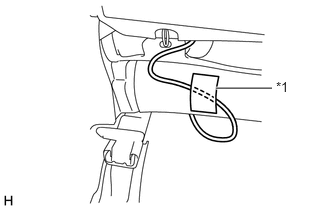
| *1 | Fastener |
Attach the fastener to connect the wire harness of the front seat side airbag.
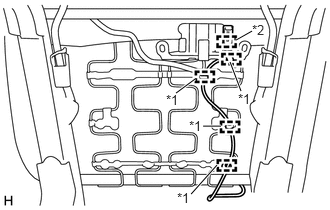
| *1 | Wire Harness Clamp |
| *2 | Connector Clamp |
Attach the 4 wire harness clamps and connector clamp to connect the wire harness of the front seat side airbag.
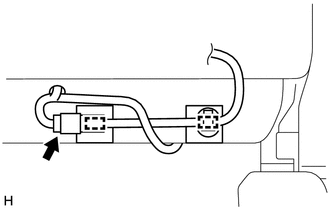
w/ Seat Heater System:
Attach the wire harness clamp and connector clamp.
Connect the connector.
Connect the rubber band.
71862
25.INSTALL FRONT INNER SEAT CUSHION SHIELD LH
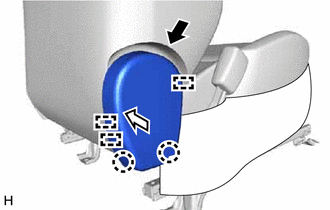

|
First |

|
Second |
Attach the 3 guides and 2 claws to install the front inner seat cushion shield LH as indicated by the arrows in the order shown in the illustration.
71861
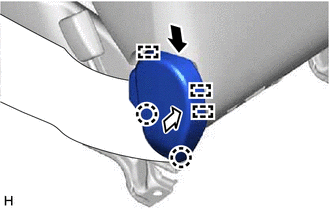
26.INSTALL FRONT INNER SEAT CUSHION SHIELD RH (for Front Passenger Side)
|
|
First |
|
|
Second |
Attach the 3 guides and 2 claws to install the front inner seat cushion shield RH as indicated by the arrows in the order shown in the illustration.
71812D
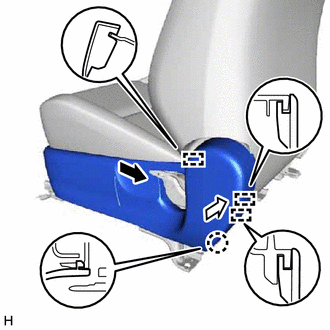
27.INSTALL FRONT SEAT CUSHION SHIELD LH
|
|
First |
|
|
Second |
Attach the 3 guides and claw to install the front seat cushion shield LH as indicated by the arrows in the order shown in the illustration.
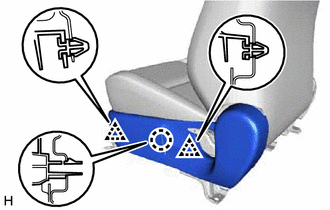
Attach the claw and 2 clips.
72495
28.INSTALL VERTICAL ADJUSTING HANDLE LH
Install the vertical adjusting handle LH with the screw.
72526A
29.INSTALL RECLINING ADJUSTER RELEASE HANDLE LH
Attach the claw to install the reclining adjuster release handle LH.