WINDOW / GLASS QUARTER WINDOW GLASS REMOVAL
CAUTION / NOTICE / HINT
- HINT:
- ·
Use the same procedure for the LH and RH sides.
·The procedures listed below are for the LH side.
PROCEDURE

 1. PRECAUTION
- NOTICE:
-
After turning the ignition switch off, waiting time may be required before disconnecting the cable from the battery terminal. Therefore, make sure to read the disconnecting the cable from the battery terminal notice before proceeding with work.
-
Click hereGeneral>INTRODUCTION>REPAIR INSTRUCTION>PRECAUTION
2.DISCONNECT CABLE FROM NEGATIVE BATTERY TERMINAL
- NOTICE:
-
When disconnecting the cable, some systems need to be initialized after the cable is reconnected.
-
Click hereGeneral>INTRODUCTION>REPAIR INSTRUCTION>INITIALIZATION
64309A
3.REMOVE PACKAGE TRAY TRIM POCKET SUB-ASSEMBLY (w/ Partition Net)
64910N
4.REMOVE TONNEAU COVER ASSEMBLY (w/ Tonneau Cover)
58410B
5.REMOVE DECK BOARD ASSEMBLY (w/o Spare Tire)
58417H
6.REMOVE REAR NO. 3 FLOOR BOARD
58416K
7.REMOVE REAR NO. 2 FLOOR BOARD
58410B
8.REMOVE DECK BOARD ASSEMBLY (for Full Size Spare Tire)
64997
9.REMOVE DECK FLOOR BOX LH
58386
10.REMOVE REAR FLOOR FINISH PLATE (w/o Spare Tire, for Compact Spare Tire)
64716P
11.REMOVE REAR DECK TRIM COVER (for Full Size Spare Tire)
58577E
12.REMOVE REAR NO. 1 FLOOR MAT SUPPORT SIDE PLATE (w/o Spare Tire)
58577E
13.REMOVE REAR NO. 1 FLOOR MAT SUPPORT SIDE PLATE (for Full Size Spare Tire)
14.REMOVE REAR SEAT ASSEMBLY
67918E
15.REMOVE REAR DOOR SCUFF PLATE LH
62332C
16.REMOVE REAR DOOR OPENING TRIM WEATHERSTRIP LH
73178A
17.REMOVE SEAT BELT ANCHOR COVER CAP
64718A
18.REMOVE DECK TRIM SERVICE HOLE COVER
64740E
19.REMOVE DECK TRIM SIDE PANEL ASSEMBLY LH
62480A
20.REMOVE INNER ROOF SIDE GARNISH ASSEMBLY LH
63310
21.REMOVE ROOF HEADLINING ASSEMBLY
Partially remove the roof headlining assembly.
Click hereVehicle Interior>INTERIOR PANELS / TRIM>ROOF HEADLINING>REMOVAL
- HINT:
-
It is not necessary to completely remove the roof headlining assembly. Slightly lower the rear section of the roof headlining assembly so that the quarter window glass assembly LH can be removed.
62720A
22.REMOVE QUARTER WINDOW ASSEMBLY LH
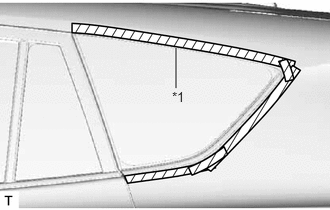
| *1 | Protective Tape |
- HINT:
-
Apply protective tape to the outer surface of the vehicle body to prevent scratches.
- NOTICE:
-
When separating the quarter window assembly from the vehicle, be careful not to damage the vehicle paint or interior/exterior ornaments.
Using a knife, cut off the moulding as shown in the illustration.
- NOTICE:
-
Be careful not to damage the vehicle body.
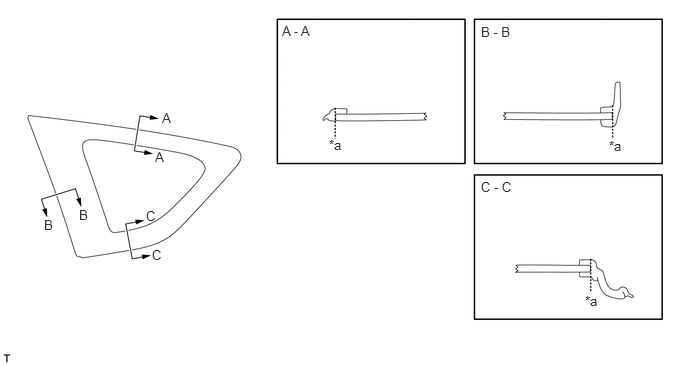
| *a | Cut | - | - |
Disconnect the connector.
From the interior, insert a piano wire between the vehicle body and the quarter window assembly as shown in the illustration.
Tie objects that can serve as handles (for example, wooden blocks) to both wire ends.
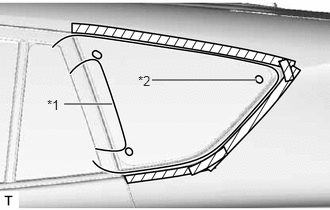
| *1 | Wire |
| *2 | Clip |
Cut through the adhesive by pulling the piano wire around the quarter window glass.
- NOTICE:
-
Leave as much adhesive on the vehicle body as possible when removing the quarter window assembly.
Using suction cups, remove the quarter window assembly LH.
- HINT:
- ·
Be careful not to drop the quarter window assembly.
- ·
Be sure to replace the quarter window assembly with a new one.
23.CLEAN VEHICLE BODY
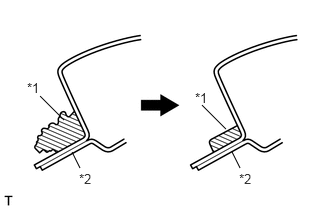
| *1 | Adhesive |
| *2 | Vehicle Body |
Clean and shape the contact surface of the vehicle body.
On the contact surface of the vehicle body, use a knife to cut away excess adhesive as shown in the illustration.
- HINT:
-
Leave as much adhesive on the vehicle body as possible.
- NOTICE:
-
Be careful not to damage the vehicle body.
Clean the contact surface of the vehicle body with cleaner.
- HINT:
-
Even if all the adhesive has been removed, clean the vehicle body.