LIGHTING (EXT) HEADLIGHT ECU REMOVAL
CAUTION / NOTICE / HINT
The necessary procedures (adjustment, calibration, initialization or registration) that must be performed after parts are installed, removed or replaced during the headlight ECU sub-assembly LH removal/installation are shown below.
| Replacement Part or Procedure | Necessary Procedures | Effects/Inoperative Functions when not Performed | Link |
|---|---|---|---|
| Headlight ECU sub-assembly LH | ·
Synchronize the vehicle information ·
Initialization of the headlight ECU sub-assembly LH |
Automatic headlight beam level control system | ( ) |
| Front bumper assembly (Including removal and installation) | ·
Ultrasonic sensor detection angle ·
Ultrasonic sensor detection angle registration |
Parking support brake system (for Gasoline model) | ()
|
| Front television camera view adjustment | Panoramic view monitor system (for Gasoline model) | ()
|
| Replacement Part or Procedure | Necessary Procedures | Effects/Inoperative Functions when not Performed | Link |
|---|---|---|---|
| Headlight ECU sub-assembly LH | ·
Synchronize the vehicle information ·
Initialization of the headlight ECU sub-assembly LH |
Automatic headlight beam level control system | ()
|
| Front bumper assembly (Including removal and installation) | ·
Ultrasonic sensor detection angle ·
Ultrasonic sensor detection angle registration |
Parking support brake system (for HV model) | ()
|
| Front television camera view adjustment | Panoramic view monitor system (for HV model) | ()
|
- NOTICE:
-
Even if the headlight ECU sub-assembly RH is replaced with a new one, synchronize the vehicle information and initialization are not necessary.
- HINT:
- ·
Use the same procedure for the RH and LH sides.
·The procedure listed below is for the LH side.
PROCEDURE

 1.REMOVE HEADLIGHT ASSEMBLY LH
for Triple Beam Headlight:
Click hereVehicle Exterior>LIGHTING (EXT)>HEADLIGHT ASSEMBLY (for Triple Beam Headlight)>REMOVAL
for Single Beam Headlight:
Click hereVehicle Exterior>LIGHTING (EXT)>HEADLIGHT ASSEMBLY(for Single Beam Headlight)>REMOVAL
81056A
2.REMOVE HEADLIGHT ECU SUB-ASSEMBLY LH
- NOTICE:
- ·
Prevention of static electricity is required during this procedure.
·Use static electricity countermeasures SST (desktop antistatic mat set) and observe all precautions to prevent damage to the system by electrostatic discharge (ESD).
·If the headlight ECU sub-assembly LH has been dropped, replace it with a new one.
·If the headlight ECU sub-assembly LH has been removed, replace the headlight gasket with a new one.
·Perform work using clean rubber gloves.
·Do not touch the headlight ECU sub-assembly LH connector with bare hands.
- SST
- 09890-47010 (09891-04010, 09891-04020, 09891-04030, 09891-04040)
Remove the 3 screws and headlight ECU sub-assembly LH.
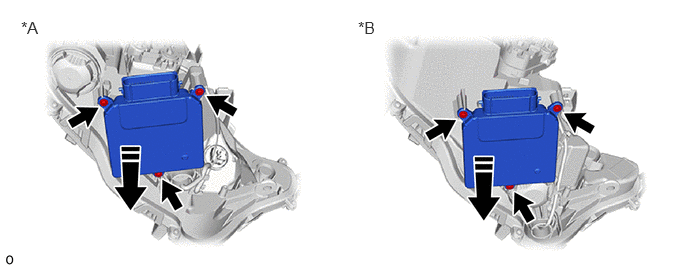
| *A | for Triple Beam Headlight | *B | for Single Beam Headlight |

|
Remove in this Direction | - | - |
Disconnect the connector cover.
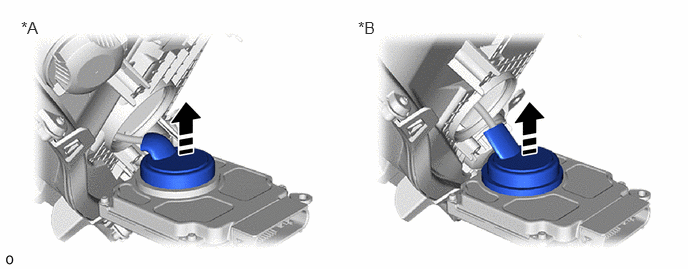
| *A | for Triple Beam Headlight | *B | for Single Beam Headlight |
|
|
Remove in this Direction | - | - |
Disconnect the connector.
- NOTICE:
-
Do not drop the connector in the headlight assembly LH.
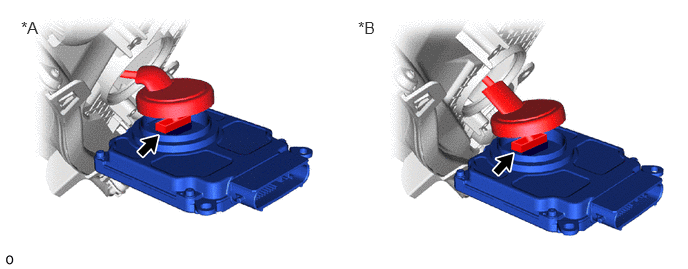
| *A | for Triple Beam Headlight | *B | for Single Beam Headlight |
81134
3.REMOVE HEADLIGHT GASKET
- NOTICE:
- ·
Prevention of static electricity is required during this procedure.
·Use static electricity countermeasures SST (desktop antistatic mat set) and observe all precautions to prevent damage to the system by electrostatic discharge (ESD).
·Perform work using clean rubber gloves.
·Do not touch the headlight ECU sub-assembly LH connector with bare hands.
- SST
- 09890-47010 (09891-04010, 09891-04020, 09891-04030, 09891-04040)
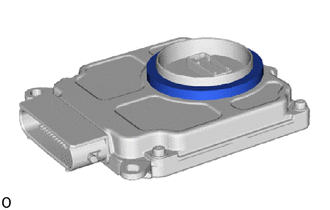
Remove the headlight gasket.