A25A-FXS FUEL FUEL TANK(w/ Canister Pump Module) INSTALLATION
PROCEDURE

 77656B
1.INSTALL NO. 6 FUEL TANK CUSHION
Install the 5 No. 6 fuel tank cushions to the fuel tank assembly.
77606
2.INSTALL NO. 1 FUEL TANK PROTECTOR SUB-ASSEMBLY
Attach the 2 claws and install the No. 1 fuel tank protector sub-assembly to the fuel tank assembly.
77642A
3.INSTALL NO. 2 FUEL TANK PROTECTOR
Attach the 2 claws and install the No. 2 fuel tank protector to the fuel tank protector sub-assembly.
77404
4.INSTALL FUEL TANK VENT HOSE SUB-ASSEMBLY
Attach the 2 clamps and install the fuel tank vent hose sub-assembly to the fuel tank assembly.
Connect the fuel tank vent hose sub-assembly to the fuel tank evaporation tube sub-assembly.
Click hereEngine / Hybrid System>A25A-FXS (FUEL)>FUEL SYSTEM>PRECAUTION
77209C
5.INSTALL FUEL TANK MAIN TUBE SUB-ASSEMBLY
Attach the clamp and install the fuel tank main tube sub-assembly to the fuel tank assembly.
77100
6.INSTALL FUEL TANK ASSEMBLY
- CAUTION:
-
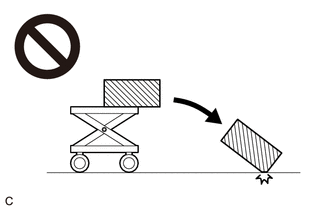
-
The fuel tank assembly is very heavy. Be sure to follow the procedure described in the repair manual, or the fuel tank assembly may fall off the engine lifter.
Set the fuel tank assembly on an engine lifter.
- NOTICE:
-
Using height adjustment attachments and plate lift attachments, keep the fuel tank assembly horizontal.
Using the engine lifter, slowly raise the fuel tank assembly, and install the fuel tank assembly, fuel tank band and fuel tank band LH with the 4 bolts.
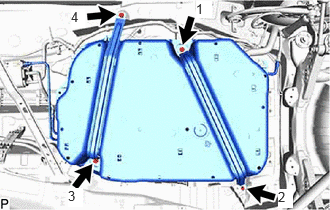
Tighten the 4 bolts in the order shown in the illustration.
- Torque:
- 45 N*m (459 kgf*cm, 33 ft.*lbf)
- NOTICE:
- ·
Be careful not to drop the fuel tank assembly.
·When installing the fuel tank assembly, tilt it slightly to prevent it from interfering with the surrounding parts.
58152A
7.CONNECT FRONT LOWER NO. 1 FLOOR HEAT INSULATOR
Attach the clip and connect the front lower No. 1 floor heat insulator to the fuel tank band sub-assembly.
8.CONNECT FUEL TANK FILLER PIPE SUB-ASSEMBLY
Connect the fuel tank filler pipe sub-assembly to the fuel tank filler pipe assembly.
Click hereEngine / Hybrid System>A25A-FXS (FUEL)>FUEL SYSTEM>PRECAUTION
9.CONNECT FUEL TANK BREATHER TUBE
Connect the fuel tank breather tube to the fuel tank filler pipe assembly.
Click hereEngine / Hybrid System>A25A-FXS (FUEL)>FUEL SYSTEM>PRECAUTION
77209C
10.CONNECT FUEL TANK MAIN TUBE SUB-ASSEMBLY
Connect the fuel tank main tube sub-assembly to the fuel tube.
Click hereEngine / Hybrid System>A25A-FXS (FUEL)>FUEL SYSTEM>PRECAUTION
77404
11.CONNECT FUEL TANK VENT HOSE SUB-ASSEMBLY
Connect the fuel tank vent hose sub-assembly to the fuel tank solenoid main valve assembly.
Click hereEngine / Hybrid System>A25A-FXS (FUEL)>FUEL SYSTEM>PRECAUTION
58167A
12.INSTALL FRONT CENTER FLOOR COVER
Attach the 2 clips and install the front center floor cover.
58166A
13.INSTALL FRONT FLOOR COVER LH
Install the front floor cover LH to the body and tighten the 7 nuts.
Attach the clip and install the 2 bolts and 4 screws.
- Torque:
- for bolt : 7.5 N*m (76 kgf*cm, 66 in.*lbf)
51420
14.INSTALL NO. 2 ENGINE UNDER COVER ASSEMBLY
51441
15.INSTALL NO. 1 ENGINE UNDER COVER
53895B
16.INSTALL FRONT FENDER FRONT SPLASH SHIELD RH
53896B
17.INSTALL FRONT FENDER FRONT SPLASH SHIELD LH
18.ADD FUEL
77020A
19.INSTALL FUEL SUCTION WITH PUMP AND GAUGE TUBE ASSEMBLY
20.CONNECT CABLE TO NEGATIVE AUXILIARY BATTERY TERMINAL
- NOTICE:
-
When disconnecting the cable, some systems need to be initialized after the cable is reconnected.
-
Click hereGeneral>INTRODUCTION>REPAIR INSTRUCTION>INITIALIZATION
65351A
21.INSTALL BATTERY HOLE COVER
58416K
22.INSTALL REAR NO. 2 FLOOR BOARD
58410B
23.INSTALL DECK BOARD ASSEMBLY