EXTERIOR PANELS / TRIM FRONT BUMPER(except Off Road Package) REASSEMBLY
PROCEDURE

 53112A
1.INSTALL LOWER RADIATOR GRILLE
53113E
2.INSTALL LOWER NO. 2 RADIATOR GRILLE
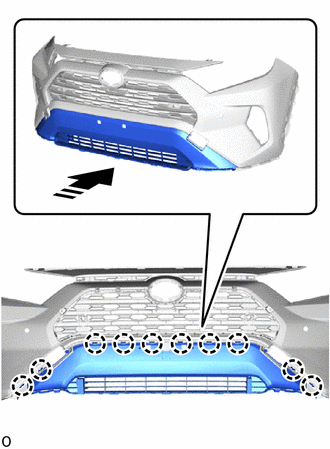

|
Install in this Direction |
Attach the claw and install the lower No. 2 radiator grille as shown in the illustration.
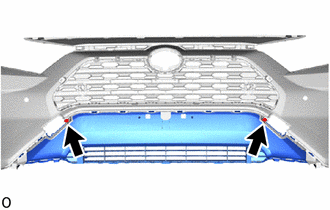
Install the 2 screws.
52711
3.INSTALL FRONT BUMPER MOULDING (for Separate Type)
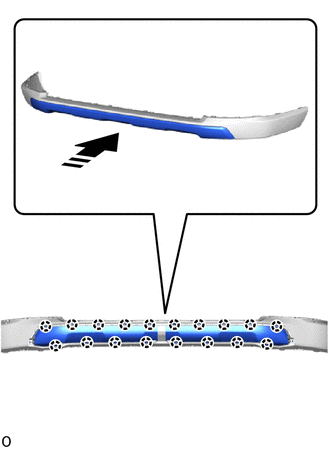
|
|
Install in this Direction |
Attach the claw and install the front bumper moulding as shown in the illustration.
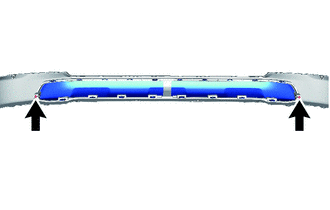
Install the 2 screws.
52411
4.INSTALL FRONT BUMPER GUARD
Attach the claw and guide to install the front bumper guard as shown in the illustration.
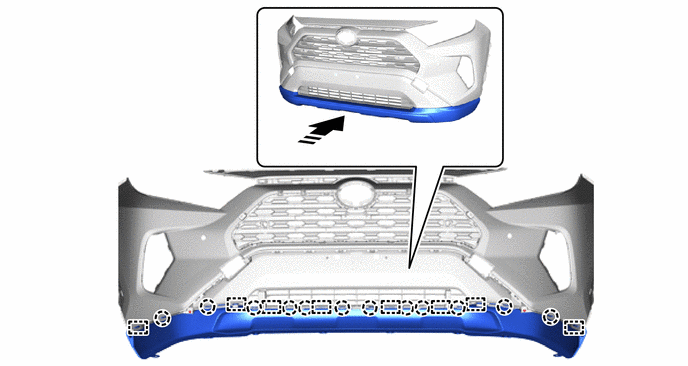
|
|
Install in this Direction | - | - |
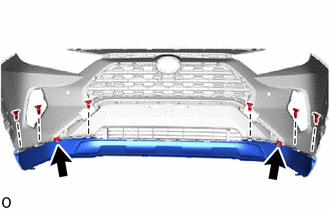
Install the 6 outside moulding retainers.
Install the 2 screws.
52438
5.INSTALL FRONT BUMPER GUARD COVER LH
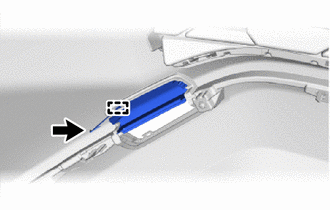

|
Fall Prevention Hook |
Attach the fall prevention hook and install the front bumper guard cover LH.
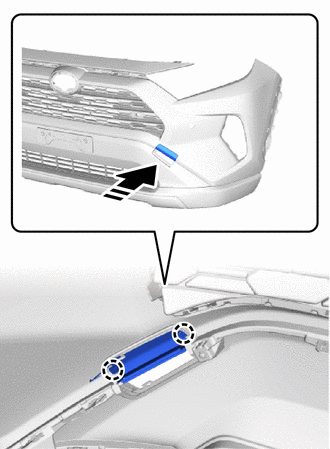
|
|
Install in this Direction |
Attach the claw.
52437
6.INSTALL FRONT BUMPER GUARD COVER RH
- HINT:
-
Use the same procedure as for the LH side.
53286C
7.INSTALL FRONT BUMPER ARM HOLE COVER LH
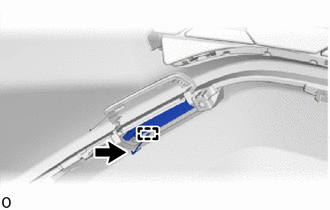
|
|
Fall Prevention Hook |
Attach the fall prevention hook and install the front bumper arm hole cover LH.
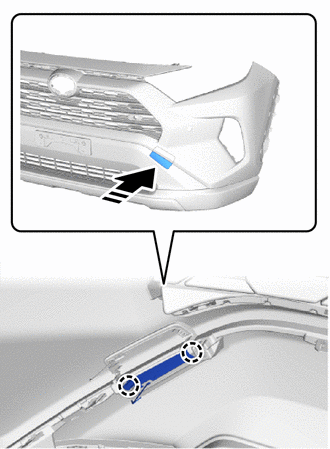
|
|
Install in this Direction |
Attach the claw.
53285J
8.INSTALL FRONT BUMPER ARM HOLE COVER RH
- HINT:
-
Use the same procedure as for the LH side.
75311
9.INSTALL RADIATOR GRILLE (OR FRONT PANEL) EMBLEM
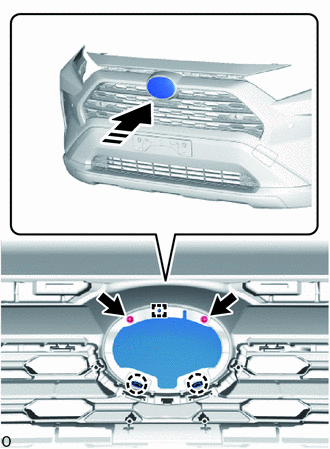
|
|
Install in this Direction |
Attach the claw and guide to install the radiator grille (or front panel) emblem.
Install the 2 screws.
52128B
10.INSTALL FRONT BUMPER HOLE COVER LH
w/ Fog Light:
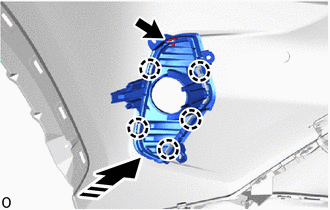
|
|
Install in this Direction |
Attach the claw and install the front bumper hole cover LH.
Install the clip.
w/o Fog Light:
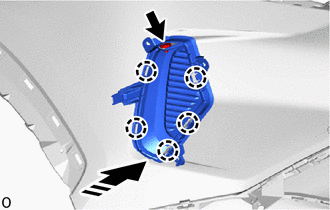
|
|
Install in this Direction |
Attach the claw and install the front bumper hole cover LH.
Install the clip.
52127D
11.INSTALL FRONT BUMPER HOLE COVER RH
- HINT:
-
Use the same procedure as for the LH side.
53124B
12.INSTALL RADIATOR GRILLE SIDE MOULDING LH
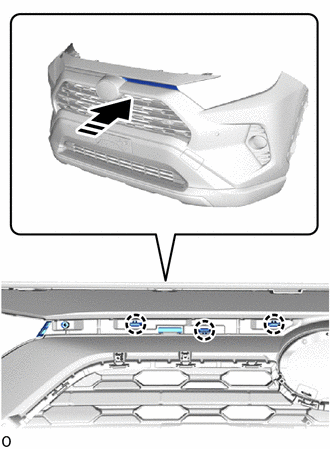
|
|
Install in this Direction |
Attach the claw and install the radiator grille side moulding LH.
53123B
13.INSTALL RADIATOR GRILLE SIDE MOULDING RH
- HINT:
-
Use the same procedure as for the LH side.
53115B
14.INSTALL RADIATOR GRILLE BRACKET
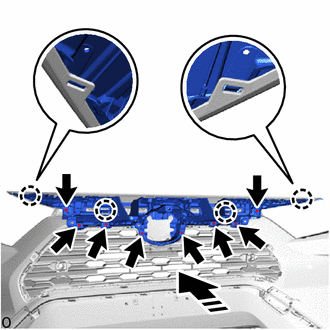
|
|
Install in this Direction |
Attach the claw and install the radiator grille bracket as shown in the illustration.
Install the 8 screws.
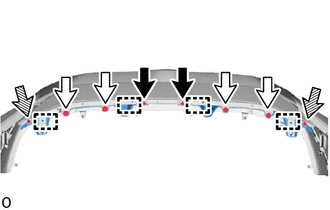
|
|
Screw |

|
Clip (A) |

|
Clip (B) |
Attach the guide and install the 2 clips (B).
Install the 4 clips (A).
Install the 2 screws.
53395E
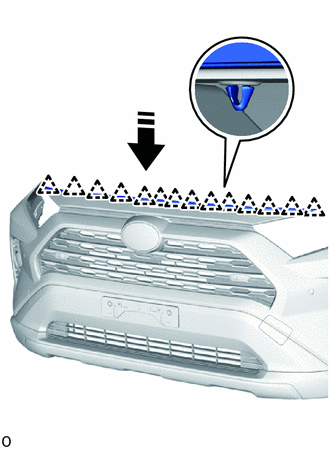
15.INSTALL FRONT HOOD TO END PANEL SEAL
|
|
Install in this Direction |
Attach the clip and install the front hood to end panel seal.
81220
16.INSTALL FOG LIGHT ASSEMBLY LH (w/ Fog Light)
81210A
17.INSTALL FOG LIGHT ASSEMBLY RH (w/ Fog Light)
- HINT:
-
Use the same procedure as for the LH side.
52114A
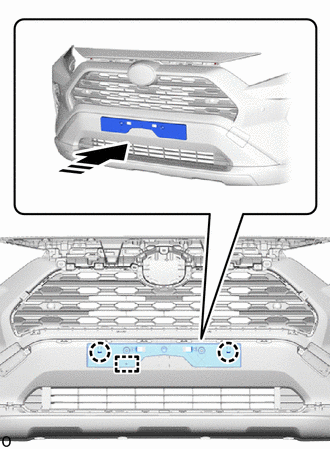
18.INSTALL FRONT BUMPER EXTENSION MOUNTING BRACKET
for Type A:
|
|
Install in this Direction |
Attach the claw and guide to install the front bumper extension mounting bracket as shown in the illustration.
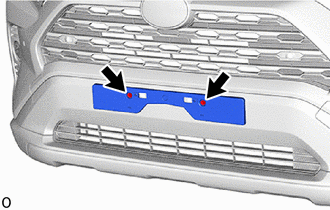
Install the 2 screws.
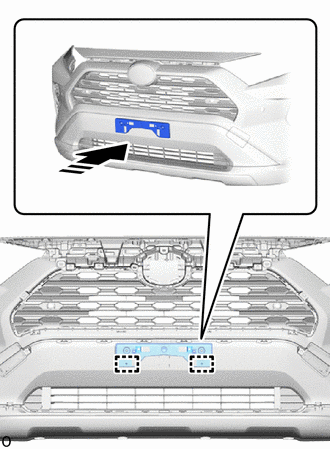
for Type B:
|
|
Install in this Direction |
Attach the guide to install the front bumper extension mounting bracket as shown in the illustration.
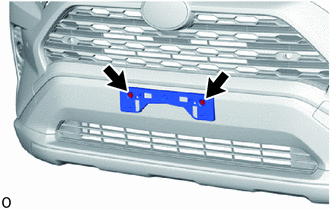
Install the 2 screws.
for Type C:
Install the front bumper extension mounting bracket with the 2 screws.
19.INSTALL NUT
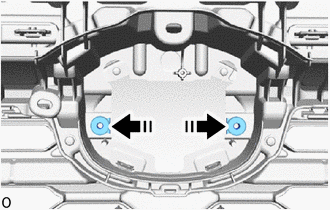
|
|
Install in this Direction |
Install the 2 nuts.
88211B
20.INSTALL MILLIMETER WAVE RADAR SENSOR ASSEMBLY (w/ Dynamic Radar Cruise Control System)
89347B
21.INSTALL FRONT CORNER ULTRASONIC SENSOR RETAINER (w/ TOYOTA Parking Assist-sensor System)
89341L
22.INSTALL FRONT CENTER ULTRASONIC SENSOR (w/ TOYOTA Parking Assist-sensor System)
89341K
23.INSTALL FRONT CORNER ULTRASONIC SENSOR (w/ TOYOTA Parking Assist-sensor System)
89348X
24.INSTALL FRONT ULTRASONIC SENSOR CLIP (w/ TOYOTA Parking Assist-sensor System)
82114
25.INSTALL NO. 4 ENGINE ROOM WIRE (w/ Wire Harness)
w/o Toyota Parking Assist-sensor System:
Attach the clamp and install the No. 4 engine room wire.
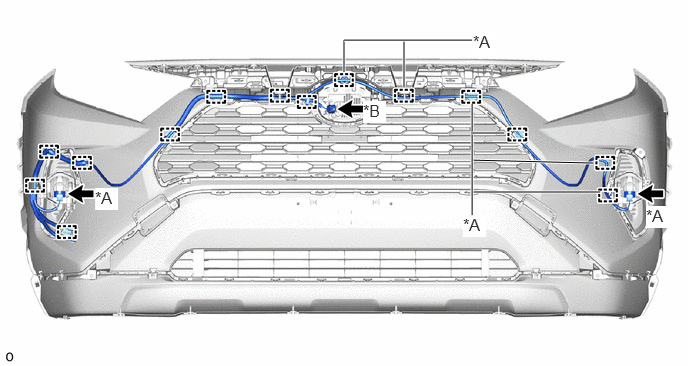
| *A | w/ Fog Light | *B | w/ Dynamic Radar Cruise Control System |
Connect each connector.
w/ Toyota Parking Assist-sensor System, w/o Parking Support Brake System:
Attach the clamp and install the No. 4 engine room wire.
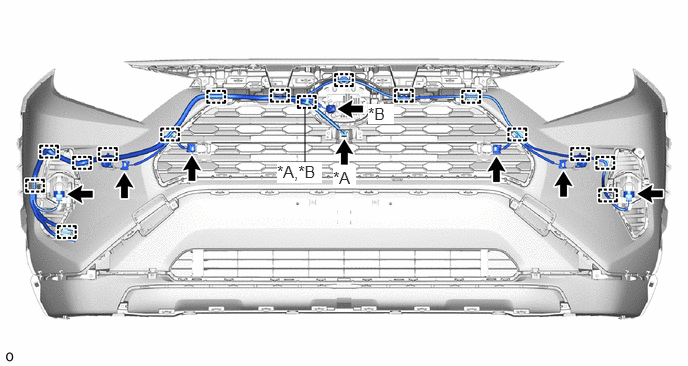
| *A | w/ Panoramic View Monitor System | *B | w/ Dynamic Radar Cruise Control System |
Connect each connector.
w/ Toyota Parking Assist-sensor System, w/ Parking Support Brake System:
Attach the clamp and install the No. 4 engine room wire.
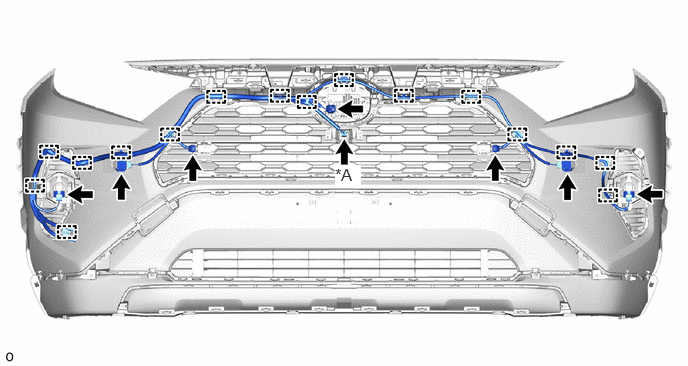
| *A | w/ Panoramic View Monitor System | - | - |
Connect each connector.
85271
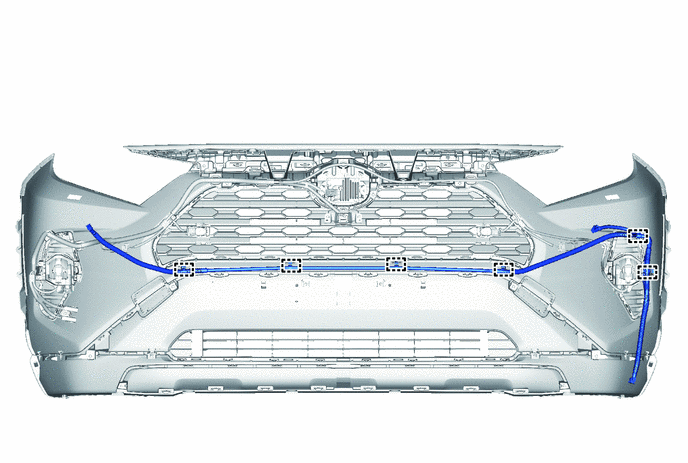
26.INSTALL NO. 1 HEADLIGHT CLEANER HOSE (w/ Headlight Cleaner System)
Attach the clamp and install the No. 1 headlight cleaner hose.
85208A
27.INSTALL HEADLIGHT WASHER ACTUATOR SUB-ASSEMBLY LH (w/ Headlight Cleaner System)
85207A
28.INSTALL HEADLIGHT WASHER ACTUATOR SUB-ASSEMBLY RH (w/ Headlight Cleaner System)
- HINT:
-
Use the same procedure described for the LH side.
85354
29.INSTALL HEADLIGHT WASHER COVER LH (w/ Headlight Cleaner System)
85353
30.INSTALL HEADLIGHT WASHER COVER RH (w/ Headlight Cleaner System)
- HINT:
-
Use the same procedure described for the LH side.
31.INSTALL FOG LIGHT SEAL (w/o TOYOTA Parking Assist-sensor System)
- HINT:
- ·
Use the same procedure for the RH and LH sides.
·The procedure listed below is for the LH side.
·When installing a new fog light seal, heat the front bumper assembly using a heat light.
- Standard:
Item Temperature Front Bumper Assembly 20 to 30°C (68 to 86°F)
- CAUTION:
-
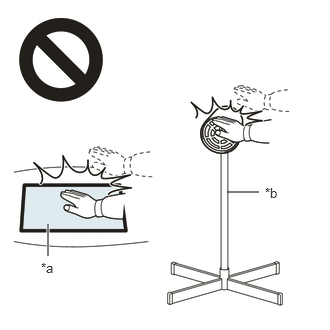 2.365,2 2.698,2 false 0.5,2.333 0.5,2.667 true 0.427,2.708 0.74,2.865 0.313,0.156 10 false *a 2.76,1.927 3.073,2.083 0.313,0.156 10 false *b
*a Heated Part *b Heat Light
- ·
Do not touch the heat light and heated parts.
·Touching the heat light may result in burns.
·Touching heated parts for a long time may result in burns.
When reusing the front bumper cover:
Using a heat light, heat the front bumper cover surface.
Remove any remaining double-sided tape from the front bumper assembly.
Wipe off any tape adhesive residue with cleaner.
- NOTICE:
- ·
Installing the fog light seal with some double-sided tape remaining may cause poor adhesion. Perform this procedure until the tape is sufficiently removed.
·Make sure to use a cloth when removing. Using a screwdriver, etc., may cause damage and poor adhesion.
·Also, clean a new front bumper cover surface.
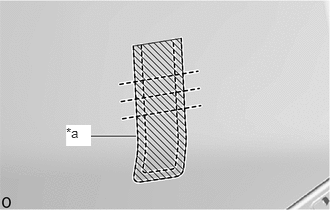
| *a | Mark-off Line |

|
Primer |
Apply primer to the front bumper assembly on the installation area of the fog light seal using a brush or felt.
- NOTICE:
- ·
Replace the brush or felt if it is dirty or has become hardened.
·Keep any painted surface free from primer.
·If the primer contacts a painted surface, it may leave light primer marks. Therefore, use protective tape when using liquid primer.
·Do not touch surfaces to which primer has been applied until the fog light seal has been attached.
Let the primer dry sufficiently.
- NOTICE:
-
Do not touch applied surfaces until the primer is dry.
- Recommended drying time:
10 minutes or more (at 23°C (73°F))
Remove the release paper of a new fog light seal trying not to touch the adhesional surface.
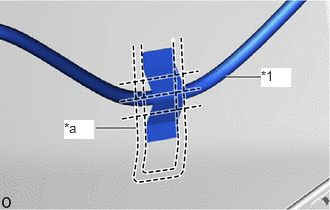
| *1 | No. 4 Engine Room Wire |
| *a | Mark-off Line |
Install the No. 4 engine room wire in the position shown in the illustration.
Install the fog light seal in the position shown in the illustration.
82821K
32.INSTALL CONNECTOR COVER (w/o Wire Harness)
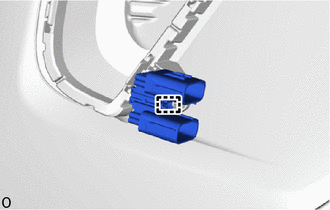
Attach the clamp and install the connector cover.