HYBRID / BATTERY CONTROL HYBRID CONTROL SYSTEM(for 2WD with NICKEL METAL HYDRIDE BATTERY) Cooling System
DESCRIPTION
The cause of the malfunction may be the cooling system.
Check whether the grille is blocked, whether coolant is leaking, the radiator fan operating condition and whether coolant has frozen.
| Area | Inspection |
|---|---|
| Grille blockage, coolant amount, coolant hoses, radiator fan | Check for overheating due to hybrid cooling system malfunction. |
| Inverter coolant temperature sensor (built-in inverter) | Check for temperature sensor malfunction. |
| Coolant freezing check | Check freeze frame values to determine whether the hybrid coolant was frozen when the DTC was stored. |
| Data List |
|---|
·
Inverter Coolant Water Temperature ·
Motor Inverter Temperature ·
Generator Inverter Calculated Temperature ·
Boosting Converter Temperature (Upper) ·
Boosting Converter Temperature (Lower) ·
Ambient Temperature ·
Inverter Water Pump Revolution |
SYSTEM DESCRIPTION
The inverter converts the high-voltage direct current of the HV battery into alternating current for the generator (MG1) and motor (MG2). The inverter generates heat during the conversion process. Therefore, the inverter is cooled by a special cooling system consisting of the inverter water pump assembly, the cooling fan, and a radiator. This cooling system is independent of the engine cooling system. The hybrid vehicle control ECU assembly monitors the inverter water pump assembly, cooling fan and cooling system, and detects malfunctions.
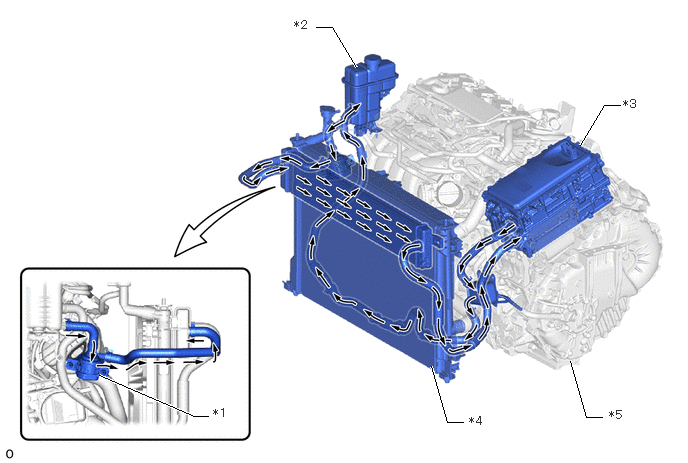
| *1 | Inverter Water Pump Assembly | *2 | Inverter Reserve Tank Assembly |
| *3 | Inverter with Converter Assembly | *4 | Radiator Assembly (HV) |
| *5 | Hybrid Vehicle Transaxle Assembly | - | - |
WIRING DIAGRAM
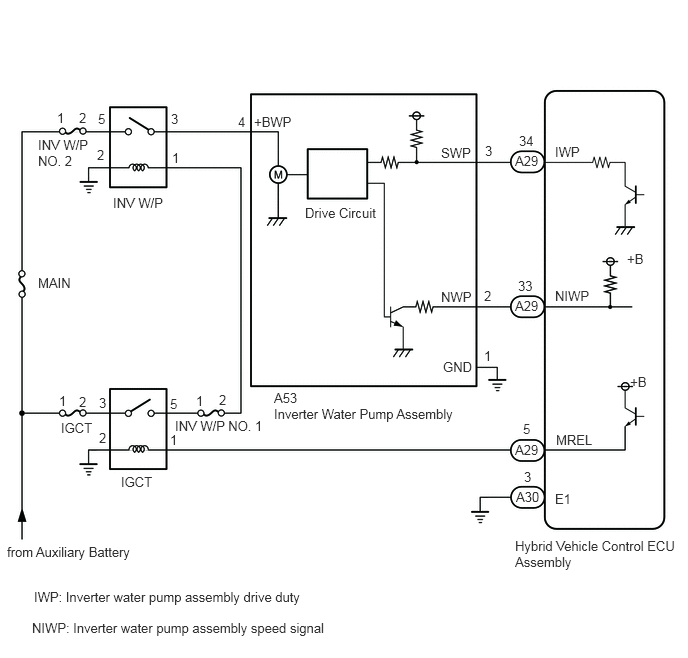
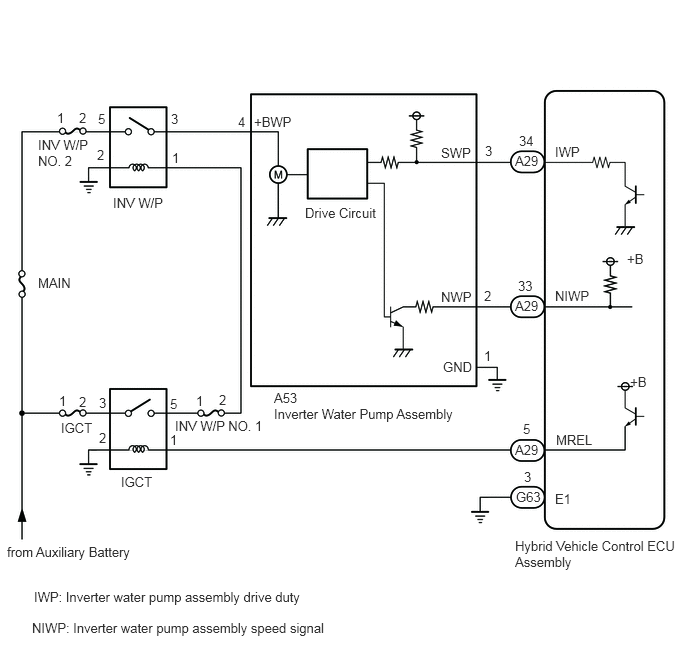
CAUTION / NOTICE / HINT
This diagnostic procedure is referenced to in the diagnostic procedure of several DTCs.
If the result of this diagnostic procedure is normal, proceed as directed in the procedure for the DTC.
- CAUTION:
- ·
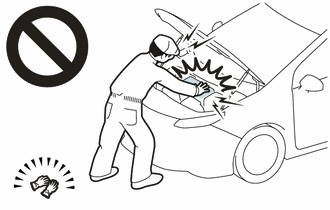
Before the following operations are conducted, take precautions to prevent electric shock by turning the power switch off, wearing insulated gloves, and removing the service plug grip from HV battery.
-Inspecting the high-voltage system
-Disconnecting the low voltage connector of the inverter with converter assembly
-Disconnecting the low voltage connector of the HV battery
·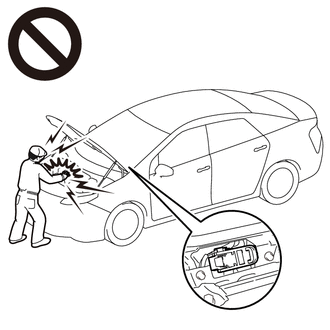
To prevent electric shock, make sure to remove the service plug grip to cut off the high voltage circuit before servicing the vehicle.
·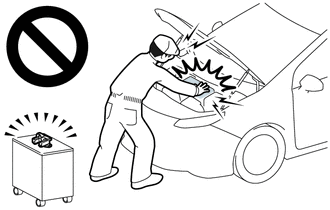
After removing the service plug grip from the HV battery, put it in your pocket to prevent other technicians from accidentally reconnecting it while you are working on the high-voltage system.
·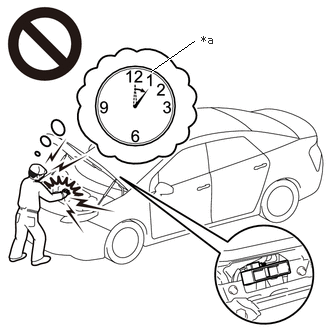 1.573,0.74 2.021,0.427 true 2.094,0.344 2.354,0.51 0.26,0.167 10 false *a
*a Without waiting for 10 minutes
After removing the service plug grip, wait for at least 10 minutes before touching any of the high-voltage connectors or terminals. After waiting for 10 minutes, check the voltage at the terminals in the inspection point in the inverter with converter assembly. The voltage should be 0 V before beginning work.
- HINT:
-
Waiting for at least 10 minutes is required to discharge the high-voltage capacitor inside the inverter with converter assembly.
- NOTICE:
-
After turning the power switch off, waiting time may be required before disconnecting the cable from the negative (-) auxiliary battery terminal. Therefore, make sure to read the disconnecting the cable from the negative (-) auxiliary battery terminal notices before proceeding with work.
-
Click hereGeneral>INTRODUCTION>REPAIR INSTRUCTION>PRECAUTION
PROCEDURE
Make sure that the front side of the radiator grille is not blocked with anything.
Ask the customer if the front side of the radiator grille was blocked with anything.
- Result:
Result Proceed to Not blocked. A Is/was blocked. B
- HINT:
-
If the radiator grille is blocked, the inverter coolant temperature will increase and this DTC may be stored.
A
B
Check the HV coolant level in the inverter reserve tank.
Check for HV coolant leaks.
- Result:
Result Proceed to No leaks are found and the HV coolant level in the inverter reserve tank assembly is above the low line. A No leaks are found and the HV coolant level in the inverter reserve tank assembly is below the low line. B HV coolant leaks are evident. C
- HINT:
- ·
After repairing the HV coolant leaks and adding coolant, perform the Active Tests "Activate the Inverter Water Pump" (Hybrid Control System) and "Control the Cooling Fan Duty Ratio" (Engine Control System) and make sure that there are no malfunctions.
·If there are signs of coolant leakage around the connecting parts of a hose and the inverter with converter assembly, replace the hose with a new one.
A
B
C
Check that the cooling system hoses are not kinked or clogged.
- OK:
The cooling system hoses are not kinked or clogged.
- Result:
Proceed to OK NG
OK
NG
Connect the GTS to the DLC3.
Turn the power switch on (IG).
Enter the following menus: Powertrain / Engine / Active Test / Control the Engine Cooling Fan Duty Ratio.
- Powertrain > Engine > Active Test
-
Tester Display Control the Engine Cooling Fan Duty Ratio - 50004 372 11
Perform the "Control the Engine Cooling Fan Duty Ratio" Active Test.
- OK:
GTS Operation Fan Operation 30 - 100% Cooling fan operates 0% Cooling fan stops
- Result:
Result Proceed to Cooling fan operate (w/ Grille Shutter) A Cooling fan operate (w/o Grille Shutter) B Cooling fan does not operate C Cooling fan do not stop
Turn the power switch off.
A
B
C
Connect the GTS to the DLC3.
Turn the power switch on (IG).
Enter the following menus: Body Electrical / Grille Shutter / Utility / Grille Shutter Control Mode Switching.
According to the display on the GTS, change the grille shutter control mode from normal mode to maintenance mode.
- Body Electrical > Grille Shutter > Utility
-
Tester Display Grille Shutter Control Mode Switching - 50005 352 4221
Enter the following menus: Body Electrical / Grille Shutter / Active Test / Shutter Closing Operation Lock Detection / Data List / Shutter Operation Lock Detection Result for Active Test.
According to the display on the GTS, perform the Active Test and read the value of Data List item Shutter Operation Lock Detection Result for Active Test.
- Body Electrical > Grille Shutter > Active Test
-
Active Test Display Shutter Closing Operation Lock Detection -
Data List Display Shutter Operation Lock Detection Result for Active Test - 50004 352 3 8
- OK:
"Normal" is displayed.
Enter the following menus: Body Electrical / Grille Shutter / Active Test / Shutter Opening Operation Lock Detection / Data List / Shutter Operation Lock Detection Result for Active Test.
According to the display on the GTS, perform the Active Test and read the value of Data List item Shutter Operation Lock Detection Result for Active Test.
- Body Electrical > Grille Shutter > Active Test
-
Active Test Display Shutter Opening Operation Lock Detection -
Data List Display Shutter Operation Lock Detection Result for Active Test - 50004 352 4 8
- OK:
"Normal" is displayed.
- HINT:
-
When the value of Data List item Shutter Operation Lock Detection Result for Active Test is "Normal", it can be determined that the grille shutter system is normal.
Enter the following menus: Body Electrical / Grille Shutter / Utility / Grille Shutter Control Mode Switching.
According to the display on the GTS, change the grille shutter control mode from maintenance mode to normal mode.
- Body Electrical > Grille Shutter > Utility
-
Tester Display Grille Shutter Control Mode Switching - 50005 352 4221
Turn the power switch off.
- Result:
Proceed to OK NG
OK
NG
- NOTICE:
- ·
Make sure that the HV coolant level is above the low line of the inverter reserve tank.
·Be sure to perform the inspection with the auxiliary battery voltage at 12 V or more.
- HINT:
-
When the auxiliary battery voltage is low, the inverter water pump assembly may not operate.
Connect the GTS to the DLC3.
Turn the power switch on (IG).
Enter the following menus: Powertrain / Hybrid Control / Active Test / Activate the Inverter Water Pump.
- Powertrain > Hybrid Control > Active Test
-
Active Test Display Activate the Inverter Water Pump -
Data List Display Inverter Water Pump Revolution - 50004 397 1 60
Select the Data List item "Inverter Water Pump Revolution".
According to the display on the GTS, perform the Active Test "Activate the Inverter Water Pump" and check the value of the Data List item "Inverter Water Pump Revolution".
- OK:
Tester Display Condition Specified Condition Inverter Water Pump Revolution Power switch on (IG)
During Active Test3176 to 8617 rpm
- HINT:
- ·
Perform the Active Test with the inverter coolant temperature between -15 and 65°C (5 to 149°F).
·When the inverter water pump assembly is not operating, the Data List item "Inverter Water Pump Revolution" displays a value 200 rpm or less.
Turn the power switch off.
- Result:
Proceed to OK NG
OK
NG
Connect the GTS to the DLC3.
Turn the power switch on (READY) and wait for 1 minute with the engine stopped.
Enter the following menus: Powertrain / Hybrid Control / Data List / Generator Inverter Calculated Temperature, Motor Inverter Temperature, Boosting Converter Temperature (Upper), Boosting Converter Temperature (Lower) and Inverter Coolant Water Temperature.
- Powertrain > Hybrid Control > Data List
-
Tester Display Generator Inverter Calculated Temperature Motor Inverter Temperature Boosting Converter Temperature (Upper) Boosting Converter Temperature (Lower) Inverter Coolant Water Temperature - 50003 397 127,130,136,137,152
Read the Data List with the engine stopped.
- Result:
Result Proceed to Other than below. A "Inverter Coolant Water Temperature" value is higher than the displayed temperature of any other Data List item by 20°C (68°F) or more. B
- HINT:
-
The lower limit temperature that can be displayed for "Generator Inverter Calculated Temperature", "Motor Inverter Temperature", "Boosting Converter Temperature (Upper)" and "Boosting Converter Temperature (Lower)" is 15°C (59°F). The lower limit temperature for "Inverter Coolant Water Temperature" is -40°C (-40°F). The "Inverter Coolant Water Temperature" value displayed on the GTS may be lower than the others, but this is not a malfunction.
Turn the power switch off.
A
B
Connect the GTS to the DLC3.
Turn the power switch on (IG).
Enter the following menus: Powertrain / Hybrid Control / Trouble Codes.
- Powertrain > Hybrid Control > Trouble Codes
- 50001 397
Read the freeze frame data item "Ambient Temperature" using the GTS.
Check if the freeze frame data item "Ambient Temperature" is below the freezing temperature of the HV coolant.
- Result:
Result Proceed to Ambient Temperature value is above freezing temperature of the HV coolant. A Ambient Temperature value is below freezing temperature of the HV coolant. B
- HINT:
- ·
HV coolant (SLLC) with a 30% concentration freezes at -15°C (5°F) and HV coolant (SLLC) with a 50% concentration freezes at -35°C (-31°F).
·If the HV coolant freezes in the HV radiator or inverter water pump, the coolant temperature in the inverter with converter assembly rises because the HV coolant cannot circulate. As a result, a DTC may be stored.
·A DTC is stored when the inverter water pump impeller cannot rotate due to freezing of the HV coolant.
·If DTCs are output due to freezing of the LLC, the problem symptom cannot be reproduced. Check the LLC replacement history and whether the LLC was frozen based on the ambient temperature when the DTCs were stored.
Turn the power switch off.
A
B
- Result:
Proceed to OK NG
OK
NG
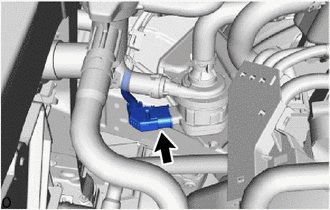
Check the connector connections and contact pressure of the relevant terminals for the inverter water pump assembly connector.
- OK:
The connector is connected securely, the terminals are not deformed or corroded and there are no contact problems.
- Result:
Proceed to OK NG
OK
NG
Disconnect the A29 hybrid vehicle control ECU assembly connector.
Disconnect the A53 inverter water pump assembly connector.
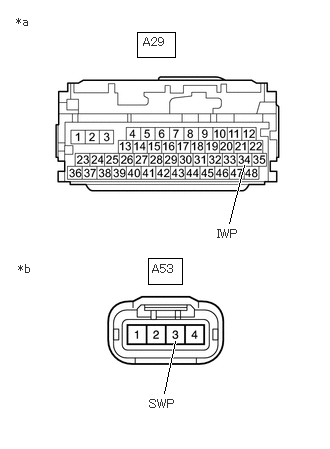
| *a | Front view of wire harness connector
(to Hybrid Vehicle Control ECU Assembly) |
| *b | Front view of wire harness connector
(to Inverter Water Pump Assembly) |
Measure the resistance according to the value(s) in the table below.
- Standard Resistance (Check for Open):
Tester Connection Condition Specified Condition A29-34 (IWP) - A53-3 (SWP) Power switch off Below 1 Ω
- Standard Resistance (Check for Short):
Tester Connection Condition Specified Condition A29-34 (IWP) or A53-3 (SWP) - Body ground and other terminals Power switch off 10 kΩ or higher
Reconnect the A53 inverter water pump assembly connector.
Reconnect the A29 hybrid vehicle control ECU assembly connector.
- Result:
Proceed to OK NG
OK
NG
- NOTICE:
-
Be sure to perform the inspection with the auxiliary battery voltage at 12 V or more.
- HINT:
-
When the auxiliary battery voltage is low, the inverter water pump assembly may not operate.
Connect the GTS to the DLC3.
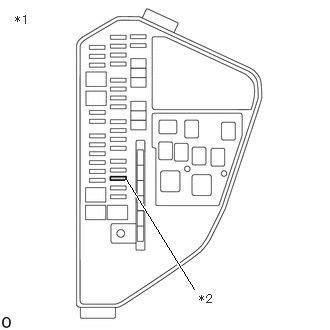
| *1 | No. 1 Engine Room Relay Block and Junction Block Assembly |
| *2 | INV W/P NO. 2 Fuse |
Remove the INV W/P NO. 2 fuse from No. 1 engine room relay block and junction block assembly.
Turn the power switch on (IG).
Enter the following menus: Powertrain / Hybrid Control / Data List / Inverter Water Pump Revolution.
- Powertrain > Hybrid Control > Data List
-
Tester Display Inverter Water Pump Revolution - 50003 397 60
According to the display on the GTS, read the Data List.
- OK:
Tester Display Condition Specified Condition Inverter Water Pump Revolution Power switch on (IG) 200 rpm or less
Turn the power switch off.
Install the INV W/P NO. 2 fuse.
- Result:
Proceed to OK NG
OK
NG
Disconnect the A29 hybrid vehicle control ECU assembly connector.
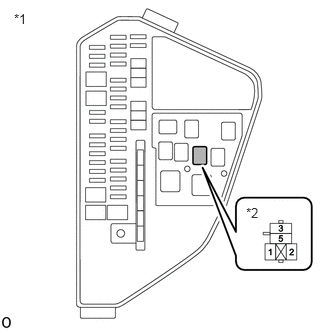
| *1 | No. 1 Engine Room Relay Block and Junction Block Assembly |
| *2 | INV W/P Relay Holder |
Remove the INV W/P relay from No. 1 engine room relay block and junction block assembly.
Connect terminals 3 and 5 of the INV W/P relay holder.
- HINT:
-
Make a short circuit between terminals 3 and 5 to supply +B voltage to the inverter water pump.
for LHD:
Measure the voltage according to the value(s) in the table below.
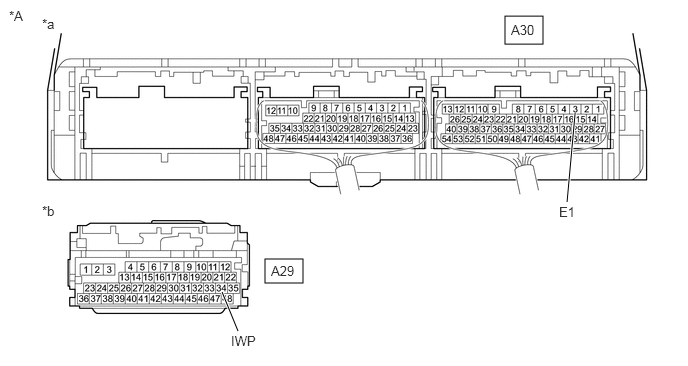
| *A | for LHD | - | - |
| *a | Component with harness connected
(Hybrid Vehicle Control ECU Assembly) |
*b | Front view of wire harness connector
(to Hybrid Vehicle Control ECU Assembly) |
- Standard Voltage:
Tester Connection Condition Specified Condition A29-34 (IWP) - A30-3 (E1) INV W/P relay holder terminals 3 and 5 connected
Power switch off11 to 14 V
- NOTICE:
-
Make sure to check for and clear DTCs after performing this inspection.
for RHD:
Measure the voltage according to the value(s) in the table below.
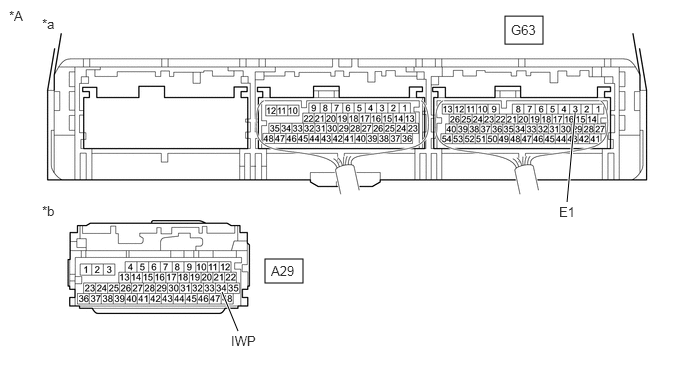
| *A | for RHD | - | - |
| *a | Component with harness connected
(Hybrid Vehicle Control ECU Assembly) |
*b | Front view of wire harness connector
(to Hybrid Vehicle Control ECU Assembly) |
- Standard Voltage:
Tester Connection Condition Specified Condition A29-34 (IWP) - G63-3 (E1) INV W/P relay holder terminals 3 and 5 connected
Power switch off11 to 14 V
- NOTICE:
-
Make sure to check for and clear DTCs after performing this inspection.
Install the INV W/P relay.
Reconnect the A29 hybrid vehicle control ECU assembly connector.
- Result:
Proceed to OK NG
OK
NG
Connect an oscilloscope between the hybrid vehicle control ECU assembly terminals specified in the table below.
Turn the power switch on (IG).
for LHD:
Check the waveform while turning the power switch on (IG).
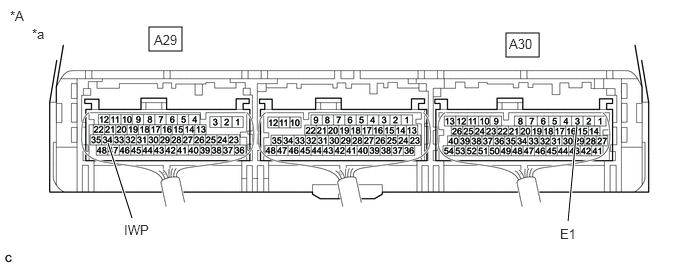
| *A | for LHD | - | - |
| *a | Component with harness connected
(Hybrid Vehicle Control ECU Assembly) |
- | - |
| Item | Content |
|---|---|
| Terminal | A29-34 (IWP) - A30-3 (E1) |
| Equipment Setting | 5 V/DIV., 50 ms./DIV. |
| Condition | Power switch on (IG) |
- OK:
Waveform duty ratio is between 3% and 9%.
for RHD:
Check the waveform while turning the power switch on (IG).
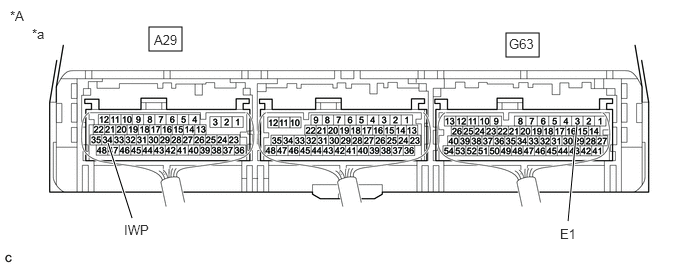
| *A | for RHD | - | - |
| *a | Component with harness connected
(Hybrid Vehicle Control ECU Assembly) |
- | - |
| Item | Content |
|---|---|
| Terminal | A29-34 (IWP) - G63-3 (E1) |
| Equipment Setting | 5 V/DIV., 50 ms./DIV. |
| Condition | Power switch on (IG) |
- OK:
Waveform duty ratio is between 3% and 9%.
Turn the power switch off.
- Result:
Proceed to OK NG
OK
NG
Click hereEngine / Hybrid System>HYBRID / BATTERY CONTROL>WATER PUMP WITH MOTOR>REMOVAL
- Result:
Proceed to NEXT
NEXT
After replacing the inverter water pump assembly, add HV coolant and perform air bleeding.
Click hereEngine / Hybrid System>HYBRID / BATTERY CONTROL>COOLANT(for Inverter)>REPLACEMENT
- Result:
Proceed to NEXT
NEXT