A25B-FXS ENGINE CONTROL CAMSHAFT TIMING CONTROL MOTOR REMOVAL
CAUTION / NOTICE / HINT
The necessary procedures (adjustment, calibration, initialization, or registration) that must be performed after parts are removed and installed, or replaced during cam timing control motor with EDU assembly removal/installation are shown below.
| Replaced Part or Performed Procedure | Necessary Procedure | Effect/Inoperative Function when Necessary Procedure not Performed | Link |
|---|---|---|---|
|
*: When performing learning using the GTS. Click here( |
|||
| Auxiliary battery terminal is disconnected/reconnected | Perform steering sensor zero point calibration | Lane control system | ( ) |
| Parking support brake system (for HV model)* | |||
| Pre-collision system | |||
| Memorize steering angle neutral point | Parking assist monitor system | ()
|
|
| Panoramic view monitor system (for HV model) | ()
|
||
| Reset back door close position | Power back door system (for HV model) | ()
|
|
| Power back door initialization | Power door lock control system | ()
|
|
·
Cam timing control motor with EDU assembly ·
Removal and installation of a cam timing control motor with EDU assembly |
Inspection after repair | ·
Poor idle, etc. ·
Engine start function, etc. |
()
|
- NOTICE:
- ·
After turning the ignition switch off, waiting time may be required before disconnecting the cable from the negative (-) auxiliary battery terminal. Therefore, make sure to read the disconnecting the cable from the negative (-) auxiliary battery terminal notices before proceeding with work.
·This procedure includes the removal of small-head bolts. Refer to Small-Head Bolts of Basic Repair Hint to identify the small-head bolts.
Click hereGeneral>INTRODUCTION>REPAIR INSTRUCTION>PRECAUTION
PROCEDURE

 58410B
1.REMOVE DECK BOARD ASSEMBLY
58416K
2.REMOVE REAR NO. 2 FLOOR BOARD
65351A
3.REMOVE BATTERY HOLE COVER
4.DISCONNECT CABLE FROM NEGATIVE AUXILIARY BATTERY TERMINAL
12601B
5.REMOVE NO. 1 ENGINE COVER SUB-ASSEMBLY
13090D
6.REMOVE CAM TIMING CONTROL MOTOR WITH EDU ASSEMBLY
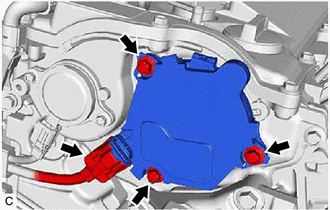
Disconnect the cam timing control motor with EDU assembly connector.
Remove the 3 bolts and cam timing control motor with EDU assembly from the No. 2 timing chain cover assembly.
- NOTICE:
-
If the cam timing control motor with EDU assembly has been struck or dropped, replace it.
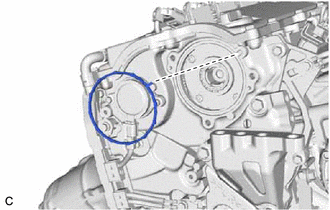
Remove the cam timing control motor O-ring from the No. 2 timing chain cover assembly.