STEERING COLUMN STEERING COLUMN ASSEMBLY INSTALLATION
PROCEDURE

 1.ALIGN FRONT WHEELS FACING STRAIGHT AHEAD
45250
2.INSTALL STEERING COLUMN ASSEMBLY
- NOTICE:
-
Make sure that the wire harness is not interfering with the steering column assembly.
Install the steering column assembly with the bolt and 2 nuts.
- Torque:
- 36 N*m (367 kgf*cm, 27 ft.*lbf)
- NOTICE:
- ·
After the column is installed, check the tilt operation.
·If a large amount of force is required to operate the tilt mechanism or abnormal noise occurs, loosen the nuts and move the bracket forward or backward until the tilt operation works smoothly.
Tighten the nuts and check the tilt operation again.
Connect each connector and engage each wire harness clamp to the steering column assembly.
45220
3.INSTALL STEERING INTERMEDIATE SHAFT ASSEMBLY
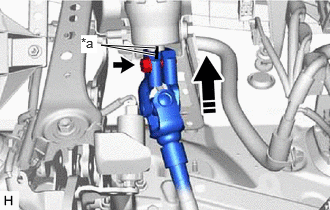
| *a | Matchmark |
Align the matchmarks on the steering intermediate shaft assembly and steering column assembly.
Install the steering intermediate shaft assembly to the steering column assembly.
Install the bolt.
- Torque:
- 35 N*m (357 kgf*cm, 26 ft.*lbf)
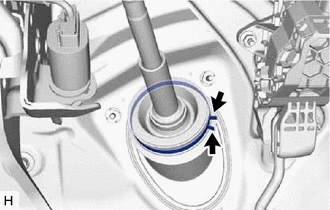
Tighten the clamp.
45253
4.INSTALL STEERING COLUMN HOLE COVER
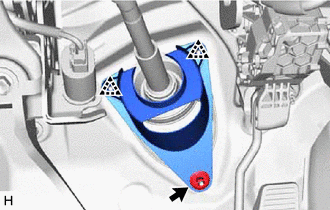
Install the steering column hole cover with the 2 clips.
Install the clip.
Return the floor carpet.
45220
5.CONNECT STEERING INTERMEDIATE SHAFT ASSEMBLY
6.INSTALL FRONT WHEEL LH (for LHD)
7.INSTALL FRONT WHEEL RH (for RHD)
87211A
8.INSTALL NO. 2 AIR DUCT (for LHD)
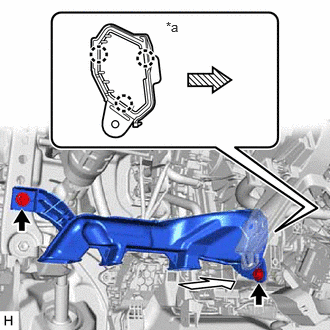
| *a | View A |

|
Front |
Attach the 3 claws to install a new No. 2 air duct.
Install the 2 bolts.
- Torque:
- 9.8 N*m (100 kgf*cm, 87 in.*lbf)
87211A
9.INSTALL NO. 2 AIR DUCT (for RHD)
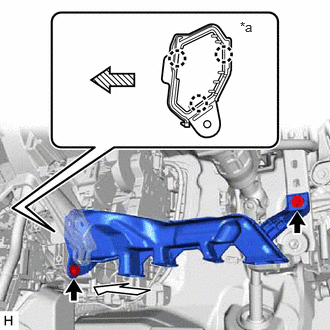
| *a | View A |
|
|
Front |
Attach the 3 claws to install a new No. 2 air duct.
Install the 2 bolts.
- Torque:
- 9.8 N*m (100 kgf*cm, 87 in.*lbf)
10.INSTALL TURN SIGNAL SWITCH ASSEMBLY WITH SPIRAL CABLE SUB-ASSEMBLY
- NOTICE:
- ·
Do not replace the spiral cable with sensor sub-assembly with the battery connected and the ignition switch ON.
·Do not rotate the spiral cable with sensor sub-assembly without the steering wheel assembly installed, with the battery connected and the ignition switch ON.
·Ensure that the steering wheel assembly is installed and aligned straight when inspecting the steering sensor.
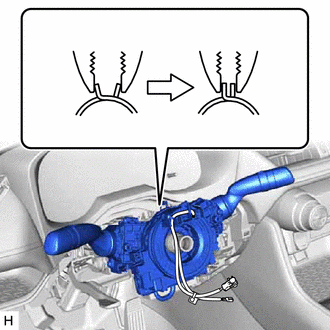
Using pliers, support the band clamp while loosened and set the turn signal switch assembly with spiral cable sub-assembly.
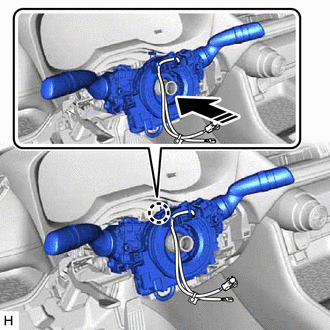

|
Install in this Direction |
Attach the claw to install the turn signal switch assembly with spiral cable sub-assembly to the steering column assembly as shown in the illustration.
Tighten the band clamp.
Connect each connector to the turn signal switch assembly with spiral cable sub-assembly.
45286B
11.INSTALL UPPER STEERING COLUMN COVER
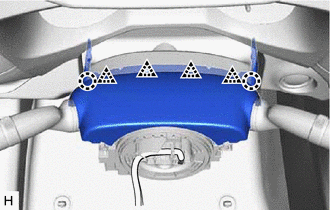
Attach the 2 claws and 4 clips to connect the upper steering column cover.
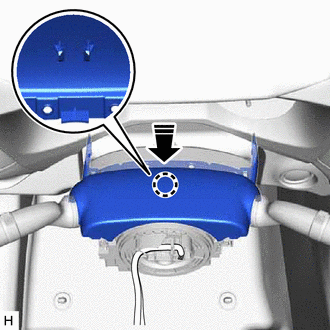
|
|
Install in this Direction |
Attach the claw to install the upper steering column cover.
45024
12.INSTALL LOWER STEERING COLUMN COVER SUB-ASSEMBLY
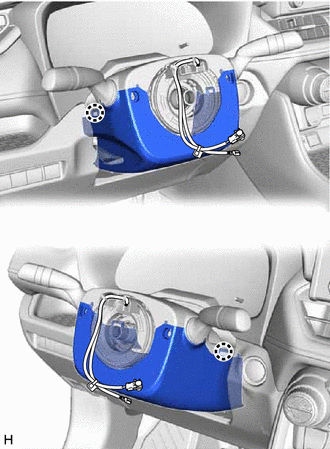
Attach the 2 claws to install the lower steering column cover sub-assembly.
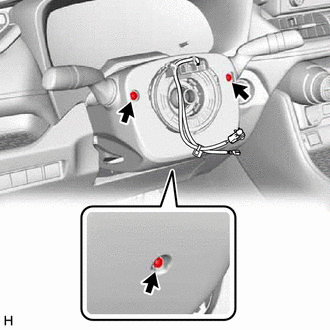
Install the 3 screws.
55410C
13.INSTALL INSTRUMENT CLUSTER FINISH PANEL ASSEMBLY
73900
14.INSTALL LOWER NO. 1 INSTRUMENT PANEL AIRBAG ASSEMBLY
55480D
15.INSTALL LOWER INSTRUMENT PANEL FINISH PANEL ASSEMBLY
55545
16.INSTALL FUSE BOX OPENING COVER
55474B
17.INSTALL INSTRUMENT CLUSTER FINISH PANEL GARNISH
55606
18.INSTALL NO. 1 INSTRUMENT PANEL UNDER COVER SUB-ASSEMBLY
62112
19.INSTALL COWL SIDE TRIM BOARD LH
67914B
20.INSTALL FRONT DOOR SCUFF PLATE LH
21.ALIGN FRONT WHEELS FACING STRAIGHT AHEAD
84306
22.INSPECT AND ADJUST SPIRAL CABLE WITH SENSOR SUB-ASSEMBLY
23.CHECK STEERING WHEEL CENTER POINT
45100
24.INSTALL STEERING WHEEL ASSEMBLY
25.CONNECT CABLE TO NEGATIVE AUXILIARY BATTERY TERMINAL
for A25A-FKS: Click hereGeneral>MAINTENANCE>A25A-FKS BATTERY>INSTALLATION
for M20A-FKS: Click hereGeneral>MAINTENANCE>M20A-FKS BATTERY>INSTALLATION
for A25A-FXS: Click hereGeneral>MAINTENANCE>A25A-FXS AUXILIARY BATTERY>INSTALLATION
for A25B-FXS: Click hereGeneral>MAINTENANCE>A25B-FXS AUXILIARY BATTERY>INSTALLATION
- NOTICE:
-
When disconnecting the cable, some systems need to be initialized after the cable is reconnected.
-
Click hereGeneral>INTRODUCTION>REPAIR INSTRUCTION>INITIALIZATION
65351A
26.INSTALL BATTERY HOLE COVER (for HV Model)
58416K
27.INSTALL REAR NO. 2 FLOOR BOARD (for HV Model)
58410B
28.INSTALL DECK BOARD ASSEMBLY (for HV Model)