BRAKE SYSTEM (OTHER) BRAKE MASTER CYLINDER(for LHD with Vacuum Brake Booster) REMOVAL
CAUTION / NOTICE / HINT
The necessary procedures (adjustment, calibration, initialization or registration) that must be performed after parts are removed and installed, or replaced during brake master cylinder sub-assembly removal/installation are shown below.
| Replaced Part or Performed Procedure | Necessary Procedure | Effect/Inoperative Function when Necessary Procedure not Performed | Link |
|---|---|---|---|
|
*: When performing learning using the GTS. Click here( |
|||
| Battery terminal is disconnected/reconnected | Drive the vehicle until stop and start control is permitted (approximately 5 to 60 minutes) | Stop and start system | for A25A-FKS:
(  ) for M20A-FKS: ( )
|
| Perform steering sensor zero point calibration | Lane control system | ()
|
|
| Parking support brake system (for Gasoline model)* | |||
| Pre-collision system | |||
| Memorize steering angle neutral point | Parking assist monitor system | ()
|
|
| Panoramic view monitor system (for Gasoline model) | ()
|
||
| Reset back door close position | Power back door system (for Gasoline model) | ()
|
|
| Power back door initialization | Power door lock control system | ()
|
|
- NOTICE:
- ·
After the ignition switch is turned off, the navigation system requires approximately a minute to record various types of memory and settings. As a result, after turning the ignition switch off, wait a minute or more before disconnecting the cable from the negative (-) auxiliary battery terminal.
·Make sure to release vacuum from the brake booster assembly before removing the brake master cylinder sub-assembly from the brake booster assembly.
PROCEDURE

 1. PRECAUTION
- NOTICE:
-
After turning the ignition switch off, waiting time may be required before disconnecting the cable from the negative (-) battery terminal. Therefore, make sure to read the disconnecting the cable from the negative (-) battery terminal notices before proceeding with work.
28800
2.REMOVE BATTERY
for A25A-FKS:
for M20A-FKS:
3.REMOVE WINDSHIELD WIPER MOTOR AND LINK ASSEMBLY
55704B
4.REMOVE COWL VENTILATOR PANEL SUB-ASSEMBLY
5.DRAIN BRAKE FLUID
- NOTICE:
-
If brake fluid leaks onto any painted surface, immediately wash it off.
47233
6.REMOVE RESERVOIR BRACKET (w/ Stop And Start System)
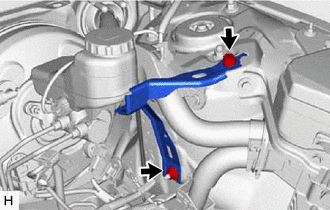
Remove the bolt, nut and reservoir bracket.
31434E
7.DISCONNECT NO. 1 CLUTCH RESERVOIR HOSE (for Manual Transaxle)
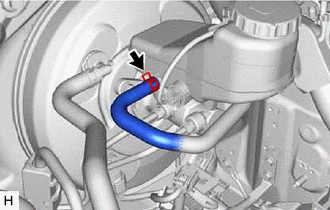
Slide the clip and disconnect the No. 1 clutch reservoir hose from the brake master cylinder reservoir assembly.
47201
8.REMOVE BRAKE MASTER CYLINDER SUB-ASSEMBLY
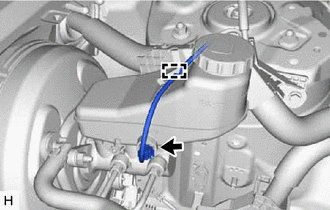
Disengage the clamp and disconnect the connector from the brake master cylinder reservoir assembly.
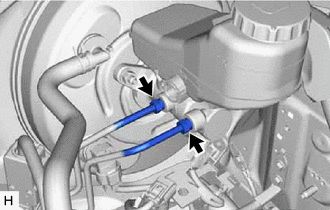
Using a union nut wrench, disconnect the 2 brake lines from the brake master cylinder sub-assembly.
- NOTICE:
- ·
Do not damage or deform the brake lines.
·Do not allow any foreign matter such as dirt or dust to enter the brake lines from the connecting parts.
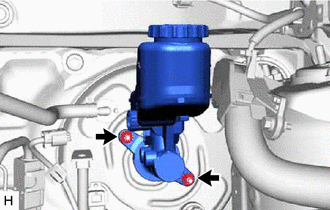
Remove the 2 nuts and brake master cylinder sub-assembly from the brake booster assembly.
- NOTICE:
- ·
The brake master cylinder sub-assembly requires careful handling. Do not drop or subject the brake master cylinder sub-assembly to any impact. Do not reuse a brake master cylinder sub-assembly that has been dropped.
·Do not hold the brake master cylinder sub-assembly by the master cylinder piston. Hold the brake master cylinder sub-assembly by its body when carrying it.
·Do not pull out the master cylinder piston.
·Do not strike or pinch the master cylinder piston, or cause any damage to the master cylinder piston by any other means.
·When installing the brake master cylinder sub-assembly to the brake booster assembly, or when removing the brake master cylinder sub-assembly from the brake booster assembly, make sure that the brake master cylinder sub-assembly is kept horizontal or with its tip facing downward (the master cylinder piston is facing upward) to prevent the master cylinder piston from falling out.
·Do not allow any foreign matter to contaminate the master cylinder piston. If any foreign matter gets on the master cylinder piston, remove it by using a piece of new and dry cloth. Do not use water or detergent. Then apply an even layer of lithium soap base glycol grease around the circumference (sliding part) of the master cylinder piston.
·Do not use any other types of grease.
·Make sure to release vacuum from the brake booster assembly before removing the brake master cylinder sub-assembly from the brake booster assembly.
9.REMOVE BRAKE MASTER CYLINDER O-RING
Remove the brake master cylinder O-ring from the brake master cylinder sub-assembly.