HEATING / AIR CONDITIONING AIR CONDITIONING UNIT(for A25A-FXS) REMOVAL
CAUTION / NOTICE / HINT
The necessary procedures (adjustment, calibration, initialization or registration) that must be performed after parts are removed, installed or replaced during the air conditioning unit assembly removal/installation are shown below.
| Replaced Part or Performed Procedure | Necessary Procedure | Effect/Inoperative Function when Necessary Procedure not Performed | Link |
|---|---|---|---|
|
*: When performing learning using the GTS. Click here( |
|||
| Auxiliary battery terminal is disconnected/reconnected | Perform steering sensor zero point calibration | Lane control system | ( ) |
| Parking support brake system (for HV model)* | |||
| Pre-collision system | |||
| Memorize steering angle neutral point | Parking assist monitor system | ()
|
|
| Panoramic view monitor system (for HV model) | ()
|
||
| Reset back door close position | Power back door system (for HV model) | ()
|
|
| Power back door initialization | Power door lock control system | ()
|
|
| Steering sensor (Including removal and installation) | Steering angle setting | Parking assist monitor system | ()
|
| Adjust steering angle | Panoramic view monitor system (for HV model) | ()
|
|
| Steering angle neutral point | Parking assist monitor system | ()
|
|
| Parking support brake system (for HV model) | ()
|
||
| Panoramic view monitor system (for HV model) | ()
|
||
- CAUTION:
-
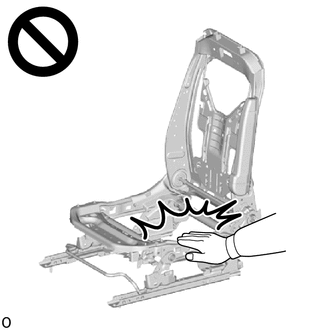
- ·
Wear protective gloves. Sharp areas on the parts may injure your hands.
·There is risk of injury.
- CAUTION:
-
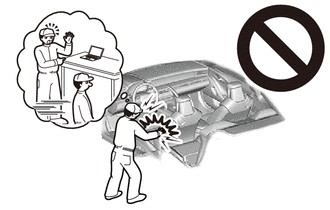
-
Some of these service operations affect the SRS airbag system. Read the precautionary notices concerning the SRS airbag system before servicing.
- ·
for HV Model with Occupant Classification System:
·w/o Occupant Classification System:
- NOTICE:
- ·
After the ignition switch is turned off, the navigation system requires approximately a minute to record various types of memory and settings. As a result, after turning the ignition switch off, wait a minute or more before disconnecting the cable from the negative (-) auxiliary battery terminal.
·After turning the ignition switch off, waiting time may be required before disconnecting the cable from the negative (-) auxiliary battery terminal. Therefore, make sure to read the disconnecting the cable from the negative (-) auxiliary battery terminal notices before proceeding with work.
Click hereGeneral>INTRODUCTION>REPAIR INSTRUCTION>PRECAUTION
- HINT:
- ·
Use the same procedure as for the LHD and RHD vehicles.
·The procedure listed below is for the LHD vehicles.
PROCEDURE

 1. PRECAUTION
- NOTICE:
-
Make sure to select face mode before disconnecting the cable from the negative (-) auxiliary battery terminal.
2. ALIGN FRONT WHEELS FACING STRAIGHT AHEAD
3.RECOVER REFRIGERANT FROM REFRIGERATION SYSTEM
for HFC-134a (R134a):
Click hereVehicle Interior>HEATING / AIR CONDITIONING>REFRIGERANT (for HFC-134a(R134a))>REPLACEMENT
for HFO-1234yf (R1234yf):
Click hereVehicle Interior>HEATING / AIR CONDITIONING>REFRIGERANT (for HFO-1234yf(R1234yf))>REPLACEMENT
4.DRAIN ENGINE COOLANT (for Engine)
5.REMOVE WINDSHIELD WIPER MOTOR AND LINK ASSEMBLY
55752
6.REMOVE COWL VENTILATOR SPLASH SHIELD
- HINT:
-
Remove using the same procedure that is performed when replacement of the cowl ventilator splash shield is necessary.
-
Click hereVehicle Exterior>WIPER / WASHER>FRONT WIPER MOTOR>REMOVAL
55704B
7.REMOVE COWL VENTILATOR PANEL SUB-ASSEMBLY
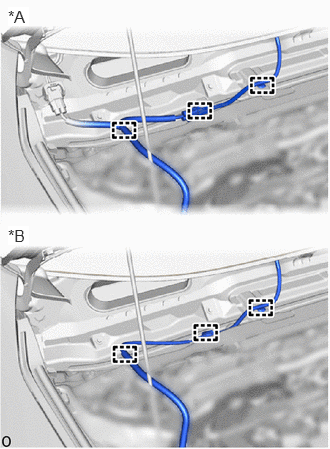
| *A | w/ Heated Windshield Defroster System |
| *B | w/ Windshield Deicer System |
Detach the clamp.
Detach the clamp.
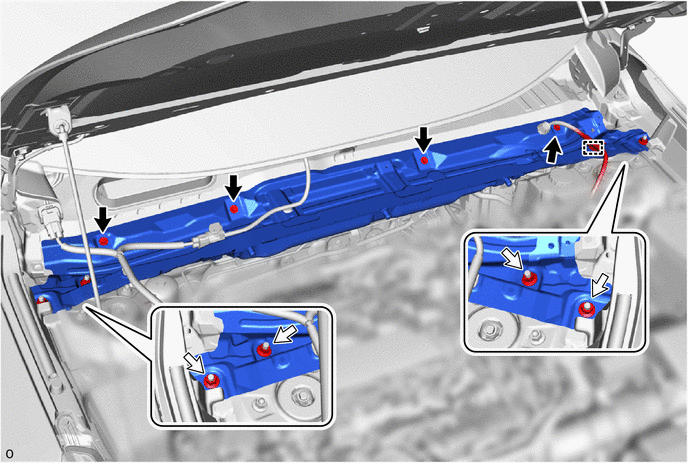

|
Bolt | 
|
Nut |
Remove the 4 bolts, 4 nuts and cowl ventilator panel sub-assembly.
8.REMOVE HOLE PLUG
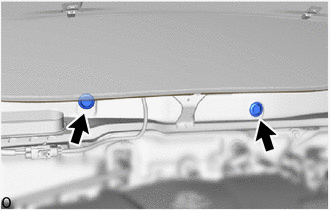
Remove the 2 hole plugs.
88707
9.DISCONNECT SUCTION PIPE SUB-ASSEMBLY
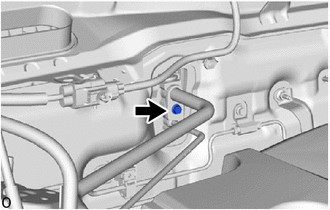
Remove the bolt.
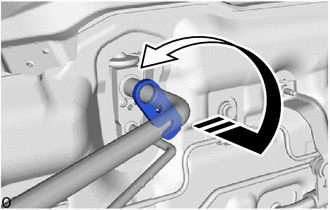

|
Rotate in this Direction |
Rotate the 1-point tightening plate as shown in the illustration.
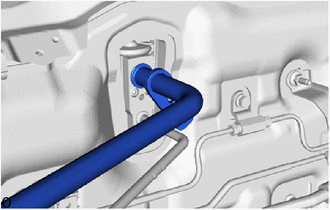
Disconnect the suction pipe sub-assembly.
- NOTICE:
-
Do not apply excessive force to the suction pipe sub-assembly.
Remove the O-ring from the suction pipe sub-assembly.
- NOTICE:
-
Seal the openings of the disconnected parts using vinyl tape to prevent entry of moisture and foreign matter.
88710E
10.DISCONNECT AIR CONDITIONING TUBE AND ACCESSORY ASSEMBLY
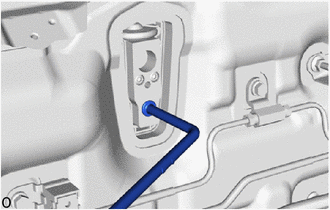
Disconnect the air conditioning tube and accessory assembly.
- NOTICE:
-
Do not apply excessive force to the air conditioning tube and accessory assembly.
Remove the O-ring from the air conditioning tube and accessory assembly.
- NOTICE:
-
Seal the openings of the disconnected parts using vinyl tape to prevent entry of moisture and foreign matter.
87246
11.DISCONNECT OUTLET HEATER WATER HOSE
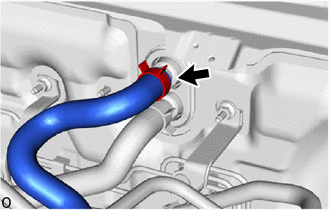
Using pliers, grip the claws of the clip and slide the clip to disconnect the outlet heater water hose.
- NOTICE:
- ·
Do not apply excessive force to the outlet heater water hose.
·Prepare a drain pan or cloth in case the coolant leaks.
87245
12.DISCONNECT INLET HEATER WATER HOSE
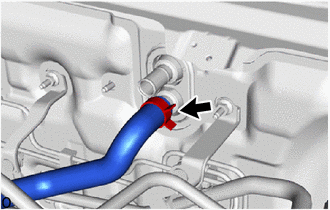
Using pliers, grip the claws of the clip and slide the clip to disconnect the inlet heater water hose.
- NOTICE:
- ·
Do not apply excessive force to the inlet heater water hose.
·Prepare a drain pan or cloth in case the coolant leaks.
87128
13.REMOVE HEATER GROMMET
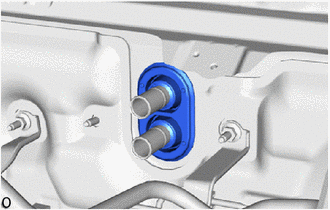
Remove the heater grommet.
14.REMOVE FRONT SEAT ASSEMBLY LH
for Manual Seat:
Click hereVehicle Interior>SEAT>FRONT SEAT ASSEMBLY (for Manual Seat)>REMOVAL
for Power Seat:
Click hereVehicle Interior>SEAT>FRONT SEAT ASSEMBLY (for Power Seat)>REMOVAL
15.REMOVE FRONT SEAT ASSEMBLY RH
- HINT:
-
Use the same procedure as for the LH side.
16.REMOVE INSTRUMENT PANEL SAFETY PAD ASSEMBLY
45250
17.REMOVE STEERING COLUMN ASSEMBLY
18.REMOVE NAVIGATION ECU WITH BRACKET (w/ Navigation System)
19.REMOVE TELEPHONE TRANSCEIVER ASSEMBLY WITH BRACKET (w/ Telematics Transceiver)
for LHD:
Click hereAudio / Visual / Telematics>TELEMATICS>TELEMATICS TRANSCEIVER>REMOVAL
for RHD:
Click hereAudio / Visual / Telematics>TELEMATICS>TELEMATICS TRANSCEIVER>REMOVAL
20.REMOVE NAVIGATION ECU WITH BRACKET (w/ Dummy Case)
- HINT:
-
Use the same procedure described as for the navigation ECU with bracket or telephone transceiver assembly with bracket.
73233
21.REMOVE OUTER LAP BELT ANCHOR COVER
67918E
22.REMOVE REAR DOOR SCUFF PLATE LH
73220
23.REMOVE FRONT SEAT OUTER BELT ASSEMBLY LH
62414A
24.REMOVE LOWER CENTER PILLAR GARNISH LH
Remove the rear side of the front door opening trim weatherstrip LH so that the lower center pillar garnish LH can be removed.
Click hereVehicle Exterior>DOOR / HATCH>FRONT DOOR OPENING TRIM WEATHERSTRIP>REMOVAL
Remove the front side of the rear door opening trim weatherstrip LH so that the lower center pillar garnish LH can be removed.
Click hereVehicle Exterior>DOOR / HATCH>REAR DOOR OPENING TRIM WEATHERSTRIP>REMOVAL
Remove the lower center pillar garnish LH.
Click hereVehicle Interior>INTERIOR PANELS / TRIM>ROOF HEADLINING>REMOVAL
67917C
25.REMOVE REAR DOOR SCUFF PLATE RH
- HINT:
-
Use the same procedure described as for the rear door scuff plate LH.
73210
26.REMOVE FRONT SEAT OUTER BELT ASSEMBLY RH
- HINT:
-
Use the same procedure described as for the front seat outer belt assembly LH.
62413A
27.REMOVE LOWER CENTER PILLAR GARNISH RH
- HINT:
-
Use the same procedure described as for the lower center pillar garnish LH.
78118
28.REMOVE ACCELERATOR PEDAL PAD
78010F
29.REMOVE ACCELERATOR PEDAL ASSEMBLY
58569D
30.REMOVE FRONT FLOOR CAUTION PLATE COVER
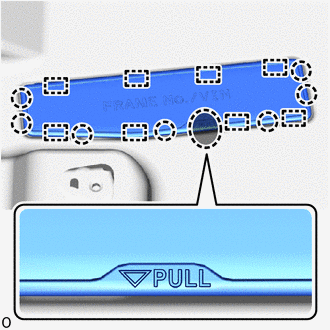

|
Place Finger Here |
Place your fingers at the positions shown in the illustration, detach the claw and guide and open the front floor caution plate cover.
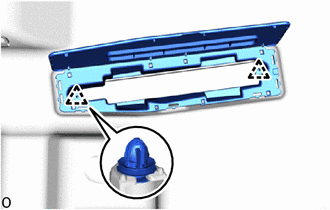
Detach the clip and remove the front floor caution plate cover.
58510C
31.REMOVE FRONT FLOOR FRONT CARPET ASSEMBLY
for LHD:
Remove the clip.
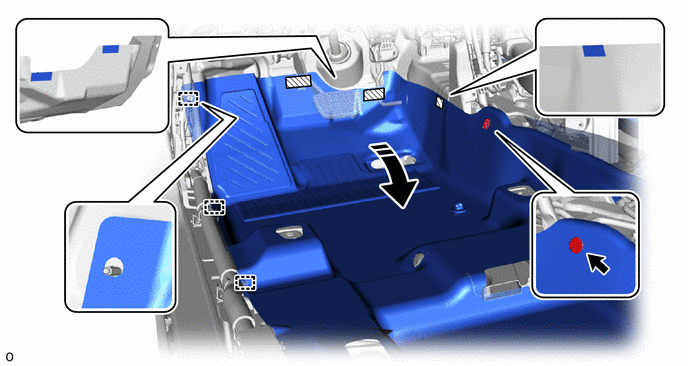
|
|
Fold Back | 
|
Fastener |
Detach the guide.
Detach each fastener and fold back the front floor front carpet assembly as shown in the illustration.
Remove the clip.
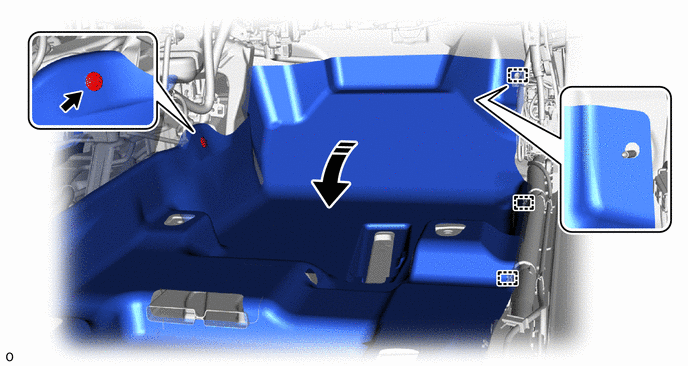
|
|
Fold Back | - | - |
Detach the guide and fold back the front floor front carpet assembly as shown in the illustration.
for RHD:
Remove the clip.
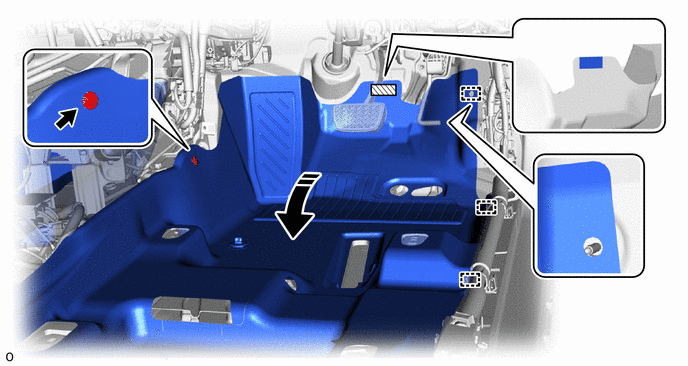
|
|
Fold Back |
|
Fastener |
Detach the guide.
Detach the fastener and fold back the front floor front carpet assembly as shown in the illustration.
Remove the clip.
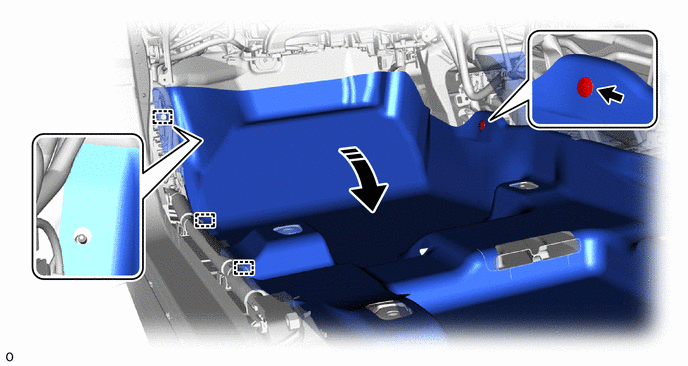
|
|
Fold Back | - | - |
Detach the guide and fold back the front floor front carpet assembly as shown in the illustration.
55215D
32.REMOVE NO. 3 DASH PANEL INSULATOR PAD
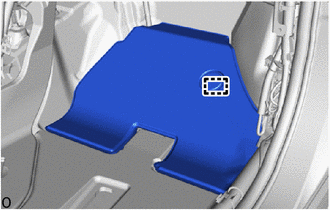
Detach the guide and remove the No. 3 dash panel insulator pad.
87212H
33.REMOVE REAR NO. 4 AIR DUCT
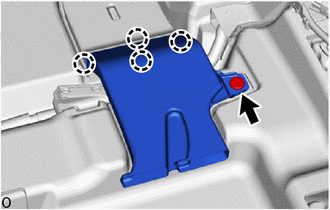
Remove the clip.
Detach the claw and remove the rear No. 4 air duct.
87212G
34.REMOVE REAR NO. 3 AIR DUCT
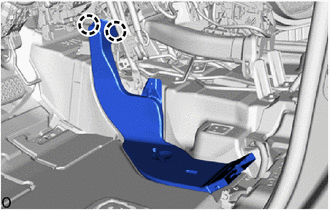
Detach the claw and remove the rear No. 3 air duct.
87212F
35.REMOVE REAR NO. 2 AIR DUCT
- HINT:
-
Use the same procedure described as for the rear No. 4 air duct.
87212
36.REMOVE REAR NO. 1 AIR DUCT
- HINT:
-
Use the same procedure described as for the rear No. 3 air duct.
58861B
37.REMOVE NO. 1 CONSOLE BOX DUCT
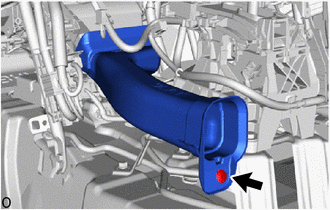
Remove the clip and No. 1 console box duct.
55085
38.REMOVE NO. 2 HEATER TO REGISTER DUCT SUB-ASSEMBLY
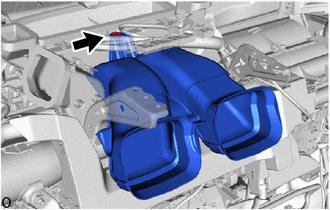
Remove the clip and No. 2 heater to register duct sub-assembly.
55308B
39.REMOVE NO. 3 INSTRUMENT PANEL TO COWL BRACE SUB-ASSEMBLY
for LHD:
Click herePower Source / Network>POWER DISTRIBUTION>MAIN BODY ECU (for LHD)>REMOVAL
for RHD:
Click herePower Source / Network>NETWORKING>NETWORK GATEWAY ECU (for RHD)>REMOVAL
40.REMOVE INSTRUMENT PANEL JUNCTION BLOCK ASSEMBLY WITH MAIN BODY ECU (for LHD)
82877
41.REMOVE ECU INTEGRATION BOX RH (for RHD)
42.DISCONNECT INSTRUMENT PANEL WIRE
for LHD:
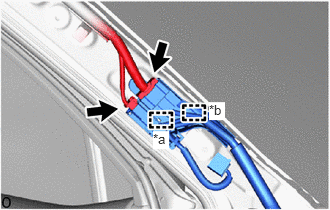
| *a | Clamp |
| *b | Guide |
Disconnect the 2 connectors.
Detach the clamp and guide.
Remove the 3 bolts.
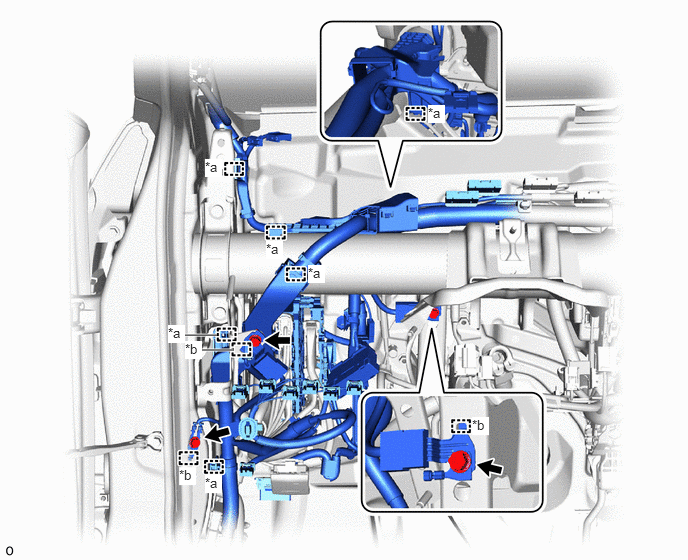
| *a | Clamp | *b | Guide |
Detach the guide and disconnect the 3 ground wires.
Detach the clamp.
Remove the nut.
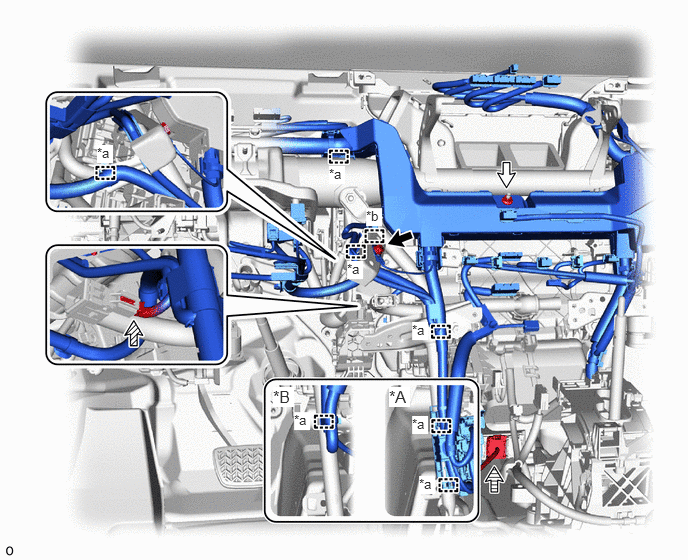
| *A | for Type A | *B | for Type B |
| *a | Clamp | *b | Guide |
|
|
Bolt |
|
Nut |

|
Connector | 
|
Lever Connector |
Remove the bolt.
Detach the guide and disconnect the ground wire.
Disconnect the connector.
Detach the clamp.
Disconnect the lever connector.
Click hereVehicle Interior>SUPPLEMENTAL RESTRAINT SYSTEMS>CENTER AIRBAG SENSOR ASSEMBLY>REMOVAL
for RHD:
Remove the 2 bolts.
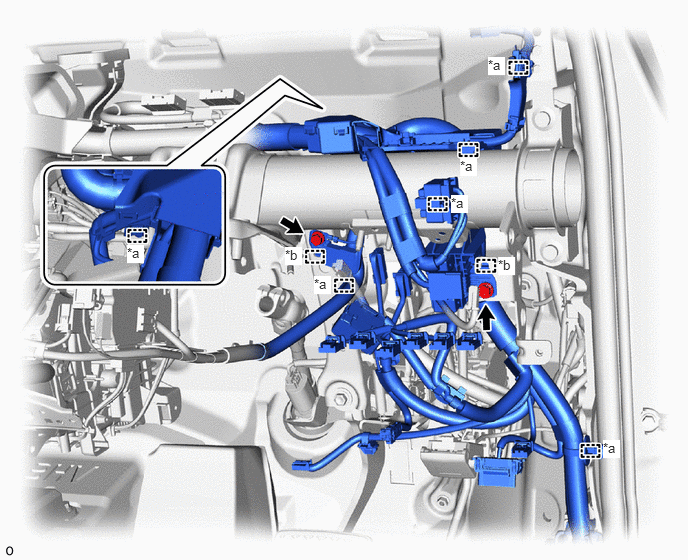
| *a | Clamp | *b | Guide |
Detach the guide and disconnect the 2 ground wires.
Detach the clamp.
Remove the nut.
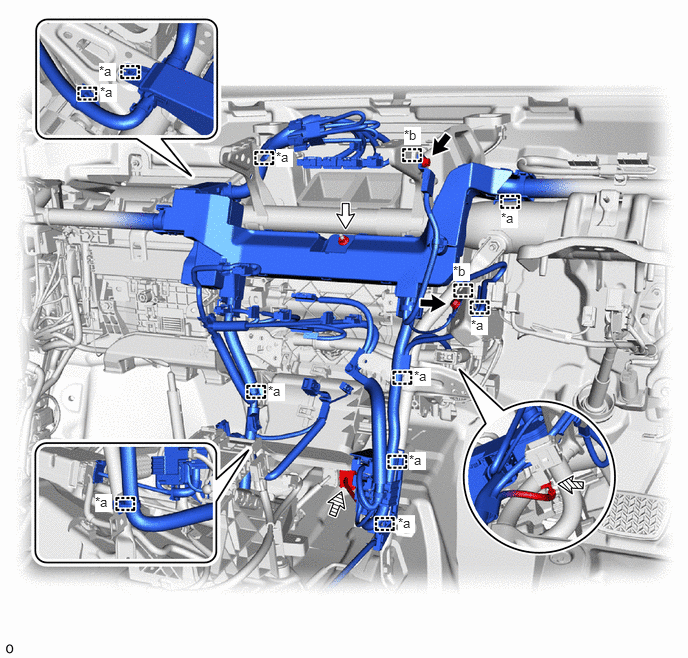
| *a | Clamp | *b | Guide |
|
|
Bolt |
|
Nut |
|
|
Connector |
|
Lever Connector |
Remove the 2 bolts.
Detach the guide and disconnect the 2 ground wires.
Disconnect the connector.
Detach the clamp.
Disconnect the lever connector.
Click hereVehicle Interior>SUPPLEMENTAL RESTRAINT SYSTEMS>CENTER AIRBAG SENSOR ASSEMBLY>REMOVAL
82877
43.REMOVE ECU INTEGRATION BOX RH (for LHD)
89981
44.REMOVE HYBRID VEHICLE CONTROL ECU ASSEMBLY (for RHD)
45.REMOVE INSTRUMENT PANEL JUNCTION BLOCK ASSEMBLY WITH MAIN BODY ECU (for RHD)
46.DISCONNECT INSTRUMENT PANEL WIRE
for LHD:
Remove the 2 bolts.
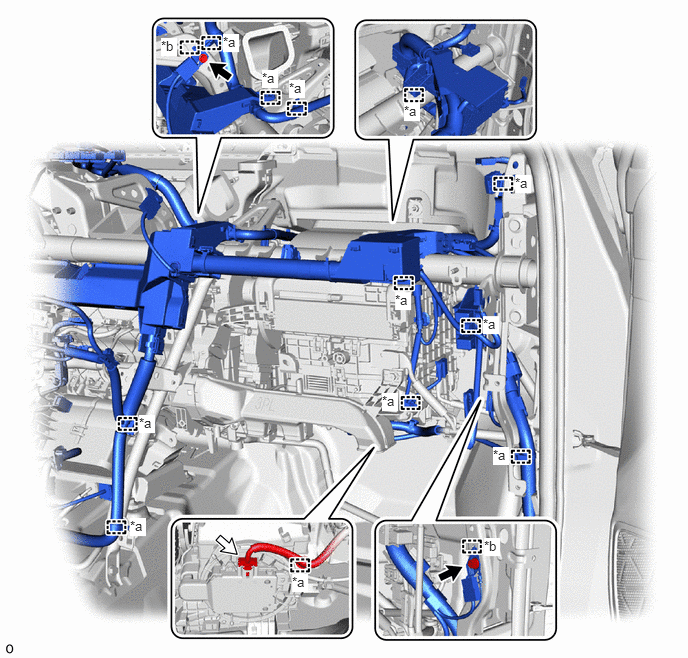
| *a | Clamp | *b | Guide |
|
|
Bolt |
|
Connector |
Detach the guide and disconnect the 2 ground wires.
Disconnect the connector.
Detach the clamp.
for RHD:
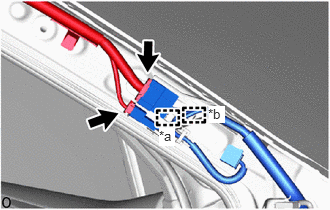
| *a | Clamp |
| *b | Guide |
Disconnect the 2 connectors.
Detach the clamp and guide.
Remove the 2 bolts.
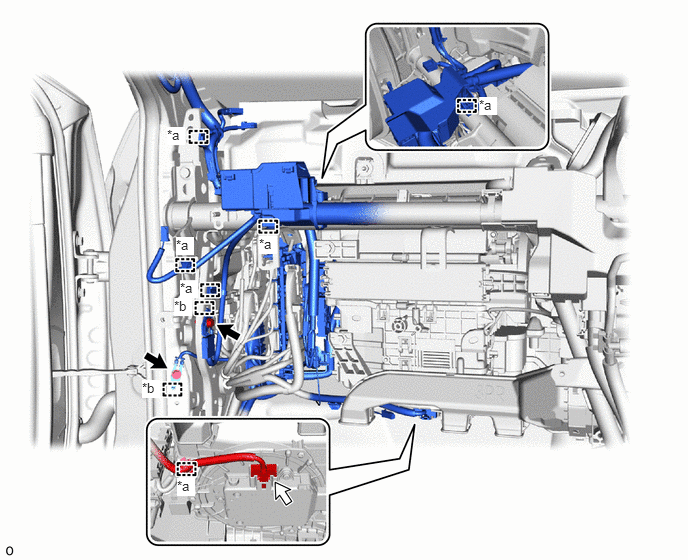
| *a | Clamp | *b | Guide |
|
|
Bolt |
|
Connector |
Detach the guide and disconnect the 2 ground wires.
Disconnect the connector.
Detach the clamp.
55306A
47.REMOVE NO. 1 INSTRUMENT PANEL BRACE SUB-ASSEMBLY
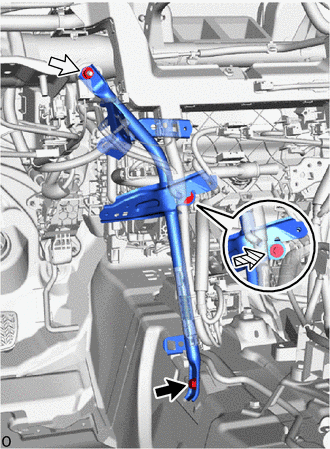
|
|
Bolt |
|
|
Nut |
|
|
Screw |
Remove the bolt, nut, screw and No. 1 instrument panel brace sub-assembly.
55307C
48.REMOVE NO. 2 INSTRUMENT PANEL BRACE SUB-ASSEMBLY
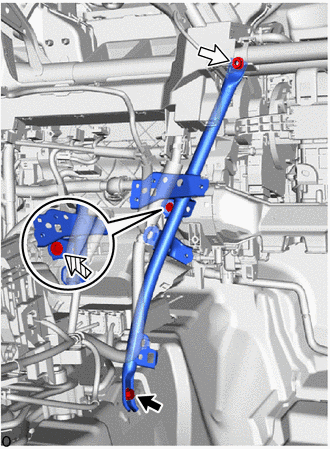
|
|
Bolt |
|
|
Nut |
|
|
Screw |
Remove the bolt, nut, screw and No. 2 instrument panel brace sub-assembly.
88539J
49.DISCONNECT DRAIN COOLER HOSE
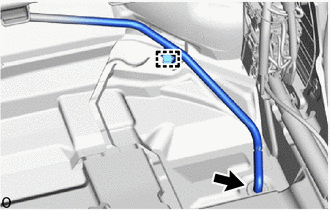
Detach the clamp.
Disconnect the drain cooler hose from the cooler unit drain hose grommet.
- NOTICE:
-
If the cooler unit drain hose grommet was removed from the body, replace it with a new one.
50.REMOVE INSTRUMENT PANEL REINFORCEMENT ASSEMBLY WITH AIR CONDITIONING UNIT ASSEMBLY
- NOTICE:
- ·
Be sure to support the air conditioning unit assembly when removing it because failure to do so may cause the bracket of the air conditioning unit assembly to break.
·When disassembling the air conditioning unit assembly, eliminate static electricity by touching the vehicle body to prevent the components from being damaged.
·Be careful not to damage the internal components of the instrument panel reinforcement assembly with air conditioning unit assembly on the glass etc. Only perform removal after first taking the appropriate actions.
·Do not allow the instrument panel reinforcement assembly with air conditioning unit assembly to strike the airbag sensor assembly. Doing so may damage the heater case, causing water leaks.
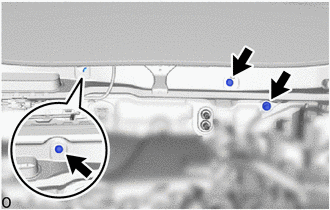
|
|
Bolt (A) |
Remove the 3 bolts (A).
Remove the bolt (B).
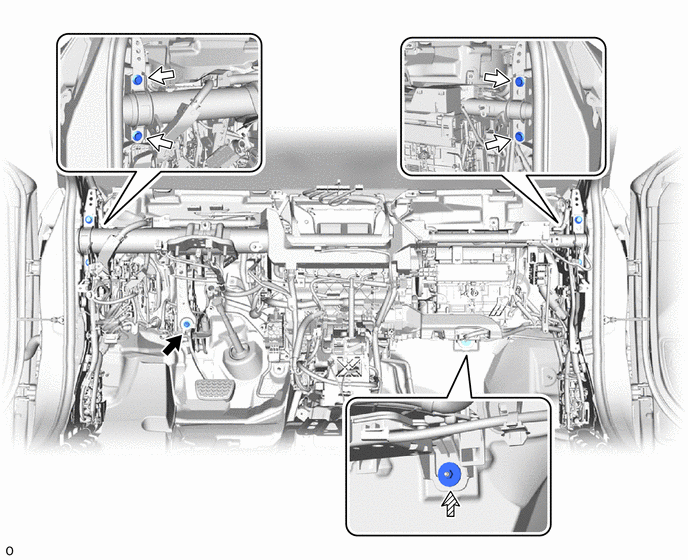
|
|
Bolt (B) |
|
Bolt (C) |
|
|
Nut | - | - |
Remove the nut.
Remove the 4 bolts (C).
Remove the instrument panel reinforcement assembly with air conditioning unit assembly from the guide as shown in the illustration.
- NOTICE:
- When carrying the instrument panel reinforcement assembly with air conditioning unit assembly, hold the bottom of the assembly. Do not hold the following parts.
- ·
Do not hold the air conditioning harness assembly. Otherwise, static electricity from the technician may damage the air conditioning harness assembly.
·Do not hold the heater core or pipe of the heater radiator unit sub-assembly. Otherwise, the pipe may detach, the clamp may be damaged, or the crimped areas of the heater core and pipe of the heater radiator unit sub-assembly may be damaged, causing coolant to leak.
·Do not hold the air conditioning radiator damper servo sub-assembly, blower damper servo sub-assembly or link. Otherwise, the servo motor may become misaligned, causing abnormal operation noise, temperature control defects, or air leaks due to sealing defects in the doors.
·Do not hold the door. Doing so may cause air leaks due to closing defects resulting from excessive opening/closing. Also, keep the door free from oil and grease.
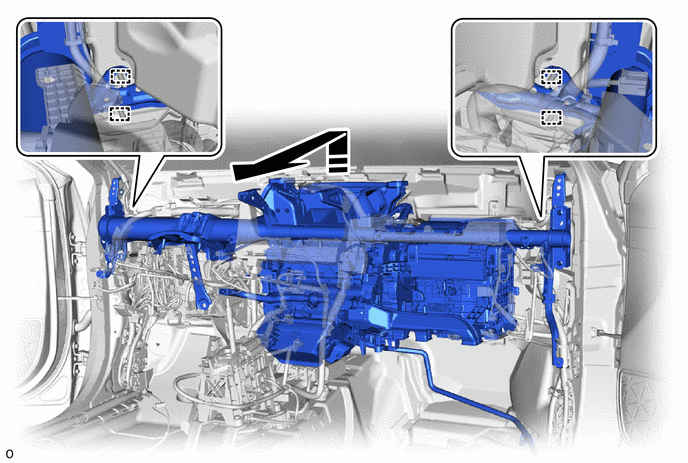
|
|
Remove in this Direction | - | - |
88650N
51.REMOVE AIR CONDITIONING AMPLIFIER ASSEMBLY
52.DISCONNECT INSTRUMENT PANEL WIRE
for LHD:
Disconnect the connector.
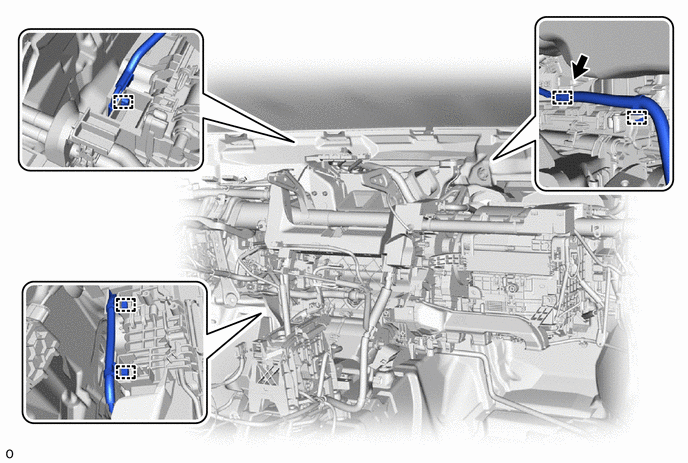
Detach the clamp.
for RHD:
Disconnect the connector.
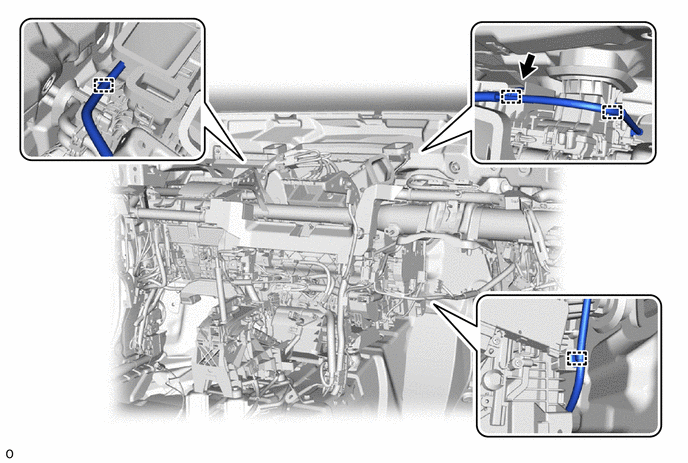
Detach the clamp.
53.REMOVE AIR CONDITIONING UNIT ASSEMBLY
- NOTICE:
- ·
Be sure to support the air conditioning unit assembly when removing it because failure to do so may cause the bracket of the air conditioning unit assembly to break.
·When disassembling the air conditioning unit assembly, eliminate static electricity by touching the vehicle body to prevent the components from being damaged.
·Be careful not to damage the internal components of the instrument panel reinforcement assembly and air conditioning unit assembly on the glass etc. Only perform removal after first taking the appropriate actions.
·Store the air conditioning unit assembly in a location free from sand and other foreign matter.
Remove the 3 bolts and air conditioning unit assembly from the instrument panel reinforcement assembly.
- NOTICE:
- When carrying the air conditioning unit assembly, hold the bottom of the assembly. Do not hold the following parts.
- ·
Do not hold the air conditioning harness assembly. Otherwise, static electricity from the technician may damage the air conditioning harness assembly.
·Do not hold the heater core or pipe of the heater radiator unit sub-assembly. Otherwise, the pipe may detach, the clamp may be damaged, or the crimped areas of the heater core and pipe of the heater radiator unit sub-assembly may be damaged, causing coolant to leak.
·Do not hold the air conditioning radiator damper servo sub-assembly, blower damper servo sub-assembly or link. Otherwise, the servo motor may become misaligned, causing abnormal operation noise, temperature control defects, or air leaks due to sealing defects in the doors.
·Do not hold the door. Doing so may cause air leaks due to closing defects resulting from excessive opening/closing. Also, keep the door free from oil and grease.
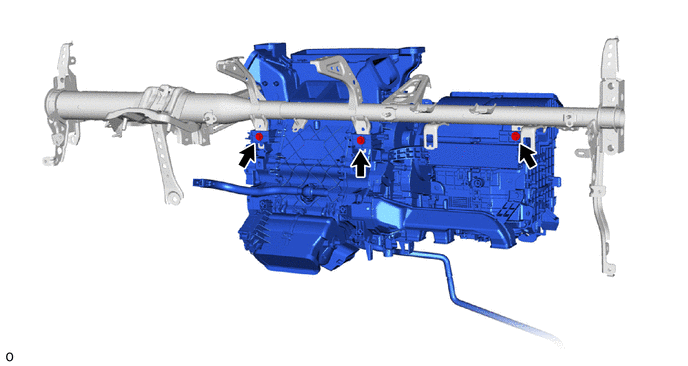
87201
54.REMOVE NO. 1 AIR DUCT SUB-ASSEMBLY
- HINT:
-
Perform this procedure only when replacement of the No. 1 air duct sub-assembly is necessary.
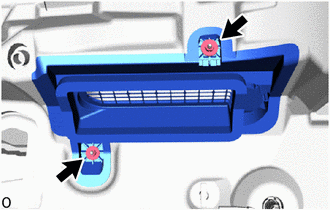
Remove the 2 nuts and No. 1 air duct sub-assembly.
58511K
55.REMOVE NO. 1 FLOOR MAT (for RHD)
- HINT:
-
Perform this procedure only when replacement of the cooler unit drain hose grommet is necessary.
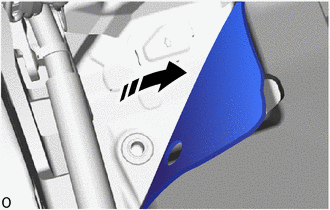
|
|
Fold Back |
Partially fold back the No. 1 floor mat as shown in the illustration.
88539G
56.REMOVE COOLER UNIT DRAIN HOSE GROMMET
- HINT:
-
Perform this procedure only when replacement of the cooler unit drain hose grommet is necessary.
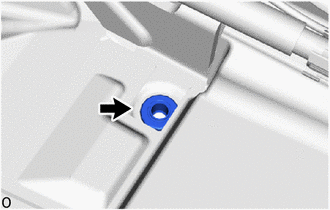
Remove the cooler unit drain hose grommet.
- NOTICE:
-
After removing the cooler unit drain hose grommet, replace it with a new one to prevent water from entering.