M20A-FKS ENGINE MECHANICAL REAR CRANKSHAFT OIL SEAL REMOVAL
CAUTION / NOTICE / HINT
The necessary procedures (adjustment, calibration, initialization, or registration) that must be performed after parts are removed and installed, or replaced during engine assembly removal/installation are shown below.
| Replaced Part or Performed Procedure | Necessary Procedure | Effect/Inoperative Function when Necessary Procedure not Performed | Link |
|---|---|---|---|
|
*1: When performing learning using the GTS. Click here( *2: w/ Gasoline Particulate Filter |
|||
| Battery terminal is disconnected/reconnected | Drive the vehicle until stop and start control is permitted (approximately 5 to 60 minutes) | Stop and start system | ( ) |
| Perform steering sensor zero point calibration | Lane control system | ()
|
|
| Parking support brake system (for Gasoline model)*1 | |||
| Pre-collision system | |||
| Memorize steering angle neutral point | Parking assist monitor system | ()
|
|
| Panoramic view monitor system (for Gasoline model) | ()
|
||
| Reset back door close position | Power back door system (for Gasoline model) | ()
|
|
| Power back door initialization | Power door lock control system | ()
|
|
| Replacement of ECM | Vehicle Identification Number (VIN) registration | DTC P063051 is output | ()
|
| ECU communication ID registration | Engine start function | See Service Bulletin for the registration method. | |
| Perform code registration (Immobiliser function) | ·
Wireless door lock control system ·
Smart entry and start system (for Entry Function) ·
smart entry and start system (for Start Function) ·
Steering lock function |
||
for K120, K120F:
If transaxle compensation code read from ECM -
Perform reset memory -
Transfer transaxle compensation code -
Perform road test to allow ECM to learn |
·
Large shift shock ·
Deterioration of fuel efficiency |
for K120:()
for K120F:( )
|
|
GPF Deposition Values*2 -
GPF deposition values save -
GPF deposition values write |
·
MIL comes on ·
Deterioration of fuel efficiency |
()
|
|
·
Replacement of engine assembly ·
Gas leak from exhaust system is repaired |
Inspection after repair | ·
Poor idle, etc. ·
Engine start function, etc. |
()
|
| Front exhaust pipe assembly*2 | GPF deposition value clear | ·
MIL comes on ·
Deterioration of fuel efficiency |
()
|
| Replacement of continuously variable transaxle assembly | for K120, K120F:
·
Perform reset memory ·
Deceleration sensor zero point calibration ·
CVT oil pressure calibration ·
Perform road test to allow TCM to learn |
·
Large shift shock ·
Deterioration of fuel efficiency |
for K120:()
for K120F:( )
|
| Replacement of CVT fluid | Air bleed oil pump with motor assembly | Stop and start system | ()
|
| ATF thermal degradation estimate reset | The value of the Data List item "ATF Thermal Degradation Estimate" is not estimated correctly | for K120:()
for K120F:( )
|
|
| Replacement of front bumper assembly | ·
Ultrasonic sensor detection angle ·
Ultrasonic sensor detection angle registration |
Parking support brake system | ()
|
| Front television camera view adjustment | Panoramic view monitor system | ()
|
|
| Front wheel alignment adjustment | Perform system variant learning and acceleration sensor zero point calibration. | ·
VSC disabled or malfunctioning ·
DTCs are output ·
Slip indicator light illuminated ·
ABS warning light illuminated |
()
|
- NOTICE:
-
This procedure includes the removal of small-head bolts. Refer to Small-Head Bolts of Basic Repair Hint to identify the small-head bolts.
-
Click hereGeneral>INTRODUCTION>REPAIR INSTRUCTION>PRECAUTION
PROCEDURE

 30300
1.REMOVE MANUAL TRANSAXLE ASSEMBLY (for Manual Transaxle)
for 4WD/AWD:
Click hereDrivetrain>EG62F (MANUAL TRANSMISSION / TRANSAXLE)>MANUAL TRANSAXLE ASSEMBLY>REMOVAL
30400
2.REMOVE CONTINUOUSLY VARIABLE TRANSAXLE ASSEMBLY
for 4WD/AWD:
Click hereDrivetrain>K120F (MULTIDRIVE / CVT)>CONTINUOUSLY VARIABLE TRANSAXLE ASSEMBLY>REMOVAL
31210
3.REMOVE CLUTCH COVER ASSEMBLY (for Manual Transaxle)
Click hereDrivetrain>CLUTCH>CLUTCH UNIT>REMOVAL
31250
4.REMOVE CLUTCH DISC ASSEMBLY (for Manual Transaxle)
Click hereDrivetrain>CLUTCH>CLUTCH UNIT>REMOVAL
13405
5.REMOVE FLYWHEEL SUB-ASSEMBLY (for Manual Transaxle)
Using height adjustment attachments and plate lift attachments, place the engine assembly on a flat level surface.
- NOTICE:
- ·
Using height adjustment attachments and plate lift attachments, keep the engine assembly level.
·To prevent the No. 2 oil pan sub-assembly from deforming, do not place any attachments under the No. 2 oil pan sub-assembly of the engine assembly.
·Using an engine sling device and engine lift, secure the engine assembly before servicing.
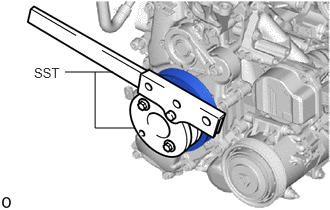
Using SST, hold the crankshaft pulley assembly.
- SST
- 09213-54015
09330-00021
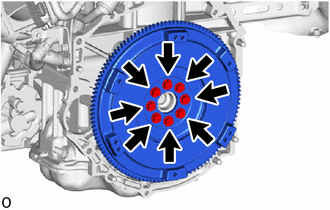
Remove the 8 bolts and flywheel sub-assembly.
32101B
6.REMOVE DRIVE PLATE AND RING GEAR SUB-ASSEMBLY
Using height adjustment attachments and plate lift attachments, place the engine assembly on a flat level surface.
- NOTICE:
- ·
Using height adjustment attachments and plate lift attachments, keep the engine assembly level.
·To prevent the No. 2 oil pan sub-assembly from deforming, do not place any attachments under the No. 2 oil pan sub-assembly of the engine assembly.
·Using an engine sling device and engine lift, secure the engine assembly before servicing.
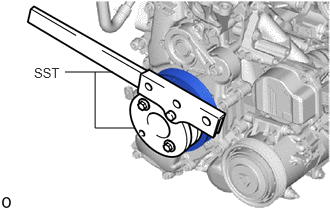
Using SST, hold the crankshaft pulley assembly.
- SST
- 09213-54015
09330-00021
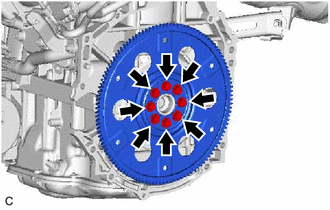
Remove the 8 bolts, rear drive plate spacer, drive plate and ring gear sub-assembly.
19315
7.REMOVE NO. 1 CRANKSHAFT POSITION SENSOR PLATE
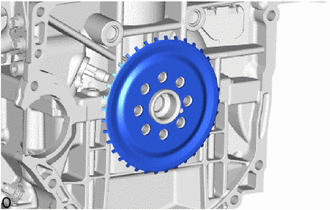
Remove the No. 1 crankshaft position sensor plate.
11401L
8.REMOVE REAR ENGINE OIL SEAL
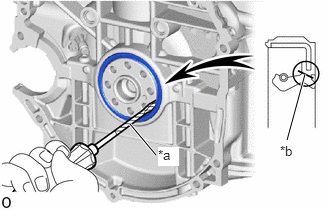
| *a | Protective Tape |
| *b | Cut Position |
Using a knife, cut off the lip of the rear engine oil seal.
Using a screwdriver, pry out the rear engine oil seal.
- NOTICE:
-
Do not damage the surface of the rear engine oil seal press fit hole or the crankshaft.
- HINT:
-
Tape the screwdriver tip before use.