SFI SYSTEM > EVAP System |
| DTC No. | Monitoring Item | See page |
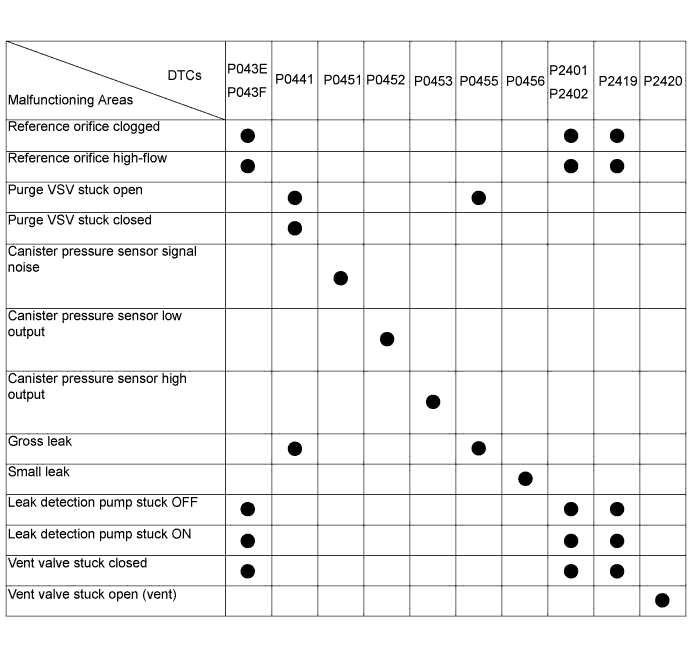
| P043E | Reference orifice clogged (built into canister pump module) |
Click here
|
| P043F | Reference orifice high-flow (built into canister pump module) | |
| P0441 |
|
Click here
|
| P0451 | Canister pressure sensor (built into canister pump module) noise |
Click here
|
| P0452 | Canister pressure sensor (built into canister pump module) voltage low | |
| P0453 | Canister pressure sensor (built into canister pump module) voltage high | |
| P0455 | EVAP gross leak |
Click here
|
| P0456 | EVAP small leak | |
| P2401 | Leak detection pump stuck OFF (built into canister pump module) |
Click here
|
| P2402 | Leak detection pump stuck ON (built into canister pump module) | |
| P2419 | Vent valve stuck closed (built into canister pump module) |
Click here
|
| P2420 | Vent valve stuck open (vent) (built into canister pump module) |
Click here
|
| P2610 | Soak timer (built into ECM) |
Click here
|
| Key-off monitor |
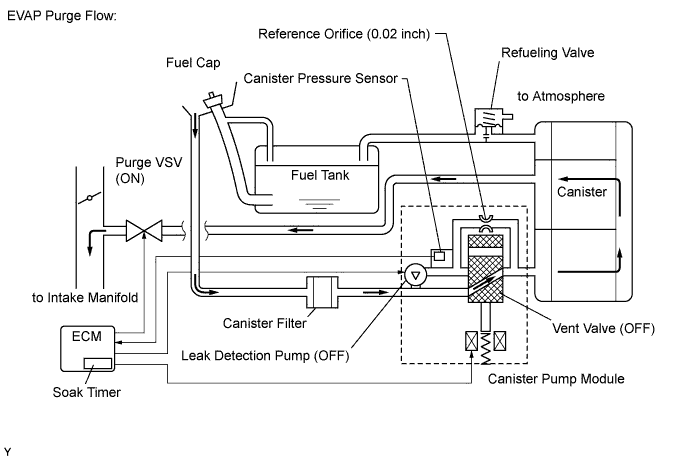
| Purge flow monitor |
| Component | Operation |
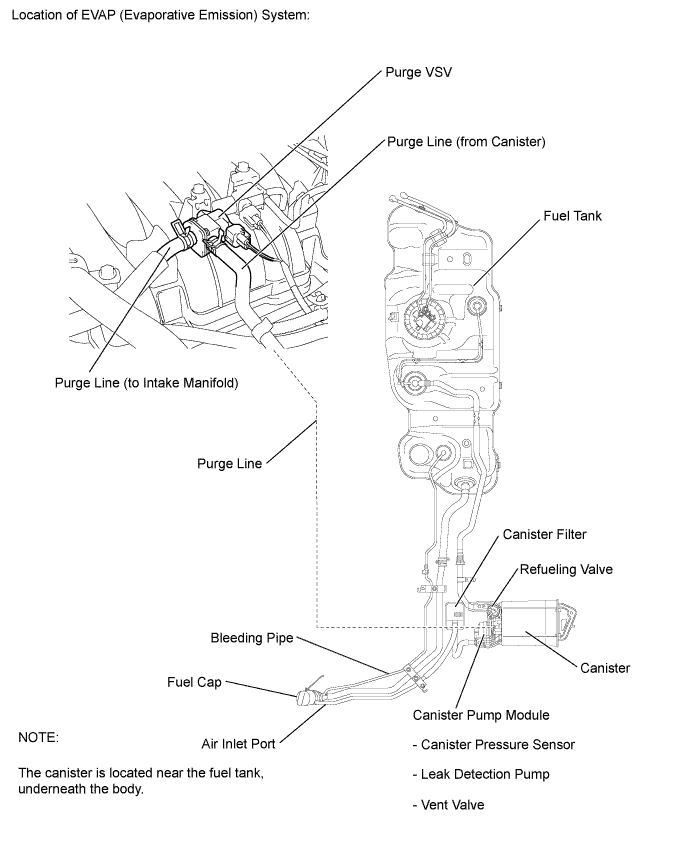
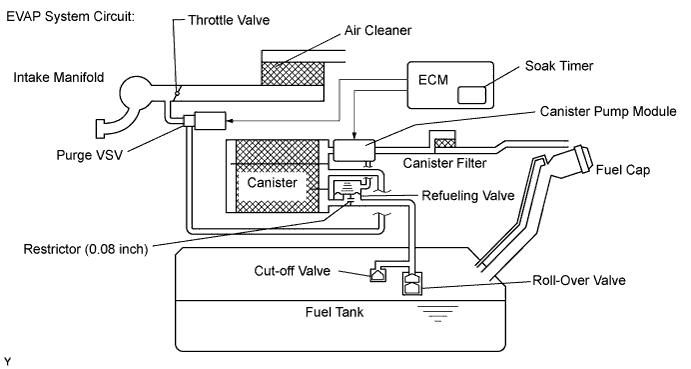
| Canister | Contains activated charcoal to absorb EVAP (Evaporative Emissions) generated in fuel tank. |
| Cut-off valve | Located in fuel tank. Valve floats and closes when fuel tank 100% full. |
| Purge VSV (Vacuum Switching Valve) | Opens or closes line between canister and intake manifold. ECM uses purge VSV to control EVAP purge flow. In order to discharge EVAP absorbed by canister to intake manifold, ECM opens purge VSV. EVAP discharge volume to intake manifold controlled by purge VSV duty cycle ratio (current-carrying time) (Open: ON; Closed: OFF). |
| Refueling valve | Controls EVAP pressure from fuel tank to canister. Valve consists of diaphragm, spring and restrictor (diameter: 0.08 inches). When fuel vapor and pressure inside fuel tank increase, valve opens. While EVAP purged, valve closes and restrictor prevents large amount of vacuum from affecting pressure in fuel tank. Valve opened while refueling. |
| Roll-over valve | Located in fuel tank. Valve closed by its own weight when vehicle overturns to prevent fuel from spilling out. |
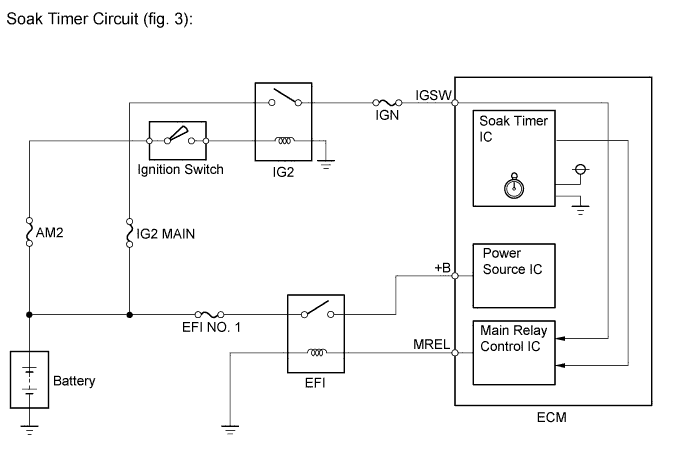
| Soak timer | Built into ECM. To ensure accurate EVAP monitor, measures 5 hours (+/-15 min) after ignition switch turned off. This allows fuel to cool down, stabilizing EVAP pressure. When approximately 5 hours elapsed, ECM activates (refer to fig. 3). |
| Canister pump module | Consists of (a) to (d) below. Canister pump module cannot be disassembled. |
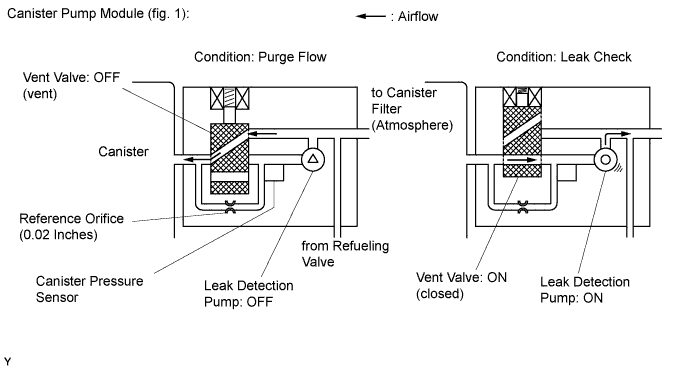
| (a) Vent valve | Vents and closes EVAP system. When ECM turns valve ON, EVAP system closed. When ECM turns valve OFF, EVAP system vented. Negative pressure (vacuum) created in EVAP system to check for EVAP leaks by closing purge VSV, turning on vent valve (closed) and operating leak detection pump (refer to fig. 1). |
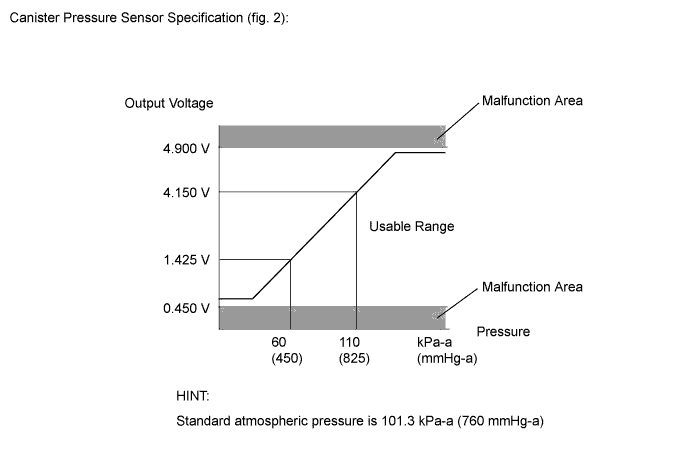
| (b) Canister pressure sensor | Indicates pressure as voltages. ECM supplies regulated 5 V to canister pressure sensor, and uses feedback from sensor to monitor EVAP system pressure (refer to fig. 2). |
| (c) Leak detection pump | Creates negative pressure (vacuum) in EVAP system for leak check. |
| (d) Reference orifice | Has opening with 0.02 inch diameter. Vacuum produced through orifice by closing purge VSV, turning off vent valve and operating leak detection pump to monitor reference pressure. Reference pressure indicates small leak of EVAP. |
| 1.CONFIRM DTC |
Turn the ignition switch off and wait for 10 seconds.
Turn the ignition switch to ON.
Turn the ignition switch off and wait for 10 seconds.
Connect the Techstream to the DLC3.
Turn the ignition switch to ON.
Turn the Techstream on.
Enter the following menus: Powertrain / Engine and ECT / Trouble Codes.
Confirm DTCs and freeze frame data.
If any EVAP system DTCs are stored, the malfunctioning area can be determined using the table below.
| NEXT | |
 |
| 2.PERFORM EVAP SYSTEM CHECK (AUTOMATIC MODE) |
Connect the Techstream to the DLC3.
Turn the ignition switch to ON.
Turn the Techstream on.
Clear DTCs (Click here).
Enter the following menus: Powertrain / Engine and ECT / Utility / Evaporative System Check / Automatic Mode.
After the Evaporative System Check is completed, check for pending DTCs by entering the following menus: Powertrain / Engine and ECT / Trouble Codes / Pending.
| NEXT | |
|
| 3.PERFORM EVAP SYSTEM CHECK (MANUAL MODE) |
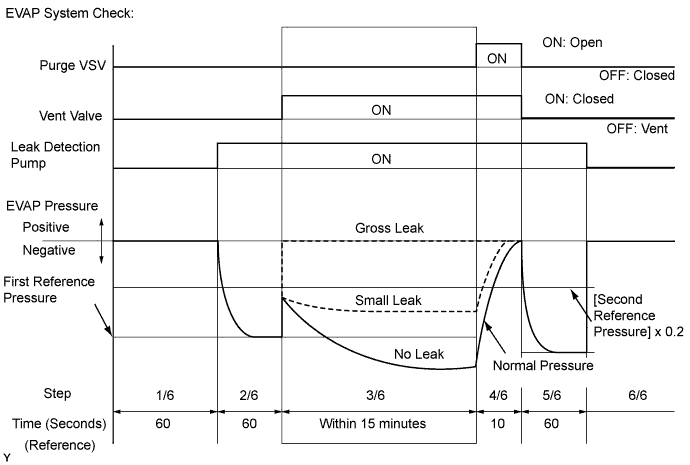
Connect the Techstream to the DLC3.
Turn the ignition switch to ON.
Turn the Techstream on.
Clear DTCs (Click here).
Enter the following menus: Powertrain / Engine and ECT / Utility / Evaporative System Check / Manual Mode.
| NEXT | |
|
| 4.PERFORM EVAP SYSTEM CHECK (STEP 1/6) |
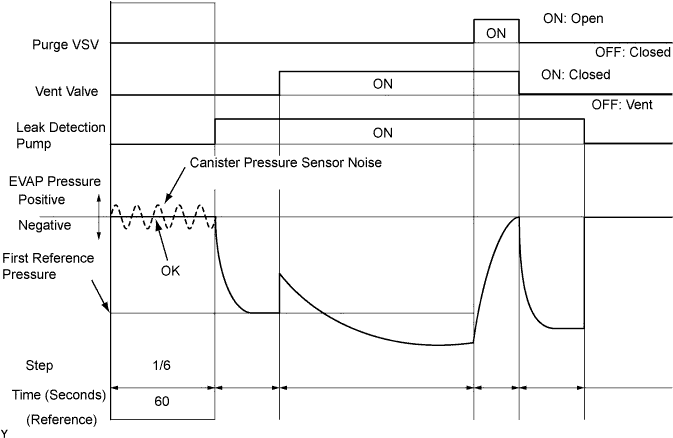
Check the EVAP pressure in step 1/6.
| DTC No.*1 | Result | Trouble Area | Proceed to |
| - | Virtually no variation in EVAP pressure | Not yet determined | A |
| P0451 | EVAP pressure fluctuates by +/-0.3 kPa-g (+/-2.25 mmHg-g) or more | Canister pressure sensor noise | B |
| (P0452 or P0453)*2 |
| Canister pressure sensor noise | C |
|
| ||||
|
| ||||
| A | |
|
| 5.PERFORM EVAP SYSTEM CHECK (STEP 1/6 TO 2/6) |
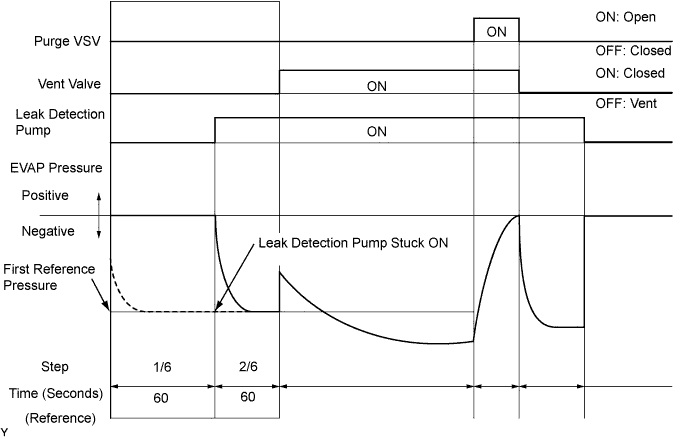
Check the EVAP pressure in steps 1/6 and 2/6.
| DTC No.* | Result | Trouble Area | Proceed to |
| - | Virtually no variation in EVAP pressure during step 1/6. Then decreases to reference pressure. | Not yet determined | A |
| P2402 | Small difference between EVAP pressures during steps 1/6 and 2/6 | Leak detection pump stuck ON | B |
|
| ||||
| A | |
|
| 6.PERFORM EVAP SYSTEM CHECK (STEP 2/6) |
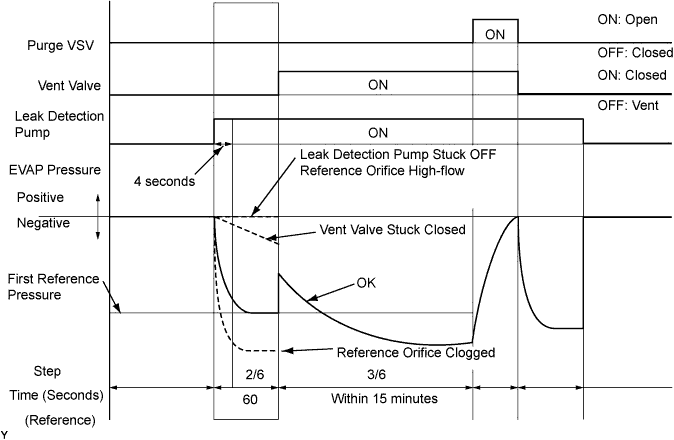
| DTC No.* | Result | Trouble Area | Proceed to |
| - | EVAP pressure in step (b) between -4.85 kPa-g and -1.057 kPa-g (-36.4 mmHg-g and -7.93 mmHg-g) | Not yet determined | A |
| P043F and P2401 | EVAP pressure in step (b) -1.057 kPa-g (-7.93 mmHg-g) or more |
| B |
| P043E | EVAP pressure in step (b) below -4.85 kPa-g (-36.4 mmHg-g) | Reference orifice clogged | C |
| P2419 | EVAP pressure in step (a) more than -1.057 kPa-g (-7.93 mmHg-g) |
| D |
|
| ||||
|
| ||||
|
| ||||
| A | |
|
| 7.PERFORM EVAP SYSTEM CHECK (STEP 2/6 TO 3/6) |
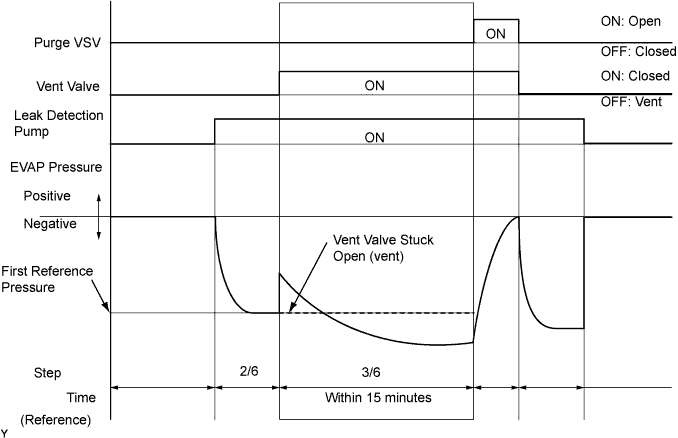
Check the EVAP pressure increase in step 3/6.
| DTC No.* | Result | Trouble Area | Proceed to |
| - | EVAP pressure increases by 0.3 kPa-g (2.25 mmHg-g) or more within 10 seconds of proceeding from step 2/6 to step 3/6 | Not yet determined | A |
| P2420 | No variation in EVAP pressure despite proceeding from step 2/6 to step 3/6 |
| B |
| P0451 | No variation in EVAP pressure during steps 1/6 through 3/6 |
| C |
|
| ||||
|
| ||||
| A | |
|
| 8.PERFORM EVAP SYSTEM CHECK (STEP 3/6) |
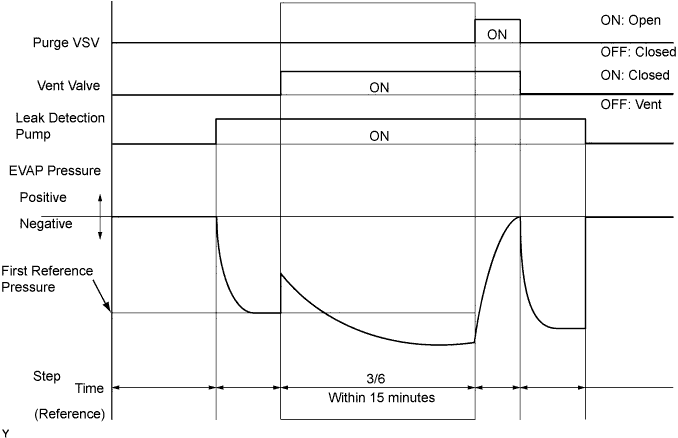
Wait until the EVAP pressure change is less than 0.1 kPa-g (0.75 mmHg-g) for 30 seconds.
Measure the EVAP pressure and record it.
| NEXT | |
|
| 9.PERFORM EVAP SYSTEM CHECK (STEP 4/6) |
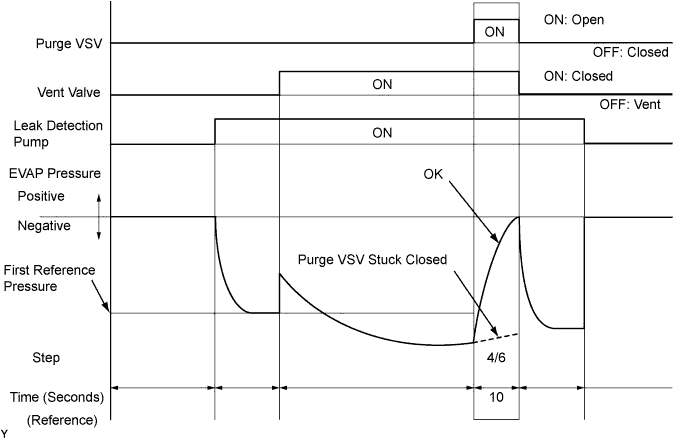
Check the EVAP pressure in step 4/6.
| DTC No.* | Result | Trouble Area | Proceed to |
| - | EVAP pressure increases by 0.3 kPa-g (2.25 mmHg-g) or more within 10 seconds of proceeding from step 3/6 to step 4/6 | Not yet determined | A |
| P0441*2 | EVAP pressure increases by 0.3 kPa-g (2.25 mmHg-g) or more within 10 seconds of proceeding from step 3/6 to step 4/6 |
| B |
| P0441 | Variation in EVAP pressure less than 0.3 kPa-g (2.25 mmHg-g) for 10 seconds after proceeding from step 3/6 to step 4/6 |
| C |
|
| ||||
|
| ||||
| A | |
|
| 10.PERFORM EVAP SYSTEM CHECK (STEP 5/6) |
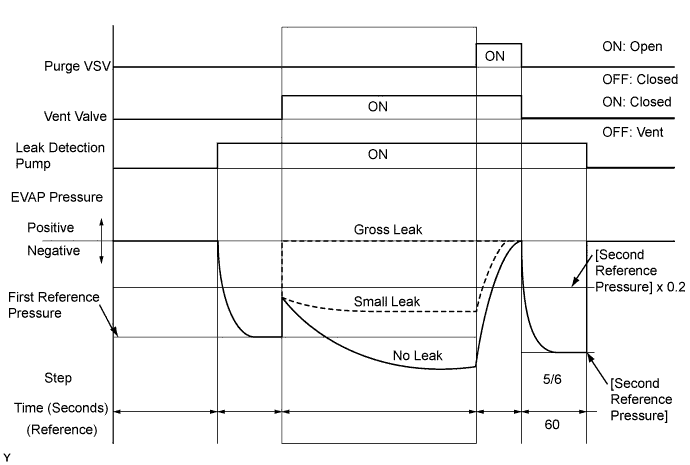
Check the EVAP pressure in step 5/6.
Compare the EVAP pressure in step 3/6 and the second reference pressure (step 5/6).
| DTC No.* | Result | Trouble Area | Proceed to |
| - | EVAP pressure (step 3/6) lower than second reference pressure (step 5/6) | Not yet determined (no leak from EVAP system) | A |
| P0441 and P0455 | EVAP pressure (step 3/6) higher than [second reference pressure (step 5/6) x 0.2] |
| B |
| P0456 | EVAP pressure (step 3/6) higher than second reference pressure (step 5/6) | EVAP small leak | B |
|
| ||||
|
| ||||
| 11.PERFORM EVAP SYSTEM CHECK (STEP 3/6) |
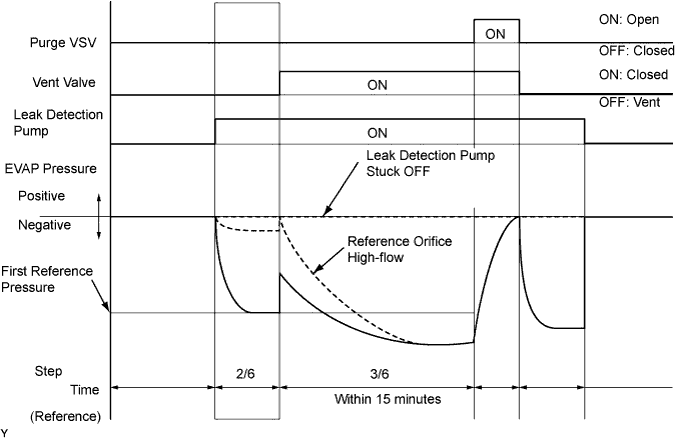
Check the EVAP pressure in step 3/6.
| DTC No.* | Result | Trouble Area | Proceed to |
| P043F | EVAP pressure less than [reference pressure] measured at 2/6 | Reference orifice high-flow | A |
| P2401 | EVAP pressure almost same as [reference pressure] measured at 2/6 | Leak detection pump stuck OFF | B |
|
| ||||
|
| ||||
| 12.INSPECT CANISTER PUMP MODULE (CANISTER PRESSURE SENSOR CIRCUIT) |
Check the canister pressure sensor circuit, referring to DTC P0451 canister pressure sensor circuit inspection procedure .
|
| ||||
| 13.INSPECT CANISTER PUMP MODULE (VENT VALVE OPERATION) |
 |
Turn the ignition switch off.
Disconnect the canister pump module connector.
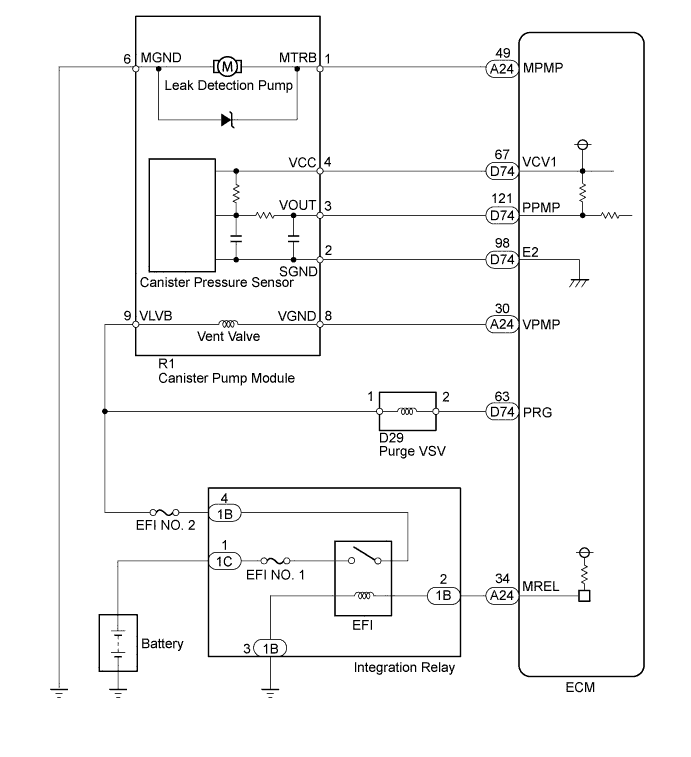
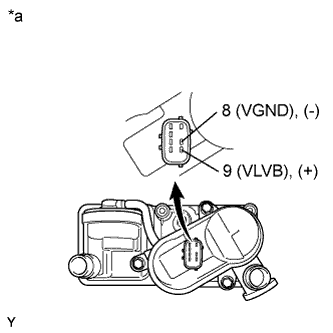
Apply the battery voltage to terminals 9 (VLVB) and 8 (VGND) of the canister pump module.
Touch the canister pump module to confirm the vent valve operation.
| *a | Component without harness connected (Canister) |
| Result | Trouble Area | Proceed to |
| Operating |
| A |
| Not operating | Vent valve | B |
|
| ||||
| A | |
|
| 14.CHECK HARNESS AND CONNECTOR (CANISTER PUMP MODULE - ECM) |
Turn the ignition switch off.
Disconnect the canister pump module connector.
Disconnect the ECM connector.
Measure the resistance according to the value(s) in the table below.
| Tester Connection | Condition | Specified Condition | Trouble Area | Proceed to |
| A27-49 (MPMP) - O24-1 (MTRB) | Always | Below 1 Ω | ECM | A |
| Always | 10 kΩ or higher | Wire harness between ECM and canister pump module | B |
|
| ||||
| A | |
|
| 15.CHECK HARNESS AND CONNECTOR (CANISTER PUMP MODULE - BODY GROUND) |
 |
Turn the ignition switch off.
Disconnect the canister pump module connector.
Measure the resistance according to the value(s) in the table below.
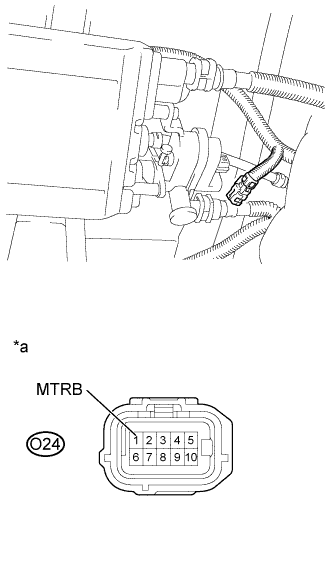
| *a | Front view of wire harness connector (to Canister Pump Module) |
| Tester Connection | Condition | Specified Condition | Trouble Area | Proceed to |
| O24-6 (MGND) - Body ground | Always | Below 1 Ω | Leak detection pump | A |
| Always | 10 kΩ or higher | Wire harness between canister pump module and body ground | B |
|
| ||||
| A | |
|
| 16.CHECK HARNESS AND CONNECTOR (CANISTER PUMP MODULE - ECM) |
Turn the ignition switch off.
Disconnect the canister pump module connector.
Disconnect the ECM connector.
Measure the resistance according to the value(s) in the table below.
| Tester Connection | Condition | Specified Condition | Trouble Area | Proceed to |
| A27-49 (MPMP) - O24-1 (MTRB) | Always | Below 1 Ω | ECM | A |
| Always | 10 kΩ or higher | Wire harness between ECM and canister pump module | B |
|
| ||||
|
| ||||
| 17.PERFORM ACTIVE TEST USING TECHSTREAM (PURGE VSV) |
 |
Enter the following menus: Powertrain / Engine and ECT / Active Test / Activate the VSV for EVAP Control.
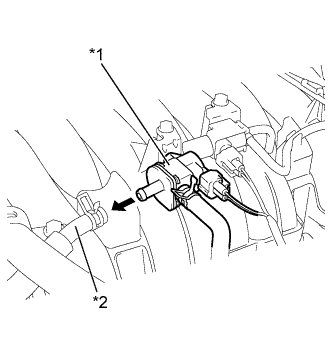
Disconnect the hose (connected to the canister) from the purge VSV.
Start the engine.
Using the Techstream, turn off the purge VSV (Activate the VSV for EVAP Control: OFF).
Use your finger to confirm that the purge VSV has no suction.
Using the Techstream, turn on the purge VSV (Activate the VSV for EVAP Control: ON).
Use your finger to confirm that the purge VSV has suction.
| *1 | Purge VSV |
| *2 | Hose (to Canister) |
| Result | Trouble Area | Proceed to |
| No suction when purge VSV turned OFF, and suction applied when turned ON | Blockage in the purge line is considered (based on result of step 9):
| A |
Leakage is considered (based on result of step 10):
| B | |
| Suction applied when purge VSV turned OFF |
| C |
| No suction when purge VSV turned ON |
| C |
|
| ||||
|
| ||||
|
| ||||
| A | |
|
| 18.INSPECT EVAP HOSE (PURGE VSV - CANISTER) |
Check for blockages in the EVAP purge line between the purge VSV and canister.
|
| ||||
| OK | |
|
| 19.INSPECT CANISTER (CHARCOAL FILTER INSIDE CANISTER) |
Check for filter blockage in the canister (Click here).
|
| ||||
|
| ||||
| 20.CHECK FUEL TANK CAP |
Check that the fuel tank cap is correctly installed and confirm that the fuel tank cap meets OEM specifications.
Tighten the fuel tank cap until a few click sounds are heard.
| Result | Trouble Area | Proceed to |
| Fuel tank cap correctly installed | - | A |
| Fuel tank cap loose |
| B |
| Defective fuel tank cap | - | B |
| No fuel tank cap | - | C |
|
| ||||
|
| ||||
|
| ||||
| 21.INSPECT PURGE VSV |
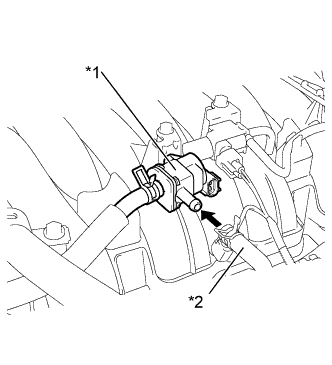 |
Turn the ignition switch off.
Disconnect the purge VSV connector.
Disconnect the hose (connected to the canister) from the purge VSV.
Start the engine.
Use your finger to confirm that the purge VSV has no suction.
| *1 | Purge VSV |
| *2 | Hose (to Canister) |
| Result | Trouble Area | Proceed to |
| No suction |
| A |
| Suction applied | Purge VSV | B |
|
| ||||
|
| ||||
| 22.INSPECT EVAP HOSE (PURGE VSV - CANISTER) |
Check for blockages in the EVAP purge line between the purge VSV and canister.
|
| ||||
| OK | |
|
| 23.CHECK EVAP HOSE (PURGE VSV - INTAKE MANIFOLD) |
|
Disconnect the hose (connected to the intake manifold) from the purge VSV.
Start the engine.
Use your finger to confirm that the hose has suction.
| *1 | Purge VSV |
| *2 | Hose (to Canister) |
| Result | Trouble Area | Proceed to |
| Suction applied | EVAP hose between purge VSV and intake manifold normal
| A |
| No suction |
| B |
|
| ||||
| A | |
|
| 24.INSPECT PURGE VSV |
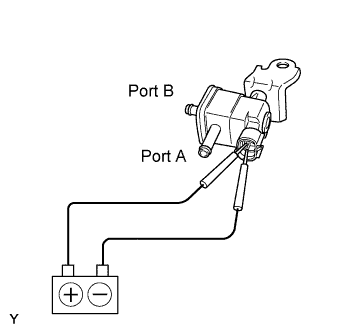 |
Remove the purge VSV (Click here).
Apply the battery voltage to the terminals of the purge VSV.
Using an air gun, confirm that air flows from port A to port B.
| Result | Trouble Area | Proceed to |
| Air flows | Purge VSV normal
| A |
| No air flow | Purge VSV | B |
|
| ||||
| A | |
|
| 25.CHECK HARNESS AND CONNECTOR (POWER SOURCE OF PURGE VSV) |
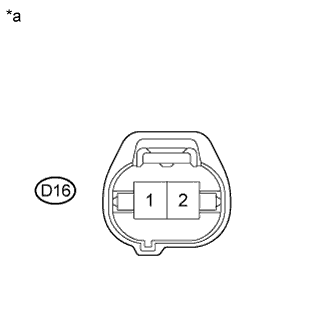 |
Disconnect the purge VSV connector.
Turn the ignition switch to ON.
Measure the voltage according to the value(s) in the table below.
| *a | Front view of wire harness connector (to Purge VSV) |
| Tester Connection | Switch Condition | Specified Condition | Trouble Area | Proceed to |
| D16-1 - Body ground | Ignition switch ON | 11 to 14 V | Purge VSV power source normal
| A |
| Ignition switch ON | Other than condition above | Wire harness or connectors between purge VSV and battery | B |
|
| ||||
| A | |
|
| 26.CHECK HARNESS AND CONNECTOR (PURGE VSV - ECM) |
Disconnect the ECM connector.
Disconnect the purge VSV connector.
Measure the resistance according to the value(s) in the table below.
| Tester Connection | Condition | Specified Condition |
| D56-63 (PRG) - D16-2 | Always | Below 1 Ω |
| D56-63 (PRG) - Body ground | Always | 10 kΩ or higher |
| D16-1 - Body ground | Always | 10 kΩ or higher |
|
| ||||
|
| ||||
| 27.INSPECT CANISTER PUMP MODULE (POWER SOURCE FOR VENT VALVE) |
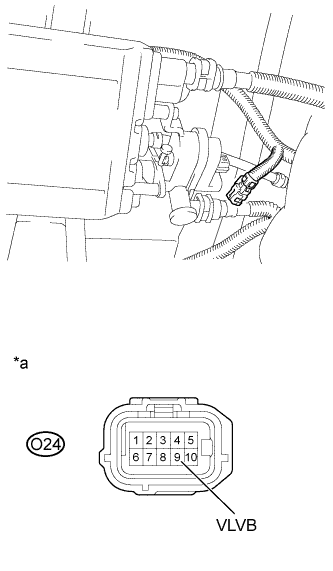 |
Turn the ignition switch off.
Disconnect the canister pump module connector.
Turn the ignition switch to ON.
Measure the voltage according to the value(s) in the table below.
| *a | Front view of wire harness connector (to Canister Pump Module) |
| Tester Connection | Switch Condition | Specified Condition | Trouble Area | Proceed to |
| O24-9 (VLVB) - Body ground | Ignition switch ON | 11 to 14 V |
| A |
| Ignition switch ON | Below 3 V |
| B |
|
| ||||
| A | |
|
| 28.INSPECT CANISTER PUMP MODULE (VENT VALVE OPERATION) |
|
Turn the ignition switch off.
Disconnect the canister pump module connector.
Apply the battery voltage to terminals 9 (VLVB) and 8 (VGND) of the canister pump module.
Touch the canister pump module to confirm the vent valve operation.
| *a | Component without harness connected (Canister) |
| Result | Trouble Area | Proceed to |
| Operating |
| A |
| Not operating | Vent valve | B |
|
| ||||
| A | |
|
| 29.CHECK HARNESS AND CONNECTOR (CANISTER PUMP MODULE - ECM) |
Disconnect the ECM connector.
Disconnect the canister pump module connector.
Measure the resistance according to the value(s) in the table below.
| Tester Connection | Condition | Specified Condition | Trouble Area | Proceed to |
| A27-30 (VPMP) - O24-8 (VGND) | Always | Below 1 Ω |
| A |
| Always | 10 kΩ or higher | Wire harness or connector between ECM and canister pump module | B |
|
| ||||
| A | |
|
| 30.INSPECT CANISTER (CHARCOAL FILTER INSIDE CANISTER) |
Check for filter blockage in the canister (Click here).
|
| ||||
|
| ||||
| 31.PERFORM ACTIVE TEST USING TECHSTREAM (VACUUM PUMP (ACTIVATE THE VACUUM PUMP)) |
|
Turn the ignition switch off.
Disconnect the canister pump module connector.
Turn the ignition switch to ON.
Enter the following menus: Powertrain / Engine and ECT / Active Test / Activate the Vacuum Pump.
Measure the voltage according to the value(s) in the table below.
| *a | Front view of wire harness connector (to Canister Pump Module) |
| Tester Connection | Condition | Specified Condition | Trouble Area | Proceed to |
| O24-1 (MTRB) - Body ground | Leak detection pump is turned ON and OFF using the Techstream | Below 3 V when OFF 9 to 14 V when ON |
| A |
| Leak detection pump is turned ON and OFF using the Techstream | Below 3 V when OFF and ON |
| B |
|
| ||||
|
| ||||
| A | |
|
| 32.CHECK HARNESS AND CONNECTOR (CANISTER PUMP MODULE - BODY GROUND) |
Turn the ignition switch off.
Disconnect the canister pump module connector.
Measure the resistance according to the value(s) in the table below.
| Tester Connection | Condition | Specified Condition | Trouble Area | Proceed to |
| O24-6 (MGND) - Body ground | Always | Below 1 Ω | Leak detection pump | A |
| Always | 10 kΩ or higher | Wire harness or connector between canister pump module and body ground | B |
|
| ||||
|
| ||||
| 33.CHECK HARNESS AND CONNECTOR (CANISTER PUMP MODULE - ECM) |
Turn the ignition switch off.
Disconnect the canister pump module connector.
Disconnect the ECM connector.
Measure the resistance according to the value(s) in the table below.
| Tester Connection | Condition | Specified Condition | Trouble Area | Proceed to |
| A27-49 (MPMP) - O24-1 (MTRB) | Always | Below 1 Ω | ECM | A |
| Always | 10 kΩ or higher | Wire harness between ECM and canister pump module | B |
|
| ||||
|
| ||||
| 34.INSPECT INTAKE MANIFOLD SUB-ASSEMBLY (EVAP PURGE PORT) |
Stop the engine.
Disconnect the purge line from the intake manifold.
Start the engine.
Use your finger to confirm that the port of the intake manifold has suction.
| Result | Trouble Area | Proceed to |
| Suction applied | Purge line between intake manifold and purge VSV | A |
| No suction | Intake manifold | B |
Reconnect the purge line.
|
| ||||
|
| ||||
| 35.CORRECTLY REINSTALL OR REPLACE FUEL TANK CAP |
|
| ||||
| 36.REPLACE FUEL TANK CAP |
|
| ||||
| 37.LOCATE EVAP LEAK PART |
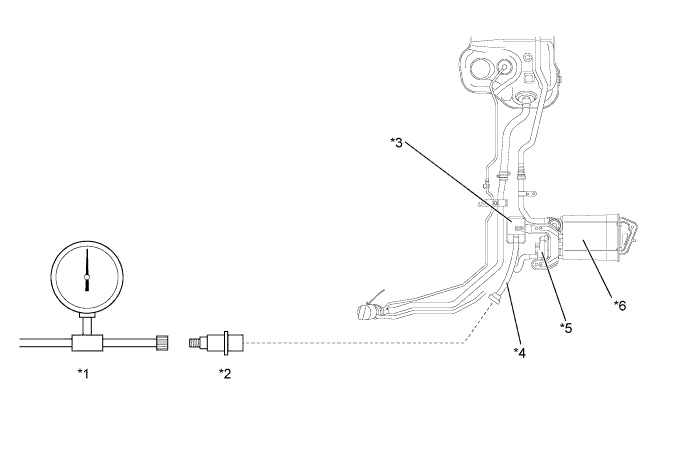
| *1 | EVAP Tester | *2 | Adapter |
| *3 | Canister Filter | *4 | Vent Hose |
| *5 | Canister Pump Module | *6 | Canister |
Disconnect the vent hose.
Connect an EVAP tester to the canister pump module with an adapter.
Pressurize the EVAP system to 3.2 to 3.7 kPa (24 to 28 mmHg).
Apply soapy water to the piping and connecting parts of the EVAP system.
Look for areas where bubbles appear. This indicates the leak point.
Repair or replace the leak point.
|
| ||||
| 38.REPLACE CANISTER POMP MODULE |
Replace the canister pump module (Click here).
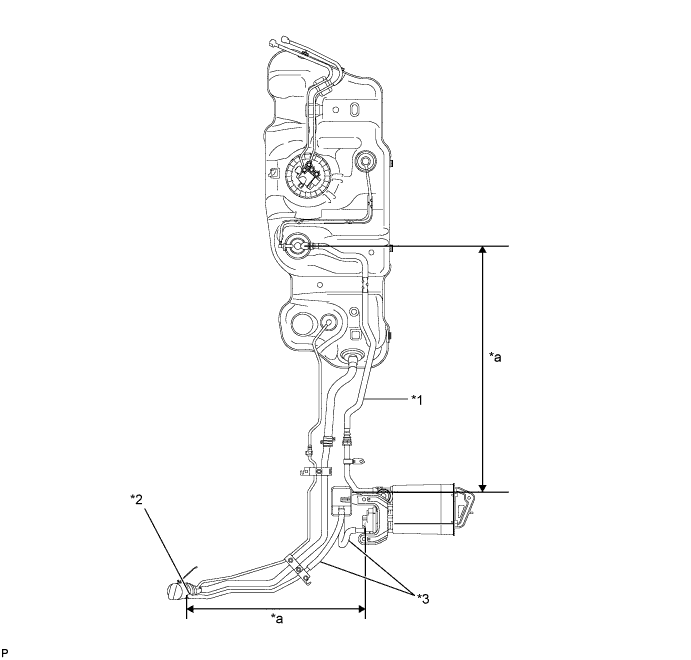
| *1 | Fuel tank vent hose | *2 | Air inlet port |
| *3 | Vent hose | - | - |
| *a | Inspection area (Check for disconnection and/or cracks) | - | - |
|
| ||||
| 39.REPLACE PURGE VSV |
Replace the purge VSV (Click here).
|
| ||||
| 40.REPAIR OR REPLACE HARNESS OR CONNECTOR |
|
| ||||
| 41.REPAIR OR REPLACE EVAP PURGE LINE (INTAKE MANIFOLD - PURGE VSV) |
|
| ||||
| 42.INSPECT INTAKE MANIFOLD SUB-ASSEMBLY (EVAP PURGE PORT) |
Check that the EVAP purge port of the intake manifold is not clogged. If necessary, replace the upper intake manifold sub-assembly (Click here).
|
| ||||
| 43.REPAIR OR REPLACE PARTS AND COMPONENTS INDICATED BY OUTPUT DTCS |
Repair the malfunctioning areas indicated by the DTCs that had been confirmed when the vehicle was brought in.
|
| ||||
| 44.REPAIR OR REPLACE EVAP PURGE LINE (PURGE VSV - CANISTER) |
|
| ||||
| 45.REPLACE CANISTER POMP MODULE |
Replace the canister pump module (Click here).
| *1 | Fuel tank vent hose | *2 | Air inlet port |
| *3 | Vent hose | - | - |
| *a | Inspection area (Check for disconnection and/or cracks) | - | - |
| NEXT | |
|
| 46.PERFORM EVAP SYSTEM CHECK (AUTOMATIC MODE) |
Connect the Techstream to the DLC3.
Turn the ignition switch to ON.
Turn the Techstream on.
Clear DTCs (Click here).
Enter the following menus: Powertrain / Engine and ECT / Utility / Evaporative System Check / Automatic Mode.
After the Evaporative System Check is completed, check for pending DTCs by entering the following menus: Powertrain / Engine and ECT / Trouble Codes / Pending.
| Result | Proceed to |
| EVAP system DTCs are output | A |
| No DTCs output (No pending DTCs output) | B |
|
| ||||
| A | |
|
| 47.REPLACE ECM |
Replace the ECM (Click here).
| NEXT | |
|
| 48.PERFORM EVAP SYSTEM CHECK (AUTOMATIC MODE) |
Connect the Techstream to the DLC3.
Turn the ignition switch to ON.
Turn the Techstream on.
Clear DTCs (Click here).
Enter the following menus: Powertrain / Engine and ECT / Utility / Evaporative System Check / Automatic Mode.
After the Evaporative System Check is completed, check for pending DTCs by entering the following menus: Powertrain / Engine and ECT / Trouble Codes / Pending.
| NEXT | ||
 | ||
| ||
| KEY-OFF MONITOR CONFIRMATION |
Preconditions
The monitor will not run unless:
Monitor Conditions
Monitor Status
| PURGE FLOW MONITOR CONFIRMATION (P0441) |
Preconditions
The monitor will not run unless:
Monitor Conditions
Monitor Status

