AB60E AUTOMATIC TRANSMISSION / TRANSAXLE AUTOMATIC TRANSMISSION SYSTEM P0894 Transmission Component Slipping P2714 Pressure Control Solenoid "D" Performance (Shift Solenoid Valve SLT)
DESCRIPTION
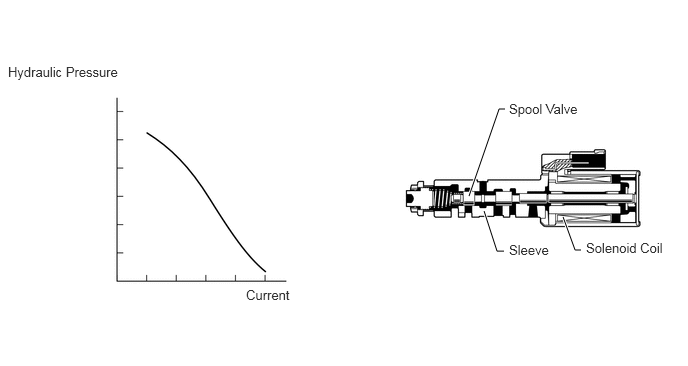
Shift solenoid valve SLT controls the transmission line pressure for smooth transmission operation based on signals from the throttle position sensor and vehicle speed sensor. The ECM adjusts the current to shift solenoid valve SLT to control the hydraulic line pressure coming from the primary regulator valve. Appropriate line pressure assures smooth shifting with varying engine outputs.
| DTC Code | DTC Detection Condition | Trouble Area |
|---|---|---|
| P0894 | The ECM detects a malfunction on SLT, S1, S2, S3, S4, SL2, gear 6 incorrect ratio (sequence valve) or 1-2 shift solenoid valve according to the revolution difference of the turbine and the output shaft, and also by the oil pressure. (2-trip detection logic) | ·
Shift solenoid valve SLT remains open or closed ·
Shift solenoid valve S1, S2, S3, S4 or SL2 remains open or closed ·
Gear 6 incorrect ratio (sequence valve) or 1-2 shift valve is stuck ·
Valve body is blocked ·
Automatic transmission (clutch, brake, gear, etc.) |
| P2714 | The ECM detects a malfunction on SLT (ON side) according to the revolution difference of the turbine and the output shaft, and also by the oil pressure (2 trip detection logic) | ·
Shift solenoid valve SLT remains open or closed ·
Shift solenoid valve S1, S2, S3, S4 or SL2 remains open or closed ·
Gear 6 incorrect ratio (sequence valve) or 1-2 shift valve is stuck ·
Valve body is blocked ·
Automatic transmission (clutch, brake, gear, etc.) |
MONITOR DESCRIPTION
The ECM calculates the amount of heat absorbed by the friction material based on the difference in revolution (clutch slippage) between the turbine and output shaft. The ECM illuminates the MIL and stores this DTC when the amount of heat absorption exceeds the specified value.
There are two causes of revolution difference.
When the shift solenoid valve SLT remains ON, oil pressure decreases, which causes the clutch engagement force to decrease.
When the shift solenoid valve remains ON or OFF, the gear position commanded by the ECM and the actual gear position are not the same.
- NOTICE:
-
If you continue driving under these conditions, the clutch will burn out and the vehicle will no longer be drivable.
MONITOR STRATEGY
| Related DTCs | P0894: Automatic transmission slip malfunction
P2714: Shift solenoid valve SLT/Functional check |
| Required sensors/Components | Shift solenoid valve SLT |
| Frequency of operation | Continuous |
| Duration | P0894 ON malfunction (A): Immediately
P0894 ON malfunction (B): 0.4 seconds P2714: Immediately |
| MIL operation | 2 driving cycles |
| Sequence of operation | None |
TYPICAL ENABLING CONDITIONS
| The monitor will run whenever the following DTCs are not present | P0717 (Turbine speed sensor circuit)
P0722 (Output speed sensor circuit) P0710, P0712, P0713, P2740, P2742, P2743 (ATF temperature sensor circuit) P0973, P0974 (Shift solenoid valve S1 circuit) P0976, P0977 (Shift solenoid valve S2 circuit) P0979, P0980 (Shift solenoid valve S3 circuit) P0982, P0983 (Shift solenoid valve S4 circuit) P0985, P0986 (Shift solenoid valve SR circuit) P0748 (Shift solenoid valve SL1 circuit) P0778 (Shift solenoid valve SL2 circuit) P2716 (Shift solenoid valve SLT circuit) P0115, P0116, P0117, P0118, P011B (ECT (Engine coolant temperature) sensor circuit) P0327, P0328, P032C, P032D, P0332, P0333, P033C, P033D (KCS sensor circuit) |
| ETCS (Electric Throttle Control System) | Not system down |
| Transmission position | "D" |
| Duration time from shifting "N" to "D" | 4 seconds or more |
| ECT | 40°C (104°F) or higher |
| Spark advance from max. retard timing by KCS control | 0° crankshaft angle or more |
| Engine | Starting |
TYPICAL MALFUNCTION THRESHOLDS
When either condition below is met: ON malfunction (A) or (B)
| Summation of C1 clutch heat generations | Specified value |
| Summation of C2 clutch heat generations | Specified value |
| Actual gear for SLT failure judgment | Not determined |
One of the following conditions is met: ON malfunction (A), (B), (C), (D), (E), (F), (G) or (H)
| Summation of C1 clutch heat generations | Specified value |
| Shift solenoid valve S1 OFF malfunction | Detected |
| Shift solenoid valve S2 OFF malfunction | Detected |
| Shift solenoid valve S3 ON malfunction | Detected |
| Shift solenoid valve S4 OFF malfunction | Detected |
| 1-2 shift valve malfunction | Detected |
| Reverse sequence valve malfunction | Detected |
| Shift solenoid valve SL2 ON malfunction | Detected |
CAUTION / NOTICE / HINT
- NOTICE:
-
Perform the universal trip to clear permanent DTCs (See page Drivetrain>AB60E AUTOMATIC TRANSMISSION / TRANSAXLE>AUTOMATIC TRANSMISSION SYSTEM>DTC CHECK / CLEAR).
PROCEDURE
Connect the Techstream to the DLC3.
Turn the ignition switch to ON.
Turn the Techstream on.
Enter the following menus: Powertrain / Engine and ECT / Trouble Codes.
Read the DTCs using the Techstream.
| Result | Proceed to |
|---|---|
·
Only P0894 is output ·
Only P0894 and P2714 are output |
A |
| P0894, P2714 and other DTCs are output | B |
- HINT:
-
If any other codes besides P0894 and P2714 are output, perform troubleshooting for those DTCs first.
A
B
- NOTICE:
- ·
Perform the test at the normal operating ATF temperature: 50 to 80°C (122 to 176°F).
·Be careful to prevent SST hose from interfering with the exhaust pipe.
·Perform the test with the A/C OFF.
- HINT:
-
Using the Techstream to perform Active Tests allows relays, VSVs, actuators and other items to be operated without removing any parts. This non-intrusive functional inspection can be very useful because intermittent operation may be discovered before parts or wiring is disturbed. Performing Active Tests early in troubleshooting is one way to save diagnostic time. Data List information can be displayed while performing Active Tests.
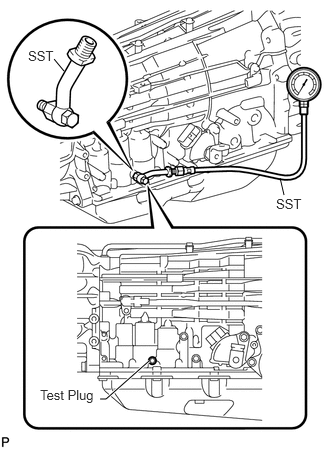
Remove the test plug on the transmission case center right side and connect SST.
- SST
- 09993-19015 (09993-00010, 09993-00040)
Connect the Techstream to the DLC3.
Start the engine and warm it up.
Measure the line pressure with SST.
Turn the Techstream on.
Enter the following menus: Powertrain / Engine and ECT / Active Test.
According to the display on the Techstream, perform the Active Test.
Measure the line pressure.
| Tester Display | Test Part | Control Range | Diagnostic Note |
|---|---|---|---|
| Activate the Solenoid (SLT)* | Operate the shift solenoid SLT and raise line pressure | ON or OFF
|
[Vehicle Condition]
·
Vehicle stopped ·
Engine idling |
- HINT:
-
*: Activate the Solenoid (SLT) in the Active Test is performed to check the line pressure changes by connecting SST to the automatic transmission, which is used in the Hydraulic Test (See page Drivetrain>AB60E AUTOMATIC TRANSMISSION / TRANSAXLE>AUTOMATIC TRANSMISSION SYSTEM>HYDRAULIC TEST) as well. Please note that the pressure values in the Active Test and Hydraulic Test are different.
- OK:
The line pressure changes as specified when performing the Active Test.
OK
NG
- HINT:
-
Using the Techstream to perform Active Tests allows relays, VSVs, actuators and other items to be operated without removing any parts. This non-intrusive functional inspection can be very useful because intermittent operation may be discovered before parts or wiring is disturbed. Performing Active Tests early in troubleshooting is one way to save diagnostic time. Data List information can be displayed while performing Active Tests.
Connect the Techstream to the DLC3.
Clear the DTC (See page Drivetrain>AB60E AUTOMATIC TRANSMISSION / TRANSAXLE>AUTOMATIC TRANSMISSION SYSTEM>DTC CHECK / CLEAR).
Enter the following menus: Powertrain / Engine and ECT / Active Test.
According to the display on the Techstream, perform the Active Test.
- HINT:
-
While driving, the shift position can be forcibly changed with the Techstream.
| Tester Display | Test Part | Control Range | Diagnostic Note |
|---|---|---|---|
| Control the Shift Position | Operate shift solenoid valve and set each shift position by yourself | ·
Press "→" button: Shift up ·
Press "←" button: Shift down |
Possible to check operation of shift solenoid valves
[Vehicle Condition] 50 km/h (30 mph) or less |
- HINT:
- ·
This test can be conducted when the vehicle speed is 50 km/h (30 mph) or less.
·The 4th to 5th and 5th to 6th up-shift must be performed with the accelerator pedal released.
·The 6th to 5th and 5th to 4th down-shift must be performed with the accelerator pedal released.
·Do not operate the accelerator pedal for at least 2 seconds after shifting and do not shift successively.
·The shift position commanded by the ECM is shown in the Data List display on the Techstream.
Compare the ECM gear shift command and the actual gear position.
| ECM gear shift command | 1st | 2nd | 3rd | 4th | 5th | 6th | Proceed to | ||
|---|---|---|---|---|---|---|---|---|---|
| Actual gear position under malfunction | Shift solenoid S1 | Stuck ON*1 | 2nd | 2nd | 3rd | 4th | 5th | 6th | A |
| Stuck OFF | 1st | 1st | 3rd | 4th | 5th | N*2 | |||
| Shift solenoid S2 | Stuck ON | 1st | 2nd | 2nd | 4th | 6th | 6th | B | |
| Stuck OFF | 3rd | 3rd | 3rd | 4th | 5th | 5th | |||
| Shift solenoid S3 | Stuck ON | 1st | 2nd | 3rd | 3rd | N*2 | N*2 | C | |
| Stuck OFF | 3rd | 4th | 4th | 4th | 5th | 6th | |||
| Shift solenoid S4 | Stuck ON*3 | 1st | 2nd | 3rd | 4th | 5th | 6th | D | |
| Stuck OFF | 1st | 2nd | 3rd | 4th | 4th | 4th | |||
| Actual gear position when normal | 1st | 2nd | 3rd | 4th | 5th | 6th | E | ||
- HINT:
- ·
*1: When shift solenoid S1 is stuck ON, the vehicle cannot drive in reverse.
·*2: Neutral
·*3: When shift solenoid S4 is stuck ON, gear shifting is normal.
A
B
C
D
E
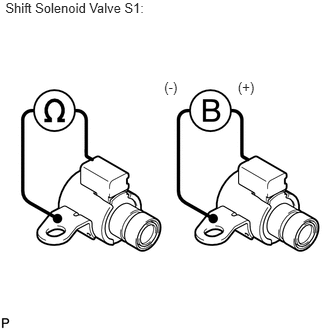
Remove the shift solenoid valve S1.
Measure the resistance according to the value(s) in the table below.
- Standard Resistance:
Tester Connection Condition Specified Condition Shift solenoid valve S1 connector terminal - Shift solenoid valve S1 body 20°C (68°F) 11 to 15 Ω
Connect the battery positive (+) lead to the terminal of the solenoid valve connector, and the negative (-) lead to the solenoid valve body. Then check that the valve moves and makes an operating noise.
- OK:
Valve moves and makes an operating noise.
| Result | Proceed to |
|---|---|
| NG | A |
| OK | B |
A
B
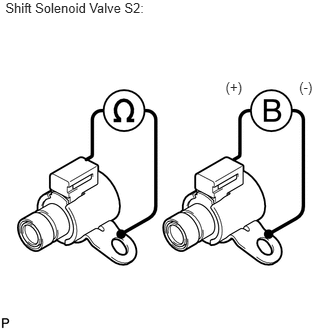
Remove the shift solenoid valve S2.
Measure the resistance according to the value(s) in the table below.
- Standard Resistance:
Tester Connection Condition Specified Condition Shift solenoid valve S2 connector terminal - Shift solenoid valve S2 body 20°C (68°F) 11 to 15 Ω
Connect the battery's positive (+) lead to the terminal of the solenoid valve connector, and the negative (-) lead to the solenoid valve body. Then check that the valve moves and makes an operating noise.
- OK:
Valve moves and makes an operating noise.
| Result | Proceed to |
|---|---|
| NG | A |
| OK | B |
A
B
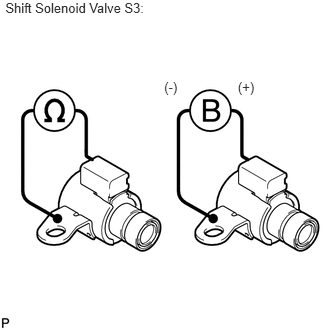
Remove the shift solenoid valve S3.
Measure the resistance according to the value(s) in the table below.
- Standard Resistance:
Tester Connection Condition Specified Condition Shift solenoid valve S3 connector terminal - Shift solenoid valve S3 body 20°C (68°F) 11 to 15 Ω
Connect the battery positive (+) lead to the terminal of the solenoid valve connector, and the negative (-) lead to the solenoid valve body. Then check that the valve moves and makes an operating noise.
- OK:
Valve moves and makes an operating noise.
| Result | Proceed to |
|---|---|
| NG | A |
| OK | B |
A
B
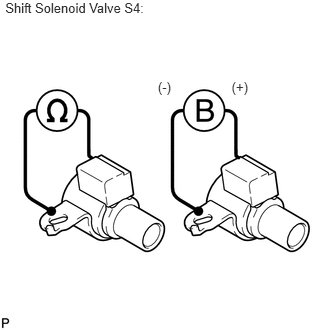
Remove the shift solenoid valve S4.
Measure the resistance according to the value(s) in the table below.
- Standard Resistance:
Tester Connection Condition Specified Condition Shift solenoid valve S4 connector terminal - Shift solenoid valve S4 body 20°C (68°F) 11 to 15 Ω
Connect the battery positive (+) lead to the terminal of the solenoid valve connector, and the negative (-) lead to the solenoid valve body. Then check that the valve moves and makes an operating noise.
- OK:
Valve moves and makes an operating noise.
OK
NG
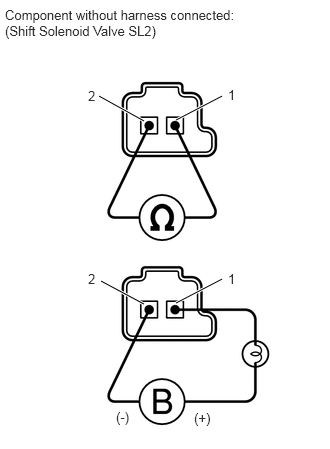
Remove the shift solenoid valve SL2.
Measure the resistance according to the value(s) in the table below.
- Standard Resistance:
Tester Connection Condition Specified Condition 1 - 2 20°C (68°F) 5.0 to 5.6 Ω
Connect the battery positive (+) lead with a 21 W bulb to terminal 1 and the negative (-) lead to terminal 2 of the solenoid valve connector. Then check that the valve moves and makes an operating noise.
- OK:
Valve moves and makes an operating noise.
| Result | Proceed to |
|---|---|
| NG | A |
| OK | B |
A
B
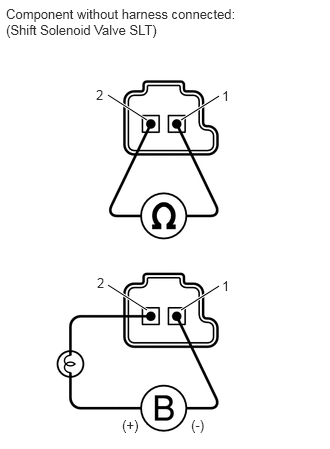
Remove the shift solenoid valve SLT.
Measure the resistance according to the value(s) in the table below.
- Standard Resistance:
Tester Connection Condition Specified Condition 1 - 2 20°C (68°F) 5.0 to 5.6 Ω
Connect the battery positive (+) lead with a 21 W bulb to terminal 2 and the negative (-) lead to terminal 1 of the solenoid valve connector. Then check that the valve moves and makes an operating noise.
- OK:
Valve moves and makes an operating noise.
OK
NG
Check the transmission valve body assembly.
- OK:
There are no foreign objects on each valve.
OK
NG
Check the torque converter assembly (See page Drivetrain>AB60E AUTOMATIC TRANSMISSION / TRANSAXLE>TORQUE CONVERTER CLUTCH AND DRIVE PLATE>INSPECTION).
- OK:
The torque converter assembly operates normally.
OK
(See pageDrivetrain>AB60E AUTOMATIC TRANSMISSION / TRANSAXLE>AUTOMATIC TRANSMISSION ASSEMBLY>REMOVAL)
NG
(See pageDrivetrain>AB60E AUTOMATIC TRANSMISSION / TRANSAXLE>AUTOMATIC TRANSMISSION ASSEMBLY>REMOVAL)