Home › Audio / Visual / Telematics › AUDIO / VIDEO › AUDIO AND VISUAL SYSTEM
RM27L0U _56 Audio / Visual / Telematics _049329 AUDIO / VIDEO _0235782 AUDIO AND VISUAL SYSTEM J

AUDIO / VIDEO  AUDIO AND VISUAL SYSTEM  AVC-LAN Circuit  


DESCRIPTION

Each unit of the audio system connected to the AVC-LAN (communication bus) transfers the signal of each switch by communication.

When a short to +B or short to ground occurs in this AVC-LAN, the audio system will not function normally as the communication is discontinued.

WIRING DIAGRAM
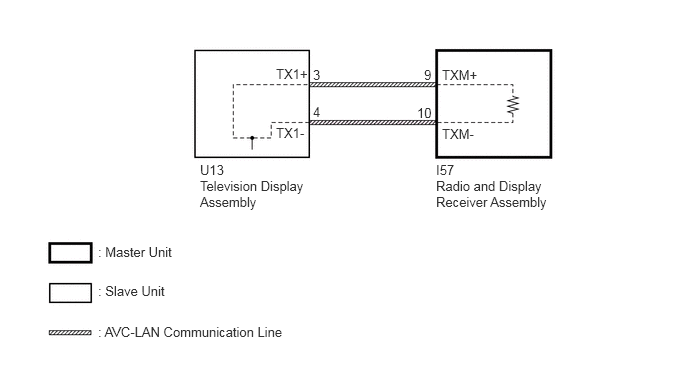
E283617E02
1.021,3.375 3.073,3.573 2.052,0.198 10 false : AVC-LAN Communication Line 4.542,1.854 5.958,2.521 1.417,0.667 10 false Radio and Display Receiver Assembly 2.083,1.854 3.271,2.531 1.188,0.677 10 false Television Display Assembly 2.083,1.688 2.448,1.833 0.365,0.146 10 false U13 4.542,1.688 4.906,1.833 0.365,0.146 10 false I57 1.021,2.542 2.073,2.729 1.052,0.188 10 false : Master Unit 1.021,2.948 2.969,3.135 1.948,0.188 10 false : Slave Unit 4.604,0.698 5.083,0.875 0.479,0.177 10 false TXM+ 4.417,0.698 4.563,0.875 0.146,0.177 10 false 9 4.344,1.094 4.531,1.271 0.188,0.177 10 false 10 3.26,0.698 3.406,0.875 0.146,0.177 10 false 3 3.26,1.083 3.448,1.26 0.188,0.177 10 false 4 4.604,1.313 5.083,1.49 0.479,0.177 10 false TXM- 2.875,0.688 3.354,0.865 0.479,0.177 10 false TX1+ 2.875,1.302 3.354,1.479 0.479,0.177 10 false TX1-

PROCEDURE

1.INSPECT RADIO AND DISPLAY RECEIVER ASSEMBLY
a.
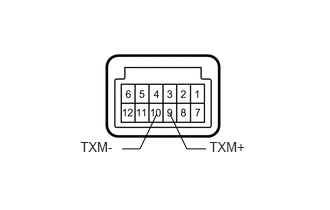
E283610E01
0.837,1.452 1.327,1.631 0.489,0.179 10 TXM- 2.182,1.452 2.671,1.631 0.489,0.179 10 TXM+ 1.272,1.551 1.457,1.551 1.457,1.551 1.633,1.187 false 2.146,1.551 1.946,1.551 1.946,1.551 1.77,1.187 false

Remove the radio and display receiver assembly with the connector(s) still connected (See page Audio / Visual / Telematics>AUDIO / VIDEO>RADIO RECEIVER>REMOVAL).


b.

Measure the resistance according to the value(s) in the table below.

Standard Resistance:
Tester Connection Condition Specified Condition
9 (TXM+) - 10 (TXM-) Always 60 to 80 Ω


OK

2.CHECK HARNESS AND CONNECTOR (RADIO AND DISPLAY RECEIVER ASSEMBLY - TELEVISION DISPLAY ASSEMBLY)

NG

REPLACE RADIO AND DISPLAY RECEIVER ASSEMBLY

2.CHECK HARNESS AND CONNECTOR (RADIO AND DISPLAY RECEIVER ASSEMBLY - TELEVISION DISPLAY ASSEMBLY)
a.

Disconnect the I57 radio and display receiver assembly connector.


b.

Disconnect the U13 television display assembly connector.


c.

Measure the resistance according to the value(s) in the table below.

Standard Resistance:
Tester Connection Condition Specified Condition
I57-9 (TXM+) - U13- 3 (TX1+) Always Below 1 Ω
I57-10 (TXM-) - U13- 4 (TX1-) Always Below 1 Ω
I57-9 (TXM+) - Body ground Always 10 kΩ or higher
I57-10 (TXM-) - Body ground Always 10 kΩ or higher


OK

3.CHECK TELEVISION DISPLAY ASSEMBLY

NG

REPAIR OR REPLACE HARNESS OR CONNECTOR

3.CHECK TELEVISION DISPLAY ASSEMBLY
a.

Temporarily replace the television display assembly with a known good one (See page Audio / Visual / Telematics>AUDIO / VIDEO>TELEVISION DISPLAY>REMOVAL).


b.

Check the rear seat entertainment system (See page Audio / Visual / Telematics>AUDIO / VIDEO>REAR SEAT ENTERTAINMENT SYSTEM>OPERATION CHECK).

OK:

Malfunction disappears.


OK

END (TELEVISION DISPLAY ASSEMBLY IS DEFECTIVE)

NG

REPLACE RADIO AND DISPLAY RECEIVER ASSEMBLY