SEAT REAR NO. 1 SEAT ASSEMBLY REASSEMBLY
CAUTION / NOTICE / HINT
- CAUTION:
-
Wear protective gloves. Sharp areas on the parts may injure your hands.
- HINT:
- ·
Use the same procedure for the RH side and LH side.
·The procedure listed below are for the RH side.
PROCEDURE

 72173A
1.INSTALL REAR SEAT TRACK ADJUSTING HANDLE RH
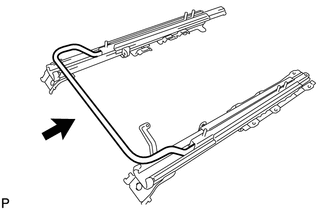
Install the rear seat track adjusting handle.
- HINT:
-
Install the adjusting handle straight, and check that it is centered.
72730E
2.INSTALL REAR SEATBACK ADJUSTER ASSEMBLY OUTER RH
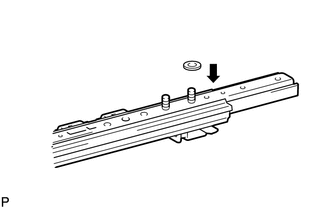
Install the washer.
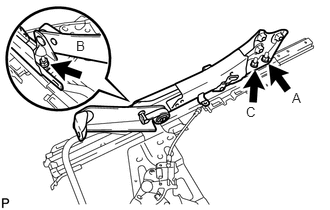
Install the rear seatback adjuster assembly with the nuts A, B and C in alphabetical order.
Tighten nut A.
- Torque:
- 32 N*m (326 kgf*cm, 24 ft.*lbf)
Tighten nut B.
- Torque:
- 32 N*m (326 kgf*cm, 24 ft.*lbf)
Tighten nut C.
- Torque:
- 32 N*m (326 kgf*cm, 24 ft.*lbf)
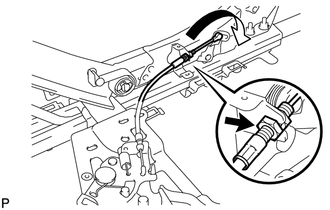
Insert and rotate the cable end to connect it.
Connect the rear No. 1 seat lock cable assembly.
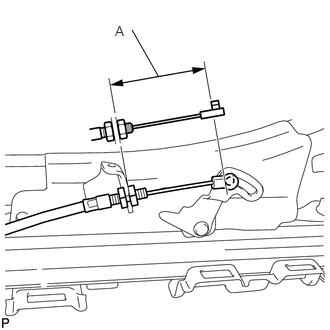
Adjust the cable length.
- HINT:
-
If the front nut became loose when the cable was removed, adjust the cable length.
| Area | Measurement |
|---|---|
| A | 51.5 to 53.7 mm (2.0276 to 2.1142 in.) |
- Torque:
- 5.5 N*m (56 kgf*cm, 49 in.*lbf)
72630B
3.INSTALL REAR NO. 1 SEAT ADJUSTER ASSEMBLY INNER RH
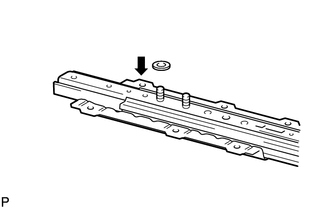
Install the washer.
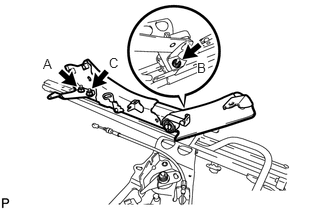
Install the rear No. 1 seat adjuster assembly and rear seat cushion support bracket with the nuts A, B and C in alphabetical order.
Tighten nut A.
- Torque:
- 32 N*m (326 kgf*cm, 24 ft.*lbf)
Tighten nut B.
- Torque:
- 32 N*m (326 kgf*cm, 24 ft.*lbf)
Tighten nut C.
- Torque:
- 32 N*m (326 kgf*cm, 24 ft.*lbf)
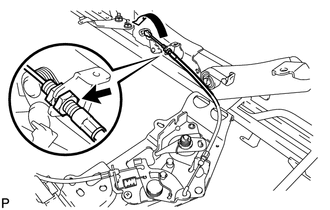
Insert and rotate the cable end to connect it.
Connect the rear No. 1 seat lock cable assembly.
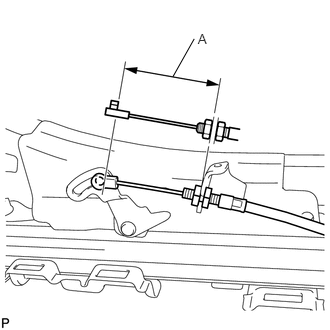
Adjust the cable length.
- HINT:
-
If the front nut became loose when the cable was removed, adjust the cable length.
| Area | Measurement |
|---|---|
| A | 51.5 to 53.7 mm (2.0276 to 2.1142 in.) |
- Torque:
- 5.5 N*m (56 kgf*cm, 49 in.*lbf)
71461A
4.INSTALL REAR SEAT CUSHION SPRING NO. 1
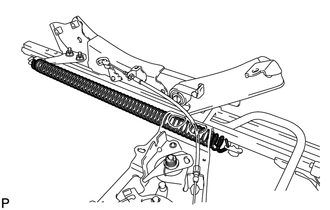
Install the rear seat cushion spring.
72704B
5.INSTALL REAR SEAT RECLINING CONTROL NO. 2 CABLE
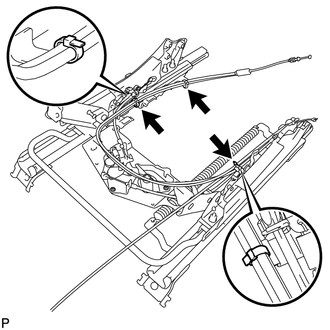
Connect the rear seat reclining control No. 2 cable and rear seatback lock control No. 1 cable sub-assembly with new 3 cable ties.
72069
6.INSTALL REAR SEATBACK LOCK CONTROL NO. 2 CABLE SUB-ASSEMBLY
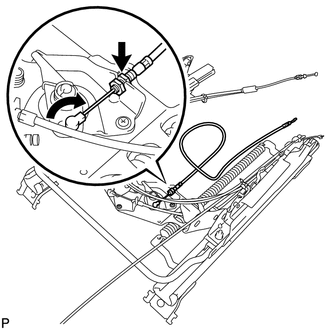
Insert and rotate the cable end to connect it.
Connect the rear seatback lock control No. 2 cable sub-assembly and install the cable.
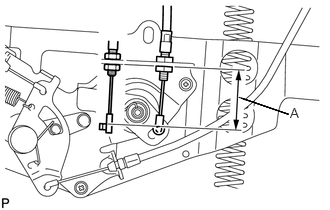
Adjust the cable length.
- HINT:
-
If the front nut became loose when the cable was removed, adjust the cable length.
| Area | Measurement |
|---|---|
| A | 39.3 to 46.3 mm (1.5472 to 1.8228 in.) |
- Torque:
- 5.5 N*m (56 kgf*cm, 49 in.*lbf)
72996
7.INSTALL REAR SEATBACK COVER RH
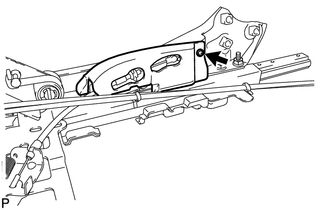
Install the rear seatback cover with the screw.
72997
8.INSTALL REAR SEATBACK COVER LH
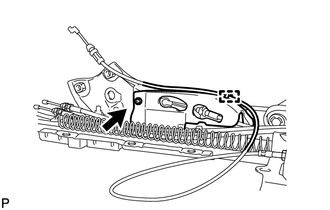
Install the rear seatback cover with the screw.
Connect the cable with the cable clamp.
71879B
9.INSTALL REAR SEAT RECLINING COVER INNER
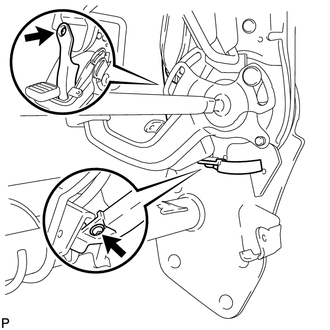
Install the rear seat reclining cover with the 2 screws.
71879A
10.INSTALL REAR SEAT RECLINING COVER INNER LH
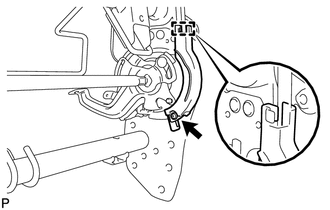
Attach the guide to install the rear seat reclining cover.
Install the screw.
72067
11.INSTALL REAR BACK LOCK CONTROL LEVER SUB-ASSEMBLY RH
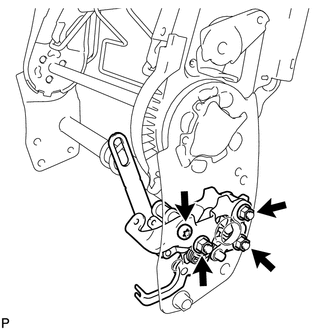
Install the rear back lock control lever sub-assembly and rear seat cushion lock striker sub-assembly with the 3 nuts.
- Torque:
- 21 N*m (214 kgf*cm, 16 ft.*lbf)
Using a T40 "TORX" socket, install the "TORX" bolt.
- Torque:
- 21 N*m (214 kgf*cm, 16 ft.*lbf)
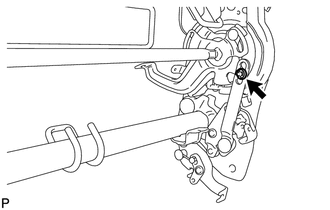
Install the washer and new E-ring.
71385B
12.INSTALL REAR SEAT CUSHION HOLDER BRACKET RH
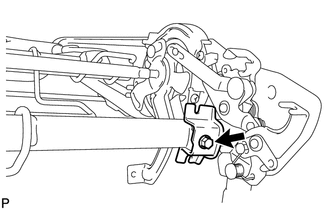
Install the rear seat cushion holder bracket with the bolt.
- Torque:
- 5.5 N*m (56 kgf*cm, 49 in.*lbf)
71017
13.INSTALL REAR SEATBACK FRAME SUB-ASSEMBLY RH
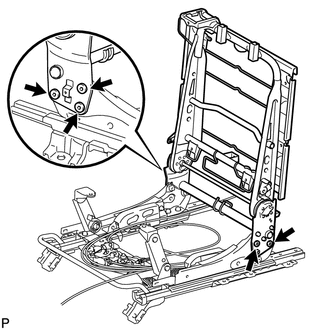
Using a T45 "TORX" socket, install the rear seatback frame sub-assembly with the 5 "TORX" bolts.
- Torque:
- 29 N*m (296 kgf*cm, 21 ft.*lbf)
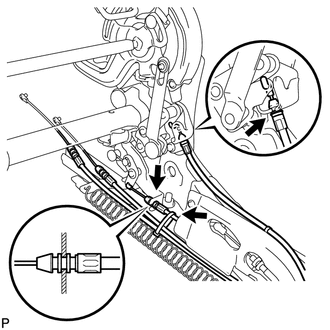
Connect the 2 cables.
- HINT:
- ·
When installing the upper cable, operate the release pedal at the back of the seat to make it easier to connect the cable. However, be careful because the seatback will fall forward.
·Install the lower cable cap on the center groove.
Bind the 3 cables with a cable tie.
Insert and rotate the 2 cable ends to connect them.
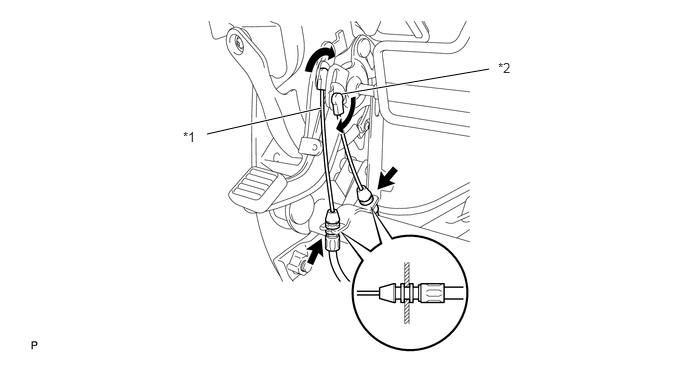
| *1 | Rear Seatback Lock Control No. 1 Cable Sub-assembly |
| *2 | Rear Seat Reclining Control No. 2 Cable |
Connect the 2 clamps and install the 2 cables.
- HINT:
-
Install the cap on the center groove.
71878A
14.INSTALL REAR SEAT RECLINING COVER INNER RH
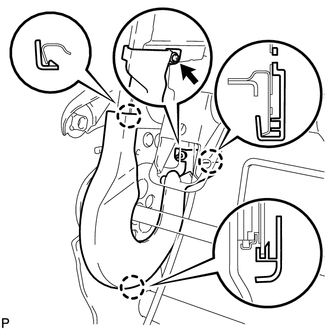
Attach the 3 claws to install the rear seat reclining cover.
Install the screw.
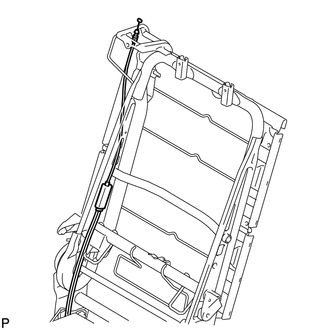
Insert the cable through the rear seatback frame sub-assembly.
71834A
15.INSTALL REAR SEAT RECLINING COVER NO. 1 LH
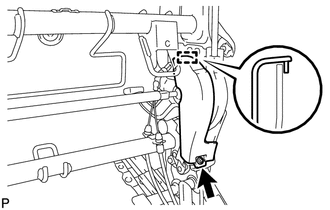
Attach the guide to install the rear seat reclining cover.
Install the screw.
87510R
16.INSTALL SEATBACK HEATER ASSEMBLY (w/ Seat Heater System)
71077S
17.INSTALL SEPARATE TYPE REAR SEATBACK COVER
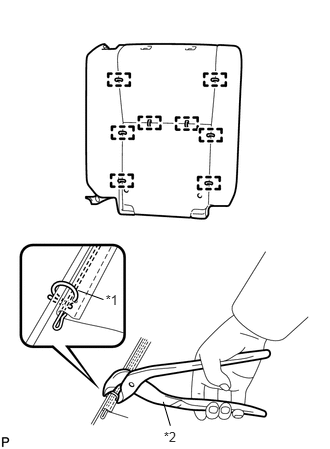
Using hog ring pliers, install the seatback cover to the seatback pad with 8 new hog rings.
| *1 | New Hog Ring |
| *2 | Hog Ring Pliers |
- NOTICE:
- ·
Be careful not to damage the cover.
·When installing the hog rings, avoid wrinkling the cover.
18.INSTALL SEATBACK COVER WITH PAD
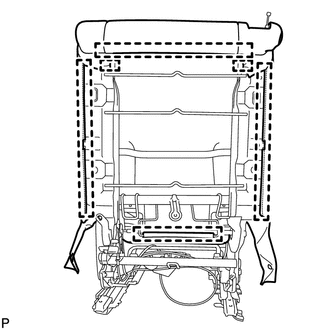
Attach the hooks to install the seatback cover with pad.
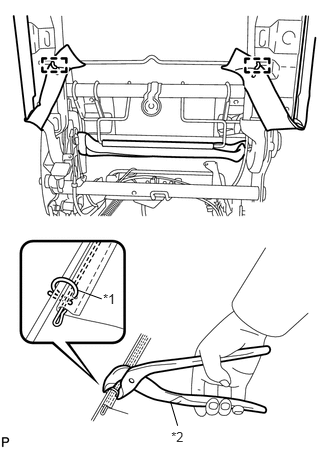
Using hog ring pliers, install the seatback cover to the seatback frame with 2 new hog rings.
| *1 | New Hog Ring |
| *2 | Hog Ring Pliers |
79013
19.INSTALL NO. 1 SEATBACK COVER SUB-ASSEMBLY RH
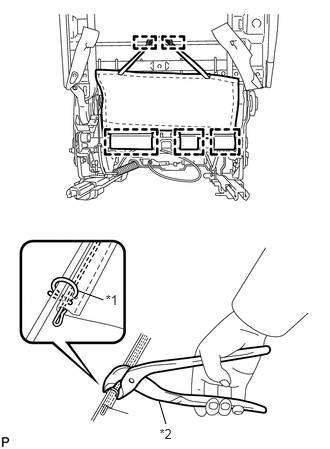
Attach the hooks.
| *1 | New Hog Ring |
| *2 | Hog Ring Pliers |
Using hog ring pliers, install the No. 1 seatback cover sub-assembly to the seatback frame with 2 new hog rings.
71931A
20.INSTALL REAR SEAT HEADREST SUPPORT
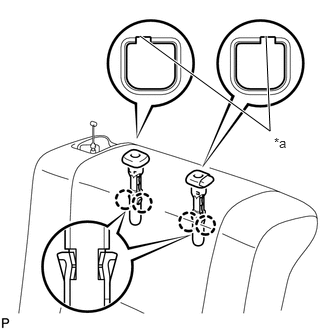
Align the protruding portion of the rear seat headrest supports with the installation grooves of the rear seatback frame.
| *a | Protruding |
Attach the 4 claws to install the 2 supports.
72927
21.INSTALL REAR SEAT CUSHION UNDER COVER RH
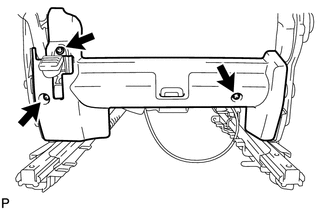
Install the rear seat cushion under cover with the 3 screws.
71629A
22.INSTALL REAR SEAT CUSHION HINGE COVER RH
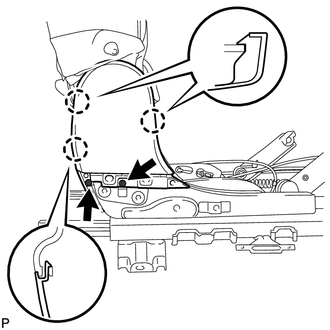
Attach the 3 claws to install the rear seat cushion hinge cover.
Install the 2 screws.
71691E
23.INSTALL REAR SEAT CUSHION HINGE COVER NO. 1
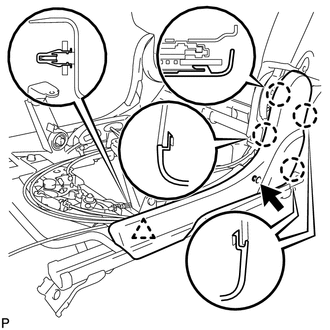
Attach the 4 claws and clip to install the rear seat cushion hinge cover.
Install the screw.
71701B
24.INSTALL REAR SEATBACK BOARD SUB-ASSEMBLY RH
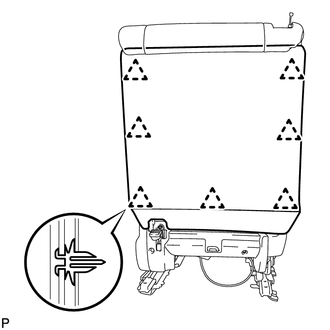
Attach the 7 clips to install the rear seatback board sub-assembly.
72810A
25.INSTALL SEAT ARMREST ASSEMBLY RH (w/ Armrest)
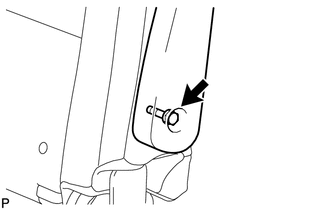
Install the seat armrest assembly with the bolt.
- Torque:
- 19 N*m (194 kgf*cm, 14 ft.*lbf)
72848A
26.INSTALL REAR NO. 1 SEAT ARMREST CAP (w/ Armrest)
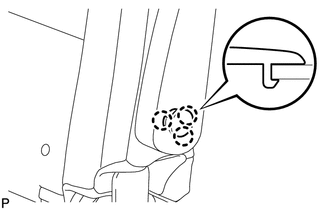
Attach the 3 claws to install the rear No. 1 seat armrest cap.
72057
27.INSTALL REAR SEAT LOCK CONTROL LEVER SUB-ASSEMBLY RH
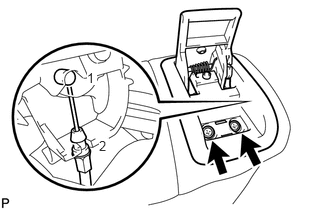
Connect the cable in the order shown in the illustration to install the lock control lever sub-assembly.
Install the rear seat lock control lever sub-assembly with the 2 screws.
72615C
28.INSTALL REAR SEATBACK LOCK STRIKER COVER
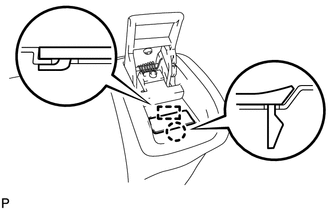
Attach the guide and claw to install the rear seatback lock striker cover.
71940A
29.INSTALL REAR SEAT HEADREST ASSEMBLY
87501A
30.INSTALL SEAT HEATER CONTROL SUB-ASSEMBLY RH
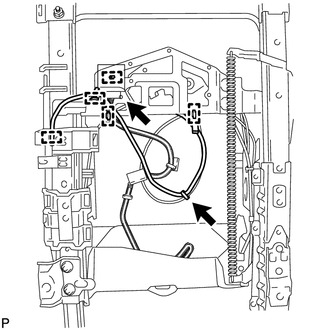
Connect the connector.
Attach the 5 harness clamps to install the seat heater control sub-assembly.
Fasten the harness and cable.
72995B
31.INSTALL NO. 1 SEAT CUSHION COVER RH
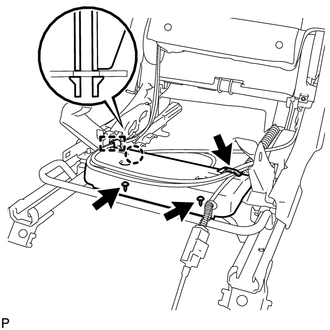
Attach the claw to install the No. 1 seat cushion cover.
Install the 2 screws.
Attach the cable clamp and connect the cable to the No. 1 seat cushion cover.
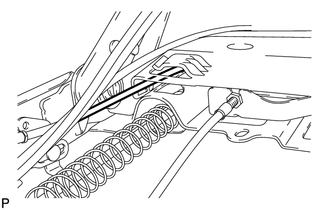
When installing the No. 1 seat cushion cover, pass the cable under the cover, as shown in the illustration.
87510P
32.INSTALL SEAT CUSHION HEATER ASSEMBLY (w/ Seat Heater System)
71075S
33.INSTALL SEPARATE TYPE REAR SEAT CUSHION COVER
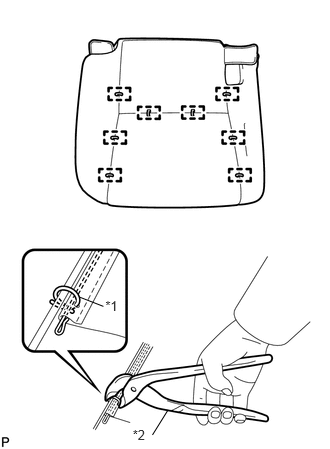
Using hog ring pliers, install the seat cushion cover to the seat cushion pad with 8 new hog rings.
| *1 | New Hog Ring |
| *2 | Hog Ring Pliers |
- NOTICE:
- ·
Be careful not to damage the cover.
·When installing the hog rings, avoid wrinkling the cover.
71650B
34.INSTALL REAR SEAT CUSHION SPRING ASSEMBLY RH (w/ Seat Heater System)
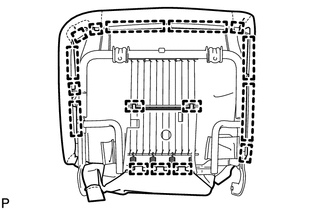
Attach the hooks to install the rear seat cushion spring assembly.
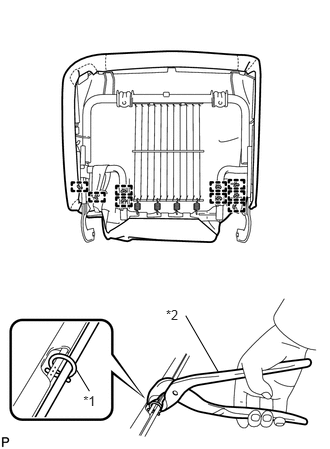
Using hog ring pliers, install the seat cushion spring with 9 new hog rings.
| *1 | New Hog Ring |
| *2 | Hog Ring Pliers |
71650B
35.INSTALL REAR SEAT CUSHION SPRING ASSEMBLY RH (w/o Seat Heater System)
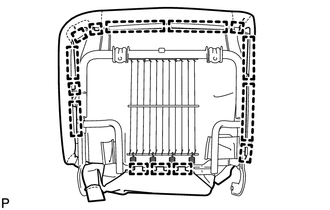
Attach the hooks to install the rear seat cushion spring assembly.
Using hog ring pliers, install the seat cushion spring with 9 new hog rings.
| *1 | New Hog Ring |
| *2 | Hog Ring Pliers |
36.INSTALL REAR NO. 1 SEAT CUSHION ASSEMBLY RH
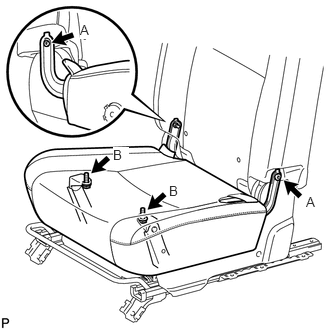
Install the 2 bushes to the cushion spring. Then, using a T45 "TORX" socket, install the 2 "TORX" bolts.
for Bolt A
- Torque:
- 21 N*m (214 kgf*cm, 16 ft.*lbf)
Install the 2 bolts.
for Bolt B
- Torque:
- 32 N*m (326 kgf*cm, 24 ft.*lbf)
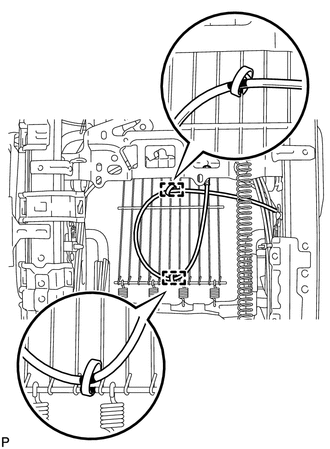
Fasten the cable to the seat cushion spring with 2 clamps and connect the cable.
- HINT:
-
Align the cable with the alignment marks on the seat cushion spring.
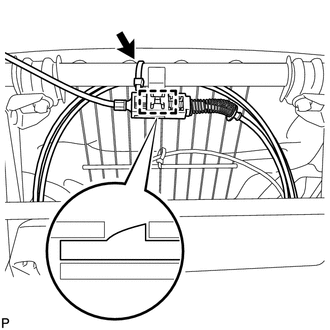
Fasten the cable with a cable tie.
Attach the cable clamp and connect the cable to the seat cushion spring.
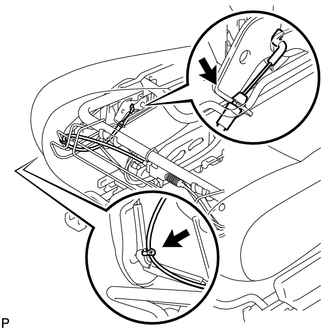
Fasten the cable to the seat cushion spring with a cable tie and connect the cable.
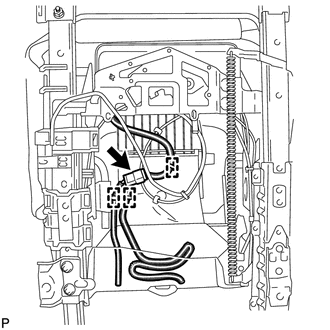
Connect the connector and attach the 3 harness clamps.
- HINT:
-
If the vehicle is equipped with the seat heater system, connect the connector and attach the clamps.
73380A
37.INSTALL REAR SEAT INNER BELT ASSEMBLY
71691H
38.INSTALL REAR SEAT CUSHION HINGE COVER NO. 2
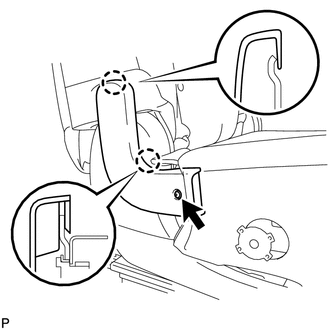
Attach the 2 claws to install the rear seat cushion hinge cover.
Install the screw.
71692H
39.INSTALL REAR SEAT CUSHION HINGE COVER NO. 3
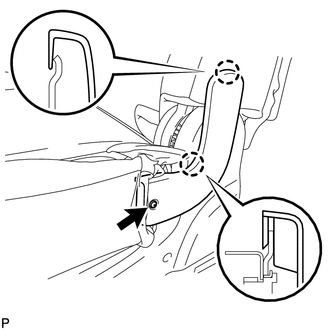
Attach the 2 claws to install the rear seat cushion hinge cover.
Install the screw.
72735
40.INSTALL REAR SEAT RECLINING RELEASE LEVER
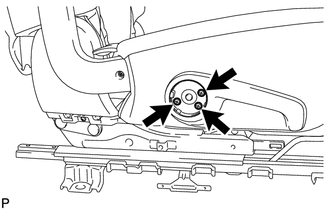
Install the rear seat reclining release lever with the 3 screws.
72572B
41.INSTALL RECLINING ADJUSTER KNOB CAP RH
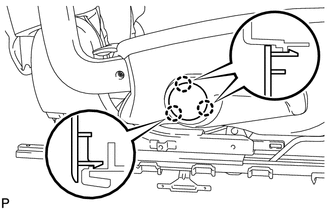
Attach the 3 claws to install the reclining adjuster knob cap.
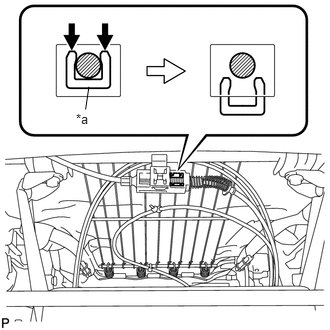
Press the pink button on the rear seatback lock control No. 1 cable to release the cable lock, operate the lever a few times to adjust the amount of cable play, and then push in the pink button to lock the cable.
| *a | Pink Button |