WINDOW / GLASS POWER WINDOW CONTROL SYSTEM Manual Up / Down Function does not Operate on Back Door Only
DESCRIPTION
If the back door power window does not operate, the retract switch in the rear wiper motor, the back door power window motor or the wire harness may be abnormal.
WIRING DIAGRAM
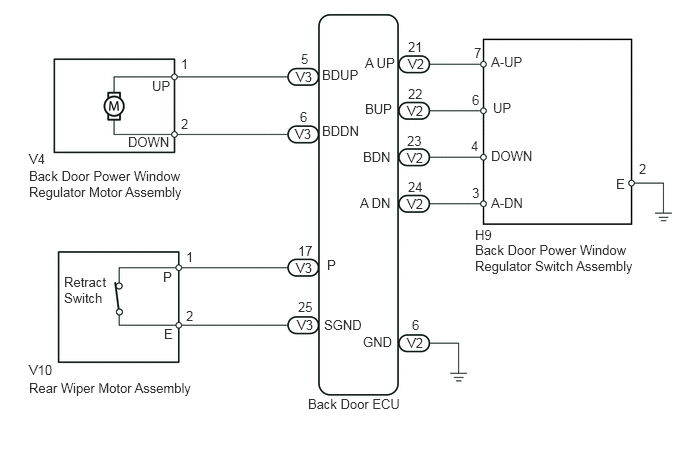
PROCEDURE
Turn the ignition switch to ON.
Turn the rear wiper switch on.
Turn the rear wiper switch off.
Check that the rear wiper stops at the retract position when the rear wiper switch is turned off.
- OK:
The rear wiper arm returns to the correct position.
OK
NG
Connect the Techstream to the DLC3.
Turn the ignition switch to ON.
Turn the Techstream on.
Enter the following menus: Body Electrical / Back Door P/W / Data List / Wiper Retracted position
According to the display on the Techstream, read the Data List.
| Tester Display | Measurement Item/Range | Normal Condition | Diagnostic Note |
|---|---|---|---|
| Wiper Retracted position | Rear wiper retract switch signal / ON or OFF | ON: Rear wiper retract switch is in ON position
OFF: Rear wiper retract switch is in OFF position |
- |
- OK:
The Techstream display changes normally when rear wiper motor is operated.
OK
NG
Connect the Techstream to the DLC3.
Turn the ignition switch to ON.
Turn the Techstream on.
Enter the following menus: Body Electrical / Back Door P/W / Active Test / Back Door Power Window
Check that the back door power window regulator motor move the window UP/DOWN.
| Tester Display | Test Part | Control Range | Diagnostic Note |
|---|---|---|---|
| Back Door Power Window | Back Door Power Window | OFF/UP/DOWN | - |
- OK:
Back door power window opens and closes.
OK
NG
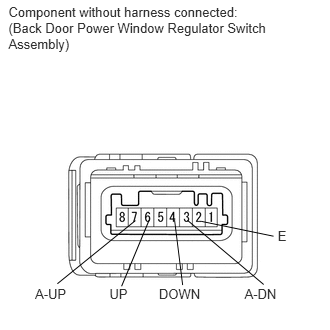
Remove the back door power window regulator switch assembly (See page Vehicle Exterior>WINDOW / GLASS>REAR POWER WINDOW SWITCH>REMOVAL).
Measure the resistance according to the value(s) in the table below.
- Standard Resistance:
Tester Connection Condition Specified Condition 2 (E) - 6(UP) - 7(A-UP) Auto UP Below 1 Ω 2 (E) - 6(UP) UP Below 1 Ω 2 (E) - 4 (DOWN) DOWN Below 1 Ω 2 (E) - 3 (A-DN) - 4 (DOWN) Auto DOWN Below 1 Ω 2 (E) - Each connectors OFF 10 kΩ or higher
Reinstall the back door power window regulator switch assembly.
OK
NG
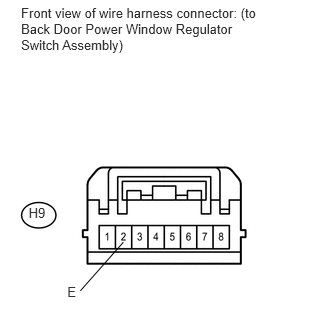
Disconnect the H9 back door power window regulator switch assembly connector.
Measure the resistance according to the value(s) in the table below.
- Standard Resistance:
Tester Connection Condition Specified Condition H9-2 (E) - Body Ground Always Below 1 Ω
Reconnect the back door power window regulator switch assembly connector.
OK
NG
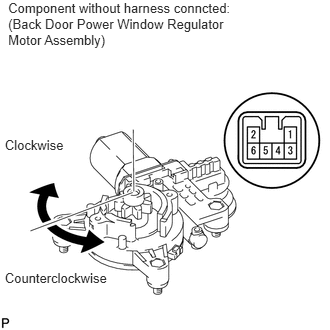
Remove the back door regulator motor assembly (See page Vehicle Exterior>DOOR / HATCH>BACK DOOR>DISASSEMBLY).
Apply battery voltage between the connector terminals and check that the motor gear rotates smoothly.
- NOTICE:
-
Do not apply battery voltage to any terminals except terminals 1 and 2.
- Standard:
Tester Connection Specified Condition Battery positive (+) → 2
Battery negative (-) → 1Motor gear counterclockwise Battery positive (+) → 1
Battery negative (-) → 2Motor gear clockwise
Reinstall the back door regulator motor assembly.
OK
NG
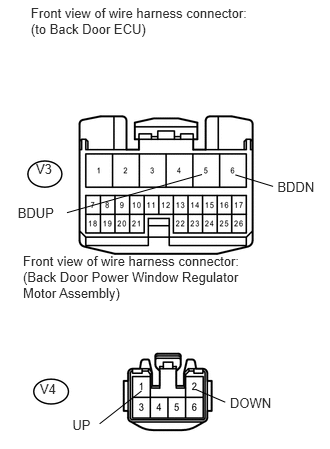
Disconnect the V3 back door ECU connector.
Disconnect the V4 back door regulator motor assembly connector.
Measure the resistance according to the value(s) in the table below.
- Standard Resistance:
Tester Connection Condition Specified Condition V3-5 (BDUP) - V4-1 (UP) Always Below 1 Ω V3-6 (BDDN) - V4-2 (DOWN) Always Below 1 Ω V3-5 (BDUP) - Body ground Always 10 kΩ or higher V3-6 (BDDN) - Body ground Always 10 kΩ or higher
Reconnect the back door ECU connector.
Reconnect the back door regulator motor assembly connector.
OK
NG
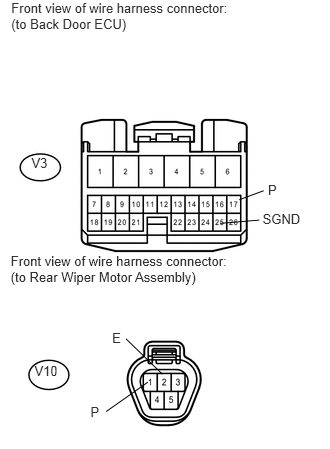
Disconnect the V3 back door ECU connector.
Disconnect the V10 rear wiper motor assembly connector.
Measure the resistance according to the value(s) in the table below.
- Standard Resistance:
Tester Connection Condition Specified Condition V3-17 (P) - V10-1 (P) Always Below 1 Ω V3-25 (SGND) - V10-2 (E) Always Below 1 Ω V3-17 (P) - Body ground Always 10 kΩ or higher V3-25 (SGND)- Body ground Always 10 kΩ or higher
Reconnect the rear wiper motor assembly connector.
Reconnect the back door ECU connector.
OK
NG