DOOR / HATCH BACK DOOR REASSEMBLY
PROCEDURE

 76871B
1.INSTALL REAR SPOILER COVER
81580D
2.INSTALL REAR LIGHT ASSEMBLY RH
81590A
3.INSTALL REAR LIGHT ASSEMBLY LH
69110A
4.INSTALL BACK DOOR LOCK (w/o Power Back Door)
69110A
5.INSTALL BACK DOOR LOCK (w/ Power Back Door)
69308
6.INSTALL BACK DOOR LOCK PROTECTOR
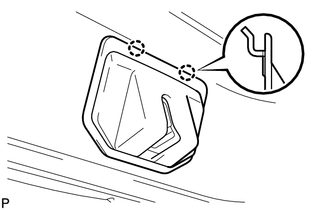
Engage the 2 claws and install the back door lock protector sub-assembly.
69211C
7.INSTALL BACK DOOR OUTSIDE HANDLE
81270
8.INSTALL LICENSE PLATE LIGHT ASSEMBLY
86790D
9.INSTALL REAR TELEVISION CAMERA ASSEMBLY (w/ Rear View Monitor System)
76801
10.INSTALL BACK DOOR OUTSIDE GARNISH
69055B
11.INSTALL BACK DOOR LOCK CYLINDER
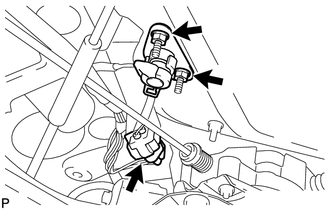
Install the back door lock cylinder with the 2 nuts.
Connect the connector.
69850D
12.INSTALL BACK DOOR POWER WINDOW REGULATOR ASSEMBLY
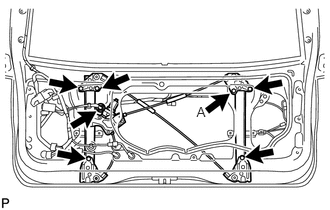
Apply MP grease to the sliding and rotating areas of the back door power window regulator.
Insert the back door power window regulator into the door panel. Provisionally tighten nut A to hang the back door power window regulator on the door panel.
- NOTICE:
-
Do not drop the back door power window regulator as it may be damaged.
Install the back door power window regulator with the 5 nuts, and tighten nut A.
- Torque:
- 8.0 N*m (82 kgf*cm, 71 in.*lbf)
Connect the connector.
68131
13.INSTALL BACK DOOR GLASS
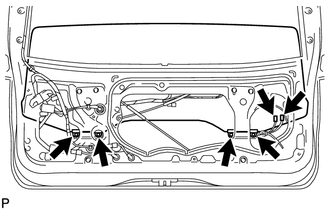
Install the back door glass onto the back door power window regulator with the 4 bolts.
- NOTICE:
-
Do not damage the glass.
Connect the 2 connectors.
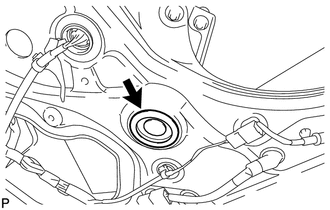
Install the hole plug.
68275
14.INSTALL BACK DOOR GLASS RUN
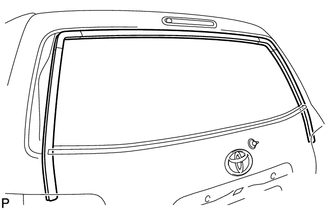
Install a new back door glass run.
68290A
15.INSTALL BACK DOOR GLASS OUTER WEATHERSTRIP ASSEMBLY
75816
16.INSTALL BACK DOOR OUTSIDE MOULDING LH
75815
17.INSTALL BACK DOOR OUTSIDE MOULDING RH
85293A
18.INSTALL REAR WIPER STOPPER
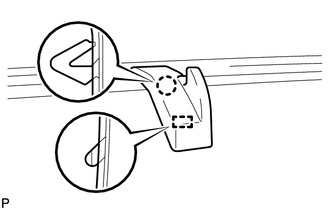
Engage the claw and guide and install the liner wiper step.
85143R
19.INSTALL REAR WIPER MOTOR GROMMET
85110R
20.INSTALL REAR WIPER MOTOR ASSEMBLY
21.INSTALL REAR WIPER ARM AND BLADE ASSEMBLY
85292A
22.INSTALL REAR WIPER ARM HEAD CAP
84260F
23.INSTALL POWER BACK DOOR SENSOR RH
84260G
24.INSTALL POWER BACK DOOR SENSOR LH
67848C
25.INSTALL BACK DOOR NO. 2 SERVICE HOLE COVER
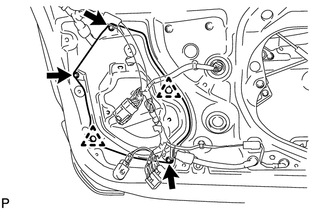
Engage the 2 clips and install the back door No. 2 service hole cover with the 3 screws.
89221
26.INSTALL MULTIPLEX NETWORK BODY ECU (w/ Power Back Door)
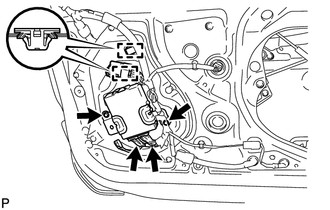
Install the multiplex network body ECU with the 2 screws.
Connect the 2 connector and engage the 2 clamps.
89747C
27.INSTALL POWER BACK DOOR WARNING BUZZER (w/ Power Back Door)
67847A
28.INSTALL BACK DOOR SERVICE HOLE COVER
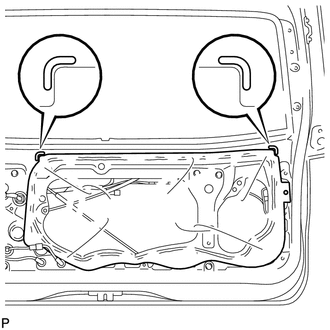
Apply butyl tape to the door panel, then install a new back door service hole cover as shown in the illustration.
- HINT:
- ·
There should be no wrinkles or folds after attaching the service hole cover.
·After attaching the service hole cover, check the quality of the seal.
68291
29.INSTALL BACK DOOR GLASS WEATHERSTRIP
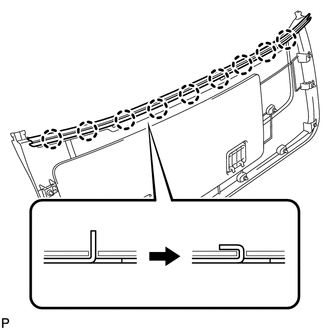
Install a new back door glass weatherstrip on the back door trim board assembly and fold down the 9 claws, as shown in the illustration.
67750
30.INSTALL BACK DOOR TRIM BOARD ASSEMBLY
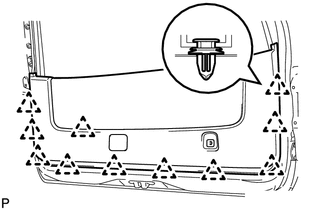
Engage the 11 clips and install the back door trim board assembly.
67961
31.INSTALL BACK DOOR PULL STRAP
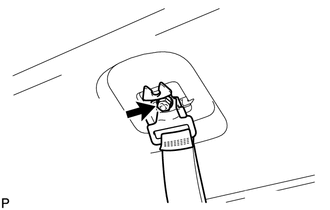
Install the back door pull strap with the bolt.
- Torque:
- 5.5 N*m (56 kgf*cm, 49 in.*lbf)
67963A
32.INSTALL BACK DOOR STRAP COVER
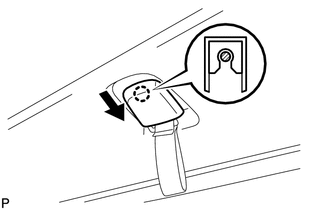
Engage the claw and slid the back door strap cover as shown in the illustration, and install it.
68957B
33.INSTALL BACK DOOR STAY LOWER BRACKET (w/ Power Back Door)
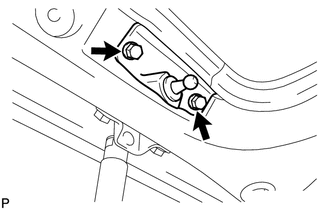
Install the back door stay lower bracket with the 2 bolts.
- Torque:
- 14 N*m (140 kgf*cm, 10 ft.*lbf)
67938A
34.INSTALL BACK DOOR SIDE GARNISH LH
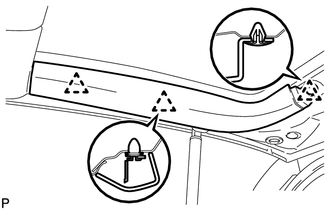
Engage the 3 clips and install the back door side garnish LH.
67937B
35.INSTALL BACK DOOR SIDE GARNISH RH
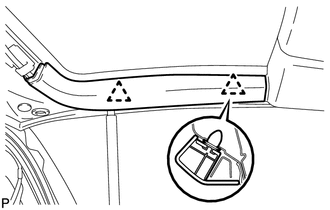
Engage the 2 clips and install the back door side garnish RH.
67939B
36.INSTALL BACK DOOR CENTER GARNISH
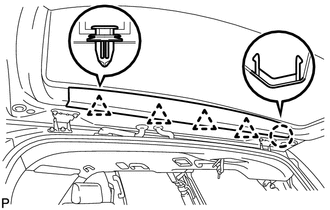
Engage the 4 clips and the claw and install the back door center garnish.
85475
37.INSTALL POWER BACK DOOR ROD (w/ Power Back Door)
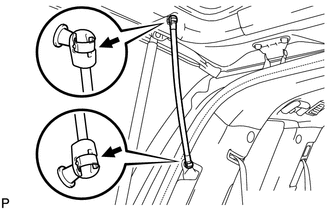
Install the power back door rod with the 2 stop rings.
38.CONNECT CABLE TO NEGATIVE BATTERY TERMINAL
- Torque:
- 5.4 N*m (55 kgf*cm, 48 in.*lbf)
- CAUTION:
-
When disconnecting the cable some systems need to be initialized after the cable is reconnected (See page General>INTRODUCTION>REPAIR INSTRUCTION>INITIALIZATION).
39.INSPECT SRS WARNING LIGHT
Inspect the SRS warning light (See page Vehicle Interior>SUPPLEMENTAL RESTRAINT SYSTEMS>AIRBAG SYSTEM>DIAGNOSIS SYSTEM).