EXTERIOR PANELS / TRIM BLACK OUT TAPE(for Front Door) REMOVAL
CAUTION / NOTICE / HINT
- HINT:
- ·
Use the same procedure for the RH side and LH side.
·The procedure described below is for the LH side.
PROCEDURE

 67492A
1.REMOVE FRONT DOOR LOWER FRAME BRACKET GARNISH
- HINT:
-
Use the same procedure as for the RH side (See page Vehicle Exterior>DOOR / HATCH>FRONT DOOR>DISASSEMBLY).
69284C
2.REMOVE FRONT DOOR INSIDE HANDLE BEZEL PLUG
- HINT:
-
Use the same procedure as for the RH side (See page Vehicle Exterior>DOOR / HATCH>FRONT DOOR>DISASSEMBLY).
74232
3.REMOVE FRONT ARMREST BASE UPPER PANEL
- HINT:
-
Use the same procedure as for the RH side (See page Vehicle Exterior>DOOR / HATCH>FRONT DOOR>DISASSEMBLY).
67602
4.REMOVE FRONT DOOR TRIM BOARD SUB-ASSEMBLY
- HINT:
-
Use the same procedure as for the RH side (See page Vehicle Exterior>DOOR / HATCH>FRONT DOOR>DISASSEMBLY).
87906B
5.REMOVE OUTER REAR VIEW MIRROR ASSEMBLY
68210C
6.REMOVE FRONT DOOR GLASS OUTER WEATHERSTRIP ASSEMBLY
68151E
7.REMOVE FRONT DOOR GLASS RUN
- HINT:
-
Use the same procedure as for the RH side (See page Vehicle Exterior>DOOR / HATCH>FRONT DOOR>DISASSEMBLY).
75922M
8.REMOVE NO. 1 BLACK OUT TAPE
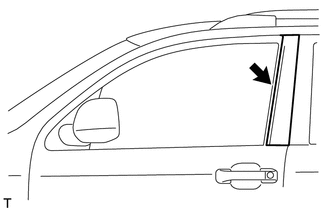
Using an infrared light, heat the No. 1 black out tape.
- CAUTION:
-
Do not burn yourself on the hot front door panel or with the infrared light.
- HINT:
-
Heat at 40 to 60°C (104 to 140°F) for 3 to 5 minutes.
Lift the end portion with your nail and peel it parallel to the attachment surface.