PARK ASSIST / MONITORING BLIND SPOT MONITOR SYSTEM OPERATION CHECK
BLIND SPOT MONITOR BEAM AXIS INSPECTION
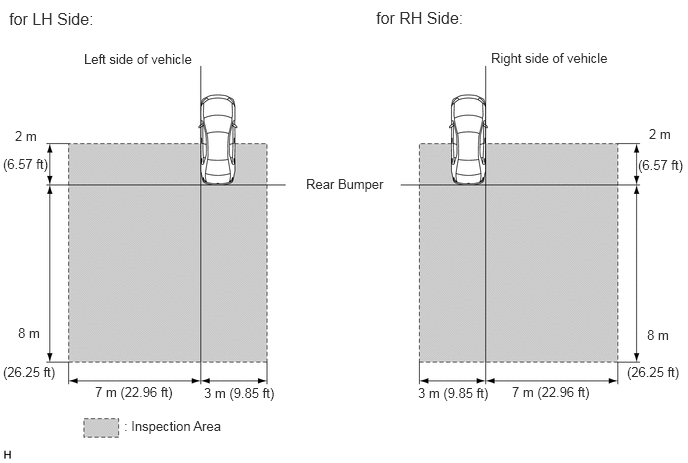
Move the vehicle to an area which can provide the space specified in the illustration to perform the beam axis inspection.
- NOTICE:
- ·
Perform this inspection on level ground.
·Make sure that there are no metal objects around the vehicle or on the ground.
·Unload the vehicle before beginning the inspection.
·Confirm that the tire pressure is correct before beginning the inspection.
·Do not place an object other than the reflector (such as a large metallic object) in or allow people to enter the inspection area (W 10 m (32.81 ft) x L 10 m (32.81 ft) x H 4 m (13.13 ft)) shown in the illustration.
·Check that DTC C1ABB and DTC C1ABC are not output.
Procedure to enter the Test Mode
Connect the Techstream to the DLC3.
Turn the ignition switch to ON.
Turn the blind spot monitor main switch (warning canceling switch assembly) on.
Turn the Techstream on.
Switch the blind monitor sensor to Test Mode using the Techstream. Enter the following menus: Body Electrical / BSM / Utility / Test Mode.
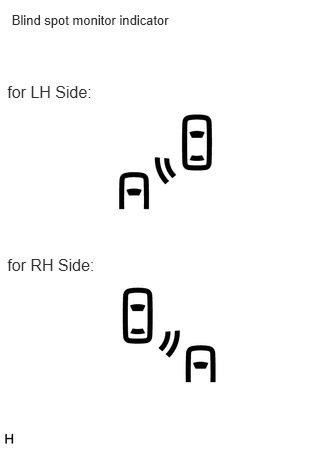
Perform the blind spot monitor beam axis inspection.
Check that the blind spot monitor indicators are not illuminated.
- NOTICE:
-
If an indicator is illuminated, the system is reacting to a piece of metal or some other object. In this case, move the vehicle to another place.
Place the reflector at position A.
- SST
- 09870-60000
09870-60010
09870-60040
- HINT:
-
Set the reflector so that its center is 565 mm (1.85 ft) above the floor.
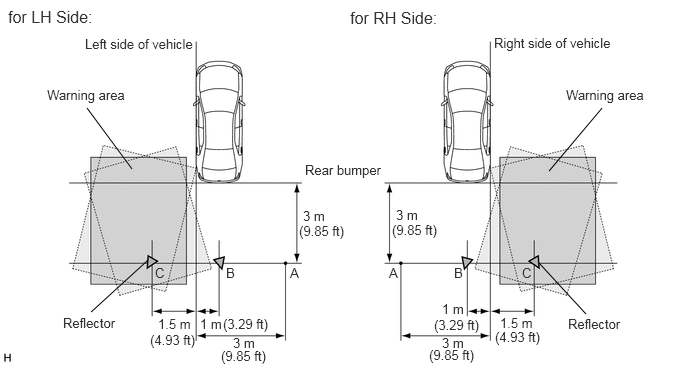
Enter Test Mode using the Techstream. Move the reflector from position A to B as shown in the illustration.
- HINT:
- ·
Make sure that the orientation of the reflector is as shown in the illustration.
·The range of allowable sensor installation angles (in the horizontal plane) with which the system can operate properly are illustrated by the different warning areas (drawn with dashed lines) shown in the illustration.
- NOTICE:
-
While moving the reflector, make sure that no people or objects pass between the vehicle and the reflector.
After placing the reflector at the specified position, be sure to leave the inspection area quickly. Also, make sure that no objects other than the reflector are in the inspection area and check that the blind spot monitor indicator does not illuminate.
- HINT:
-
If the indicator illuminates, repeat the same action (i.e. move the reflector from A to B). If the indicator illuminates again, check the installation of the blind spot monitor sensor.
Move the reflector from position B to C as shown in the illustration.
- HINT:
-
Make sure that the orientation of the reflector is as shown in the illustration.
- NOTICE:
-
While moving the reflector, make sure that no people or objects pass between the vehicle and the reflector.
After placing the reflector at the specified position, be sure to leave the inspection area quickly. Also, make sure that no objects other than the reflector are in the inspection area and check that the blind spot monitor indicator illuminates.
- HINT:
-
If the indicator does not illuminate, repeat the same action (i.e. move the reflector from B to C). If the indicator does not illuminate again, check the installation of the blind spot monitor sensor.
Finish Test Mode.
CHECK BLIND SPOT MONITOR INSTALLATION
- NOTICE:
- ·
Perform this inspection on level ground.
·Unload the vehicle before beginning the inspection.
·Confirm that the tire pressure is correct before beginning the inspection.
Remove the rear bumper (See page Audio / Visual / Telematics>PARK ASSIST / MONITORING>BLIND SPOT MONITOR SENSOR>REMOVAL).
Attach a jig similar to the one shown in the illustration to the outward facing surface of the blind spot monitor sensor and check that the blind spot monitor sensor is perpendicular to the floor surface or within the allowable range.
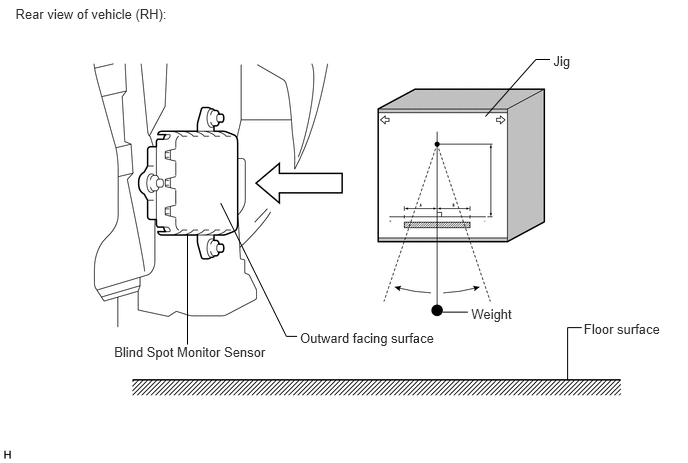
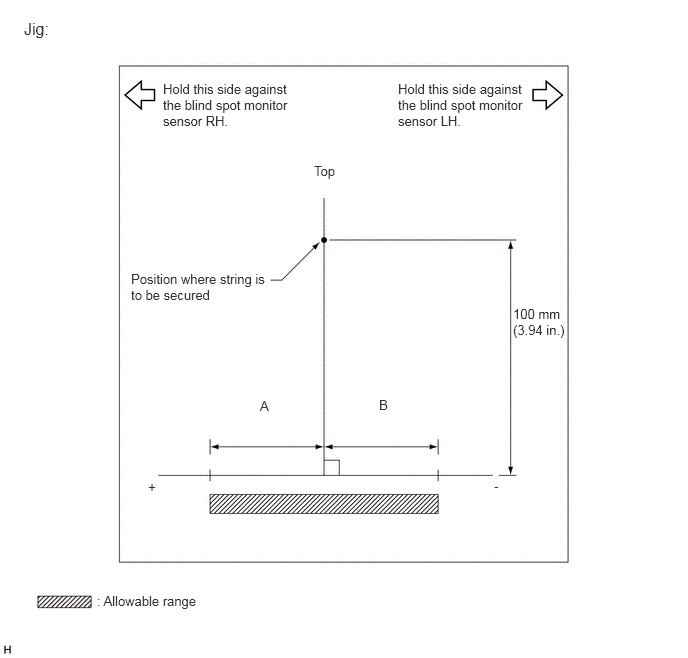
| A | B | |
|---|---|---|
| Blind spot monitor sensor RH | 17 mm (0.67 in) | -17 mm (-0.67 in) |
| Blind spot monitor sensor LH | 8 mm (0.31 in) | -26 mm (-1.02 in) |
- NOTICE:
-
Allowable ranges A and B are different between the blind spot monitor sensor LH and RH.
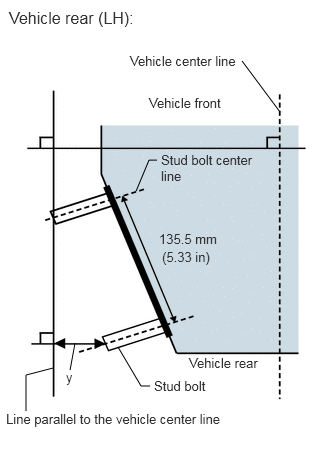
Using the sensor installation stud bolt center lines as a reference, check that the stud bolts are as shown in the illustration.
| Dimension | Specified Value |
|---|---|
| y | 37 to 77 mm (1.46 to 3.03 in) |
- HINT:
-
If the results are not as specified, it is possible that the blind spot monitor sensor installation area (frame, stud bolt) is deformed, so make corrections as necessary.