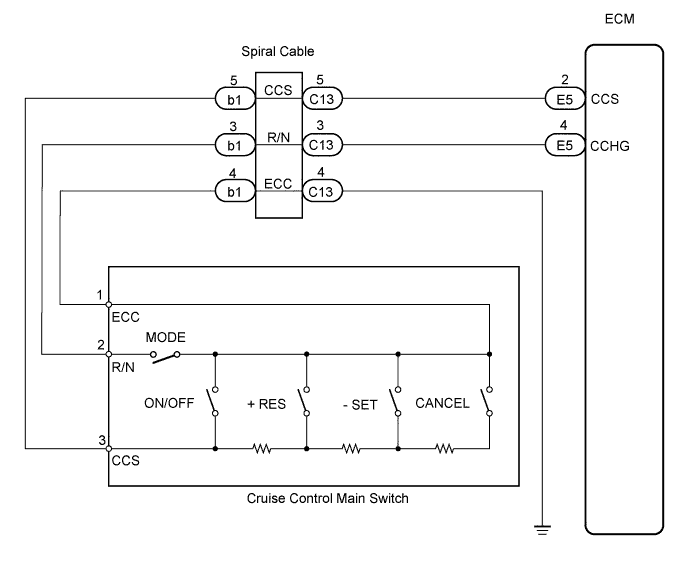
DYNAMIC LASER CRUISE CONTROL SYSTEM > Cruise Control Switch Circuit |
| 1.READ VALUE USING TECHSTREAM |
 |
Connect the Techstream to the DLC3.
Turn the ignition switch to ON.
Turn the Techstream on.
Enter the following menus: Powertrain / Laser Cruise / Data List.
Check the Data List for proper functioning of the cruise control main switch.
| Techstream Display | Measurement Item/Range | Normal Condition | Diagnostic Note |
| CCS Main SW M-CPU | Main switch signal (Main CPU) / ON or OFF | ON: Main switch ON OFF: Main switch OFF | - |
| Cancel Switch | CANCEL switch signal / ON or OFF | ON: CANCEL switch ON OFF: CANCEL switch OFF | - |
| SET/COAST Switch | SET/COAST switch signal / ON or OFF | ON: - (COAST)/SET switch ON OFF: - (COAST)/SET switch OFF | - |
| RES/ACC Switch | RES/ACC switch signal / ON or OFF | ON: + (ACCEL)/RES (RESUME) switch ON OFF: + (ACCEL)/RES (RESUME) switch OFF | - |
| Result | Proceed to |
| OK | A |
| NG (all items are defective) | B |
| NG (1 to 3 items are defective) | C |
|
| ||||
|
| ||||
| B | |
 |
| 2.INSPECT CRUISE CONTROL MAIN SWITCH |
Remove the cruise control main switch (Click here).
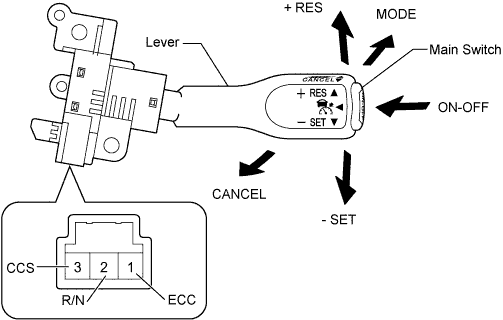
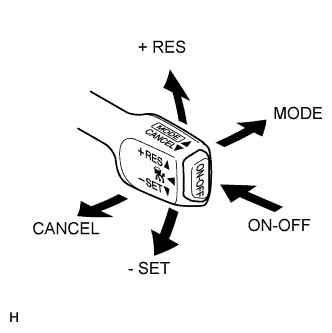
Measure the resistance according to the value(s) in the table below.
| Tester Connection | Switch Condition | Specified Condition |
| 1 (ECC) - 2 (R/N) 1 (ECC) - 3 (CCS) | Main Switch off*1 | 1 MΩ or higher |
| 1 (ECC) - 3 (CCS) | Main switch on | Below 2.5 Ω |
| 1 (ECC) - 2 (R/N) | MODE | Below 2.5 Ω |
| 1 (ECC) - 3 (CCS) | + RES | 235 to 245 Ω |
| 1 (ECC) - 3 (CCS) | - SET | 617 to 643 Ω |
| 1 (ECC) - 3 (CCS) | CANCEL | 1509 to 1571 Ω |
|
| ||||
| OK | |
|
| 3.INSPECT HARNESS AND CONNECTOR (CRUISE CONTROL MAIN SWITCH - SPIRAL CABLE) |
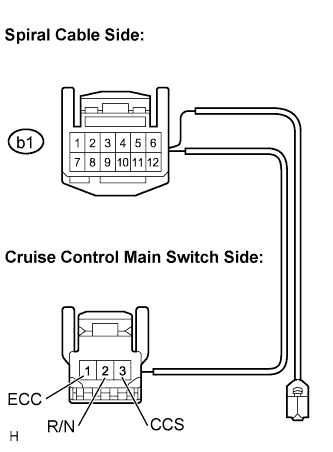 |
Disconnect the spiral cable connector.
Measure the resistance according to the value(s) in the table below.
| Tester Connection | Condition | Specified Condition |
| Cruise control main switch side connector 3 (CCS) - b1-5 | Always | Below 1 Ω |
| Cruise control main switch side connector 1 (ECC) - b1-4 | Always | Below 1 Ω |
| Cruise control main switch side connector 2 (R/N) - b1-3 | Always | Below 1 Ω |
|
| ||||
| OK | |
|
| 4.INSPECT SPIRAL CABLE |
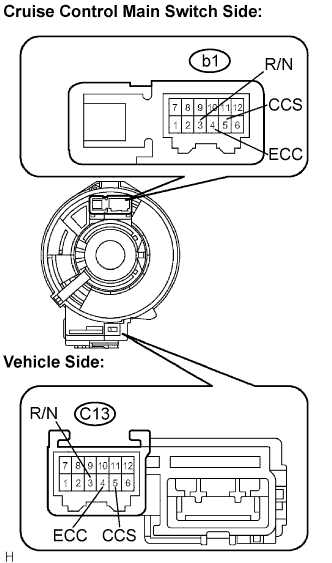 |
Remove the spiral cable.
Measure the resistance according to the value(s) in the table below.
| Tester Condition | Spiral Cable Position | Specified Condition |
| b1-3 (R/N) - C13-3 (R/N) | Center | Below 1 Ω |
| 2.5 rotations to the left | ||
| 2.5 rotations to the right | ||
| b1-5 (CCS) - C13-5 (CCS) | Center | Below 1 Ω |
| 2.5 rotations to the left | ||
| 2.5 rotations to the right | ||
| b1-4 (ECC) - C13-4 (ECC) | Center | Below 1 Ω |
| 2.5 rotations to the left | ||
| 2.5 rotations to the right |
|
| ||||
| OK | |
|
| 5.CHECK HARNESS AND CONNECTOR (SPIRAL CABLE - ECM) |
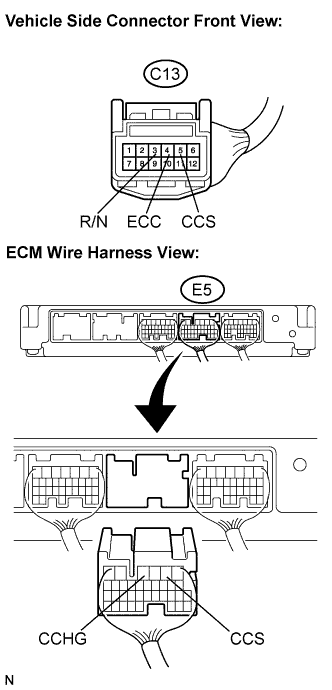 |
Measure the resistance according to the value(s) in the table below.
| Tester Connection | Condition | Specified Condition |
| C13-5 (CCS) - E5-2 (CCS) | Always | Below 1 Ω |
| C13-3 (R/N) - E5-4 (CCHG) | Always | Below 1 Ω |
| C13-5 (CCS) - Body ground | Always | 10 kΩ or higher |
| C13-3 (R/N) - Body ground | Always | 10 kΩ or higher |
| C13-4 (ECC) - Body ground | Always | Below 1 Ω |
|
| ||||
| OK | ||
 | ||
| ||
