B48 STARTING STARTER REMOVAL
CAUTION / NOTICE / HINT
- CAUTION:
- ·
Working on 12 V vehicle electrical system.
Risk of short circuits! Risk of fire!
-Disconnect the cable from the negative (-) battery terminal.
- ·
Hot surfaces.
Risk of burning!
-Perform all work only on components that have cooled down.
PROCEDURE

 1.DISCONNECT CABLE FROM NEGATIVE BATTERY TERMINAL
Click hereGeneral>MAINTENANCE>B48 BATTERY>REMOVAL
51219
2.REMOVE FRONT SUSPENSION MEMBER LOWER PROTECTOR
12140
3.REMOVE OIL PAN COVER
- NOTICE:
- ·
Electrostatic discharge.
·Damage to or destruction of electrical components.
-Leave electrical components in original packaging until just before they are installed. Use the original packaging only for any return shipments. Always package removed components straight away.
-Only touch the housings of electrical components. Do not touch pins or multi-pin connectors directly.
-Anti static work clothing and antistatic shoes (with ESD symbol).
-For additional information see:
Click hereGeneral>INTRODUCTION>REPAIR INSTRUCTION>PRECAUTION
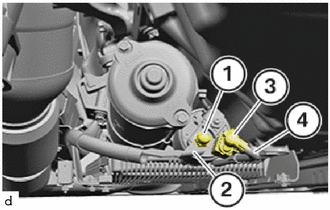
Unfasten nut (1).
Remove starter wiring assembly (2) from starter assembly.
Unlock connector (3) and disconnect.
Remove the transmission wire (4) for terminal 50 from the starter assembly.
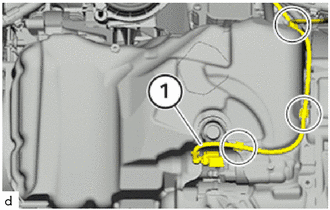
Unclip the transmission wire (1) from the oil pan cover in the marked areas.
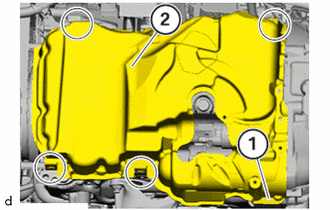
Remove the clip (1).
Remove the clips in the marked areas.
- NOTICE:
- ·
Bending of plastic parts.
Application of too much force can lead to bending of plastic parts.
-Place special tool directly beside the mounting clip.
-Continue unclipping the part without using the tool if possible.
Slightly lower the oil pan cover (2), slide forward and place it on the front axle support.
28100
4.REMOVE STARTER ASSEMBLY
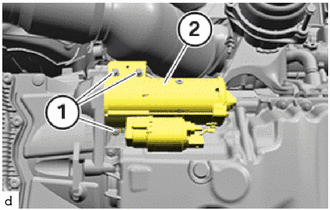
Loosen E10 bolts (1).
Remove the starter assembly (2).
28192
5.REMOVE STARTER COVER
Remove the starter cover from the starter assembly.