B58 BATTERY / CHARGING GENERATOR INSTALLATION
PROCEDURE

 16620D
1.INSTALL V-RIBBED BELT TENSIONER ASSEMBLY
- CAUTION:
- ·
Danger of injury!
-Reduce preload as far as possible before disassembly. Relieve component.
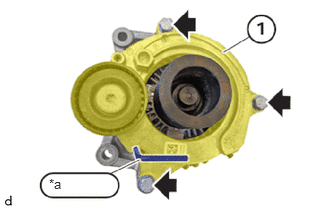
| *a | 4 mm Hexagon Wrench |
Guide in and install the V-ribbed belt tensioner assembly (1).
Tighten bolts (arrows).
- Torque:
- 28 N*m (286 kgf*cm, 21 ft.*lbf)
Make sure that the 4 mm hexagon wrench is fitted correctly.
27020
2.INSTALL GENERATOR ASSEMBLY
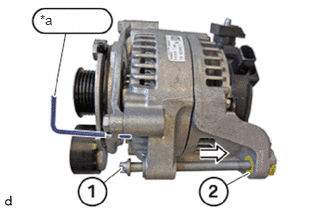
| *a | 4 mm Hexagon Wrench |
Make sure that the 4 mm hexagon wrench is fitted correctly.
Slightly push back the threaded support sleeve (2) in the direction of the arrow to facilitate the installation of the generator assembly.
Screw bolt (1) into the threaded support sleeve (2).
Press back the threaded support sleeve (2) using the bolt (1).
Once again unscrew the bolt (1) from the threaded support sleeve (2).
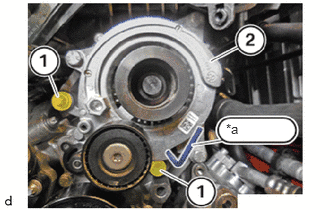
| *a | 4 mm Hexagon Wrench |
Insert and install the generator assembly (2).
Tighten the E12 bolts (1).
- Torque:
- 38 N*m (387 kgf*cm, 28 ft.*lbf)
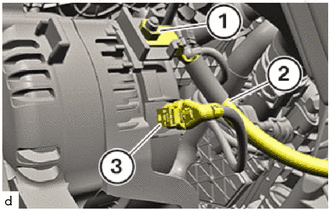
Insert and install the generator wire (2).
Tighten nut (1).
- Torque:
- 19 N*m (194 kgf*cm, 14 ft.*lbf)
Connect and lock the connector (3).
- HINT:
-
The connector (3) must engage audibly.
17882
3.INSTALL NO. 2 AIR CLEANER HOSE
4.INSTALL FAN AND GENERATOR V BELT
5.CONNECT CABLE TO NEGATIVE BATTERY TERMINAL