B48 ENGINE MECHANICAL FRONT CRANKSHAFT OIL SEAL REMOVAL
PROCEDURE

 1.DISCONNECT CABLE FROM NEGATIVE BATTERY TERMINAL
Click hereGeneral>MAINTENANCE>B48 BATTERY>REMOVAL
2.REMOVE FAN AND GENERATOR V BELT
28100
3.REMOVE STARTER ASSEMBLY
13470
4.REMOVE CRANKSHAFT PULLEY ASSEMBLY
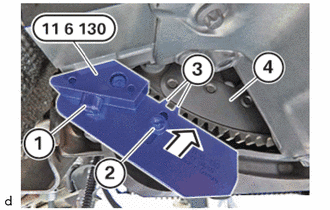
Position the special tool 0 496 595 (11 6 130) and secure it on the timing gear case using the bolt (1).
- SST
- 09700-WA040
The special tool 0 496 595 (11 6 130) must lie flat on the transmission housing.
- SST
- 09700-WA040
If necessary, turn the engine in the direction of rotation until the teeth (3) engage correctly in the gearing of the flywheel sub-assembly (4).
Slide the counter support with the bolt (2) in the direction of the arrow until the teeth (3) engage completely in the gearing of the flywheel sub-assembly.
Hand-tighten the bolt (2).
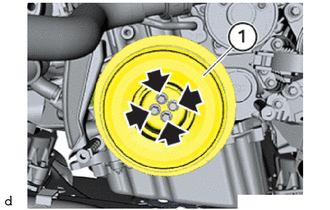
Unscrew the E12 bolts (arrows) on the crankshaft pulley assembly (1).
Remove the crankshaft pulley assembly (1).
5.REMOVE FRONT CRANKSHAFT OIL SEAL
- NOTICE:
- ·
Scratches.
Tools and sharp-edged components can cause scratches.
-Protect working area.
-Handle tools and components carefully.
- HINT:
-
When the crankshaft pulley assembly is exchanged, the front crankshaft oil seal must also be replaced.
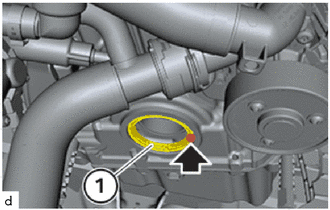
Carefully drive in the front crankshaft oil seal (1) in the marked area (arrow) using a punch to approx. 1 cm deep.
Do not damage the sealing surface on the cylinder block sub-assembly in the process.
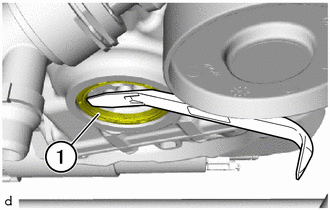
Lever out and remove front crankshaft oil seal (1).
Do not scratch the sealing surface on the cylinder block sub-assembly in the process.
Replace front crankshaft oil seal.