MAINTENANCE B48 OIL AND OIL FILTER REPLACEMENT
CAUTION / NOTICE / HINT
- CAUTION:
- ·
Hot fluids.
Risk of scalding!
-Conduct all work in the vehicle wearing appropriate personal protective equipment only.
- NOTICE:
- ·
Engine damage caused by excessively filling the engine with engine oil.
Filling an excessive quantity of engine oil may cause engine damage.
-Observe the exact engine oil filling capacity.
-Drain the engine oil.
PROCEDURE

 12601B
1.REMOVE NO. 1 ENGINE COVER SUB-ASSEMBLY
12180E
2.REMOVE OIL FILLER CAP ASSEMBLY
- NOTICE:
- ·
Contaminant or foreign body.
Contamination can result in malfunctions, operating failure or leaks.
-Adhere to the utmost cleanliness.
-Protect components from contamination e.g. by covering.
-Close off line connections with seal plugs.
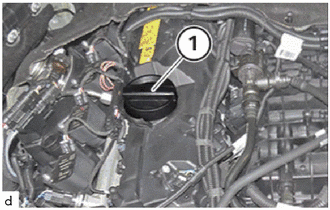
Open oil filler cap assembly (1).
15620
3.REMOVE OIL FILTER CAP ASSEMBLY
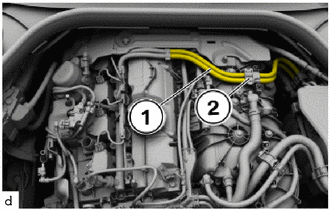
Unclip the engine wiring harness (1) from the holder (2).
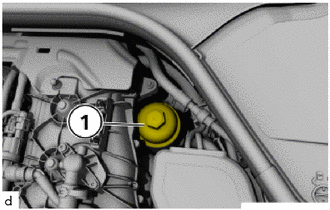
Using a 27 mm socket wrench, loosen the oil filter cap assembly (1).
- HINT:
-
Engine oil flows out of the oil filter bracket and back into the oil pan sub-assembly.
12101A
4.REMOVE OIL PAN DRAIN PLUG
- CAUTION:
- ·
Hot fluids.
Risk of scalding!
-Conduct all work in the vehicle wearing appropriate personal protective equipment only.
- ·
Collect and dispose of emerging fluids. Observe country-specific waste disposal regulations.
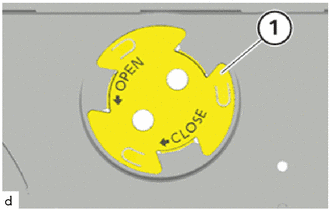
While pulling the center No. 4 engine under cover (1) downward, rotate it and remove it.
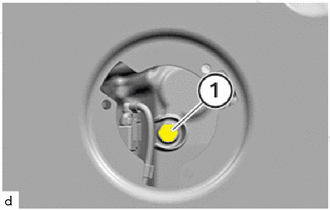
Release oil drain plug (1).
Catch and dispose of emerging engine oil.
12101A
5.INSTALL OIL PAN DRAIN PLUG
Replace the oil pan drain plug gasket.
Position oil pan drain plug on the oil pan sub-assembly and tighten.
- Torque:
- 25 N*m (255 kgf*cm, 18 ft.*lbf)
Install center No. 4 engine under cover.
04152
6.REMOVE OIL FILTER ELEMENT
- CAUTION:
- ·
Hot fluids.
Risk of scalding!
-Conduct all work in the vehicle wearing appropriate personal protective equipment only.
- ·
Hot surfaces.
Risk of burning!
-Perform all work only on components that have cooled down.
- ·
Collect and dispose of emerging fluids. Observe country-specific waste disposal regulations.
- NOTICE:
- ·
Contaminant or foreign body.
Contamination can result in malfunctions, operating failure or leaks.
-Adhere to the utmost cleanliness.
-Protect components from contamination e.g. by covering.
-Close off line connections with seal plugs.
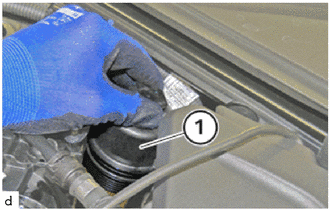
Feed the oil filter cap assembly (1) including oil filter element out to the top.
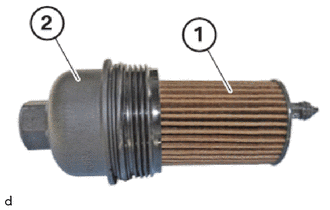
Loosen the oil filter element (1) from the oil filter cap assembly (2).
Replace oil filter element.
04152
7.INSTALL OIL FILTER ELEMENT
- NOTICE:
- ·
Contaminant or foreign body.
Contamination can result in malfunctions, operating failure or leaks.
-Adhere to the utmost cleanliness.
-Protect components from contamination e.g. by covering.
-Close off line connections with seal plugs.
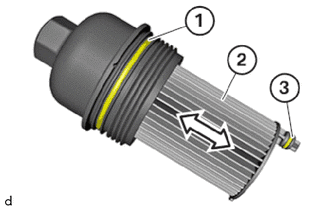
Replace O-rings (1) and (3).
- HINT:
-
Before installation, coat the O-rings (1) and (3) with engine oil.
Push the oil filter element (2) into the oil filter cap assembly.
- HINT:
-
The oil filter element (2) must engage audibly.
Position the oil filter cap assembly with the oil filter element correctly in the guide bore hole (1) in the oil filter bracket (2).
Install the oil filter cap assembly including oil filter element.
15620
8.INSTALL OIL FILTER CAP ASSEMBLY
Apply a small amount of engine oil to the O-ring.
Using a 27 mm socket wrench, tighten the oil filter cap assembly.
- Torque:
- 25 N*m (255 kgf*cm, 18 ft.*lbf)
Clip in the engine wiring harness in the holder.
9.ADD ENGINE OIL
- NOTICE:
- ·
Engine damage caused by excessively filling the engine with engine oil.
Filling an excessive quantity of engine oil may cause engine damage.
-Observe the exact engine oil filling capacity.
-Drain the engine oil.
Fill in engine oil at the oil filler neck.
- Standard Oil:
Toyota Genuine Motor Oil SN 0W-20 C5 for GR Toyota Supra
| Item | Standard Condition |
|---|---|
| Drain and refill with oil filter change | 5.25 liters (5.5 US qts, 4.6 Imp. qts) |
12180E
10.INSTALL OIL FILLER CAP ASSEMBLY
- NOTICE:
- ·
Contaminant or foreign body.
Contamination can result in malfunctions, operating failure or leaks.
-Adhere to the utmost cleanliness.
-Protect components from contamination e.g. by covering.
-Close off line connections with seal plugs.
Close oil filler cap assembly.
11.INSPECT FOR ENGINE OIL LEAK
Start the engine. Make sure that there are no engine oil leaks from the area that was worked on.
12.CHECK ENGINE OIL LEVEL
12601B
13.INSTALL NO. 1 ENGINE COVER SUB-ASSEMBLY
14. PERFORM CBS RESET