| NG |  |
| Go to step 6 |
DTC C1422 Master Cylinder Pressure Sensor Zero Point High Malfunction |
| DTC Code | DTC Detection Condition | Trouble Area |
| C1422 | When the stop light switch is off, the PM/C1 terminal voltage is 0.86 V or higher for 5 seconds or more. |
|
| 1.CHECK STOP LIGHT SWITCH OPERATION |
Check that the stop lights come on when the brake pedal is depressed and go off when the brake pedal is released.
|
| ||||
| OK | |
 |
| 2.READ VALUE USING TECHSTREAM (STOP LIGHT SW AND MASTER CYLINDER SENSOR) |
Turn the ignition switch off.
Connect the Techstream to the DLC3.
Turn the ignition switch to ON.
Turn the Techstream on.
Enter the following menus: Chassis / ABS/VSC/TRAC / Data List.
| Tester Display | Measurement Item/Range | Normal Condition | Diagnostic Note |
| Stop Light SW | Stop light switch/ ON or OFF | ON: Brake pedal depressed OFF: Brake pedal released | - |
| Master Cylinder Sensor | Master cylinder pressure sensor reading/ Min.: 0 V, Max.: 5 V | 0.3 to 0.9 V: When brake pedal is released | Reading increases when brake pedal is depressed. |
|
| ||||
| OK | |
|
| 3.RECONFIRM DTC |
Clear the DTCs (Click here).
Start the engine.
Drive the vehicle at a speed of 40 km/h (25 mph) or more and perform a braking test (decelerate the vehicle by depressing the brake pedal).
Check if the same DTC is output (Click here).
| Result | Proceed to |
| DTC C1422 is not output | A |
| DTC C1422 is output | B |
|
| ||||
| A | ||
 | ||
| ||
| 4.CHECK BRAKE PEDAL AND STOP LIGHT SWITCH INSTALLATION |
Turn the ignition switch off.
Check the brake pedal height and stop light switch installation (Click here).
|
| ||||
| OK | |
|
| 5.CHECK HARNESS AND CONNECTOR (STP TERMINAL) |
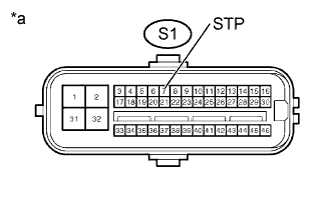 |
Disconnect the skid control ECU (master cylinder solenoid) connector.
Measure the voltage according to the value(s) in the table below.
| Tester Connection | Condition | Specified Condition |
| S1-7 (STP) - Body ground | Brake pedal depressed | 8 to 14 V |
| S1-7 (STP) - Body ground | Brake pedal released | Below 1.5 V |
| *a | Front view of wire harness connector (to Skid Control ECU (Master Cylinder Solenoid)) |
|
| ||||
| OK | ||
| ||
| ||
| 6.CHECK HARNESS AND CONNECTOR (POWER SOURCE TERMINAL) |
Disconnect the stop light switch assembly connector.
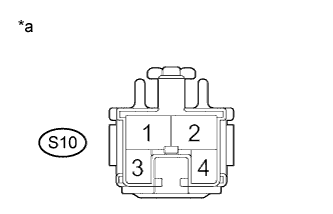 |
Measure the voltage according to the value(s) in the table below.
| Tester Connection | Switch Condition | Specified Condition |
| S10-2 - Body ground | Always | 11 to 14 V |
| *a | Front view of wire harness connector (to Stop Light Switch Assembly) |
|
| ||||
| OK | |
|
| 7.INSPECT STOP LIGHT SWITCH ASSEMBLY |
Disconnect the stop light switch assembly connector.
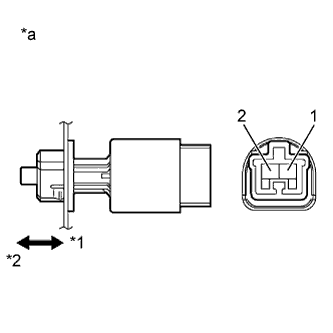 |
Measure the resistance according the value(s) in the table below.
| Tester Condition | Switch Connection | Specified Condition |
| 1 - 2 | Switch pin free | Below 1 Ω |
| 1 - 2 | Switch pin pushed in | 10 kΩ or higher |
| *a | Component without harness connected (to Stop Light Switch Assembly) |
| *1 | Pushed in |
| *2 | Free |
Reconnect the stop light switch assembly connector.
|
| ||||
| OK | |
|
| 8.CHECK HARNESS AND CONNECTOR (STOP LIGHT SWITCH ASSEMBLY - STOP LP CTRL RELAY) |
Remove the STOP LP CTRL relay from the engine room relay block.
Measure the resistance according the value(s) in the table below.
| Tester Connection | Condition | Specified Condition |
| S10-1 - STOP LP CTRL relay-4 | Always | Below 1 Ω |
| S10-1 - Body ground | Always | 10 Ω or higher |
Reinstall the STOP LP CTRL relay from the engine room relay block.
|
| ||||
| OK | |
|
| 9.INSPECT LP CTRL RELAY |
Remove the STOP LP CTRL relay from the engine room relay block.
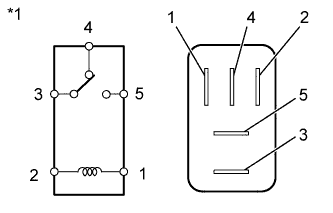 |
Measure the resistance according to the value(s) in the table below.
| Tester Connection | Condition | Specified Condition |
| 3 - 4 | Battery voltage not applied | Below 1 Ω |
| Battery voltage applied to terminal 1 and 2 | 10 kΩ or higher | |
| 3 - 5 | Battery voltage not applied | 10 kΩ or higher |
| Battery voltage applied to terminal 1 and 2 | Below 1 Ω |
| *1 | STOP LP CTRL Relay |
|
| ||||
| OK | |
|
| 10.CHECK HARNESS AND CONNECTOR (REAR COMBINATION LIGHT ASSEMBLY, HIGH MOUNTED STOP LIGHT ASSEMBLY - STOP LP CTRL RELAY) |
Remove the STOP LP CTRL relay from the engine room relay block.
Measure the resistance according the value(s) in the table below.
| Tester Connection | Condition | Specified Condition |
| S10-1 - STOP LP CTRL relay-4 | Always | Below 1 Ω |
| S10-1 - Body ground | Always | 10 Ω or higher |
Reinstall the STOP LP CTRL relay from the engine room relay block.
|
| ||||
|
| ||||
| A | ||
| ||
| ||
| 11.INSPECT REAR COMBINATION LIGHT ASSEMBLY |
Remove the rear combination light assembly connector .
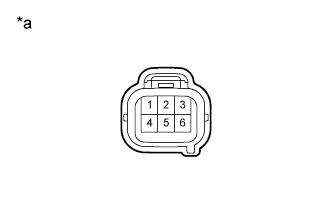 |
Apply battery voltage to the terminals and check that the rear combination light illuminates.
| Measurement Condition | Specified Condition |
| Positive battery - Terminal 4 Negative battery - Terminal 3 | Rear combination light illuminates |
| *a | Component without harness connected (to Rear Combination Light Sssembly) |
Reinstall the rear combination light assembly.
|
| ||||
| OK | ||
| ||
| ||
| 12.INSPECT CENTER STOP LIGHT BULB |
Remove the high mounted stop light assembly connector.
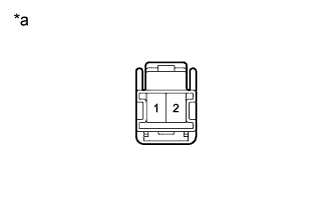 |
Apply battery voltage to the terminals and check that the rear combination light illuminates.
| Measurement Condition | Specified Condition |
| Positive battery - Terminal 1 Negative battery - Terminal 2 | High mounted stop light illuminates |
| *a | Component without harness connected (to High Mounted Stop Light Assembly) |
Reinstall the high mounted stop light assembly.
|
| ||||
| OK | ||
| ||
| ||
