CYLINDER HEAD (for Bank 1 4WD and Pre-Runner) > REMOVAL |
| 1. DISCHARGE FUEL SYSTEM PRESSURE |
| 2. REMOVE BATTERY |
| 3. DRAIN ENGINE COOLANT |
|
Remove the service hole cover from the engine under cover.
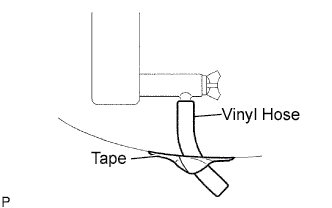
Install a vinyl hose onto the drain on the radiator side.
Fix the vinyl hose with tape.
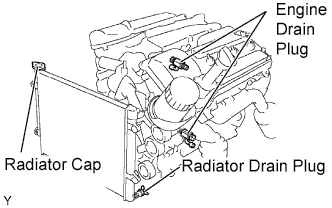 |
Loosen the 3 drain plugs on the engine and radiator, and drain the coolant.
Remove the radiator cap.
Drain the coolant from the reservoir tank.
Tighten the 3 drain plugs.
Remove the vinyl hose from the radiator.
| 4. DRAIN ENGINE OIL |
Remove the engine under cover seal No. 3.
Remove the oil pan drain plug and drain the engine oil.
Clean the oil pan drain plug and install it with a new gasket.
| 5. REMOVE POWER STEERING LINK ASSEMBLY |
| 6. REMOVE FRONT DIFFERENTIAL CARRIER ASSEMBLY (for 4WD) |
| 7. REMOVE TIMING CHAIN OR BELT COVER SUB-ASSEMBLY |
| 8. REMOVE CHAIN SUB-ASSEMBLY |
| 9. REMOVE NO.1 COOL AIR INLET |
Remove the 2 bolts, then remove the cool air inlet.
| 10. REMOVE FRONT EXHAUST PIPE ASSEMBLY |
| 11. REMOVE MANIFOLD STAY |
Remove the 3 bolts, then remove the exhaust manifold stay.
| 12. REMOVE EXHAUST MANIFOLD SUB-ASSEMBLY |
Disconnect the air fuel ratio sensor connector.
Remove the 6 nuts, then remove the exhaust manifold and gasket.
| 13. DISCONNECT NO.1 FUEL PIPE SUB-ASSEMBLY |
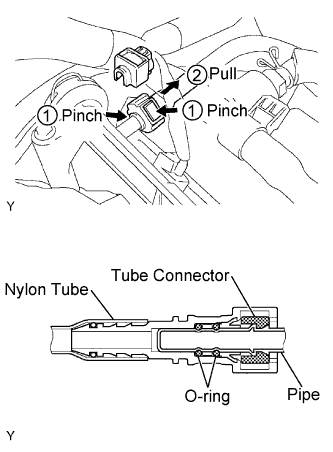 |
Remove the fuel pipe clamp.
Pinch the tube connector, and then pull the fuel pipe out of the pipe as shown in the illustration.
| 14. DISCONNECT NO.2 FUEL PIPE SUB-ASSEMBLY |
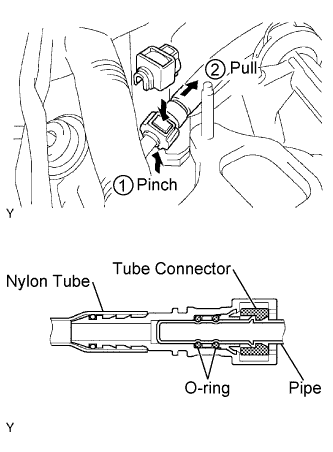 |
Remove the fuel pipe clamp.
Pinch the tube connector, and then pull the fuel pipe out of the pipe as shown in the illustration.
| 15. REMOVE INTAKE MANIFOLD |
Disconnect the 6 fuel injector connectors.
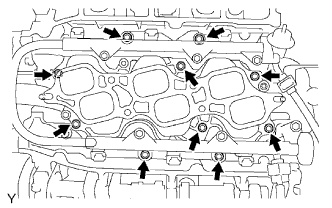 |
Remove the 10 bolts, then remove the intake manifold and gasket.
| 16. REMOVE WATER BY-PASS JOINT REAR |
Disconnect the engine coolant temperature sensor connector.
Disconnect the heater hose.
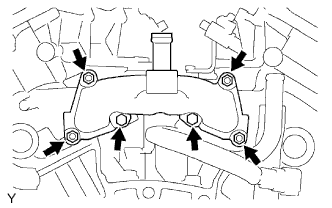 |
Remove the 2 bolts and 4 nuts, then remove the water by-pass joint RR and 2 gaskets.
Remove the O-ring from the water outlet hose.
| 17. REMOVE CAMSHAFT TIMING GEARS AND NO.2 CHAIN (for Bank 1) |
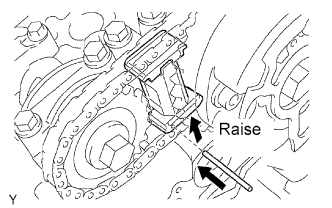 |
While raising the chain tensioner No. 2, insert a pin of φ 1.0 mm (0.039 in.) into the hole to fix it.
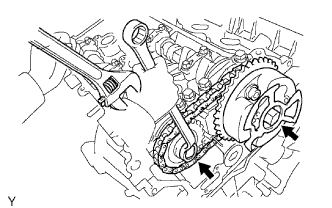 |
Hold the hexagonal portion of the camshaft with a wrench.
Remove the 2 bolts, then remove the camshaft timing gear, camshaft timing gear assembly and timing chain No. 2.
| 18. REMOVE NO.2 CHAIN TENSIONER ASSEMBLY |
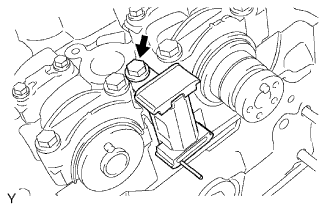 |
Remove the bolt, then remove the chain tensioner No. 2.
| 19. REMOVE CAMSHAFTS |
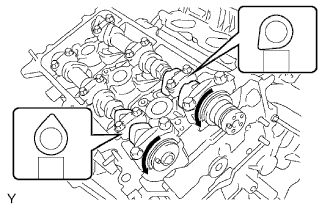 |
Rotate the camshafts counterclockwise using a wrench so that the cam lobes of No. 1 cylinder face in the directions shown in the illustration.
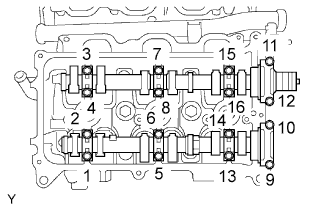 |
Using several steps, loosen and remove the 16 bearing cap bolts uniformly in the sequence shown in the illustration.
Remove the 8 bearing caps and 2 camshafts.
| 20. REMOVE NO.2 CAMSHAFT BEARING |
| 21. REMOVE CYLINDER HEAD SUB-ASSEMBLY |
Remove the 2 bolts and separate the 2 ground cables.
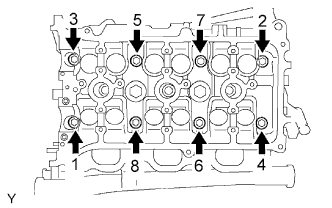 |
Using several steps, loosen the 8 cylinder head bolts on the cylinder head uniformly with a 10 mm bi-hexagon wrench in the sequence shown in the illustration. Remove the 8 cylinder head bolts and 8 plate washers.
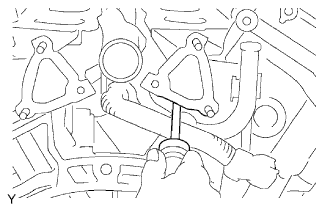 |
Lift the cylinder head from the dowels on the cylinder block, and place the cylinder head on wooden blocks on a bench.
| 22. REMOVE CYLINDER HEAD GASKET |