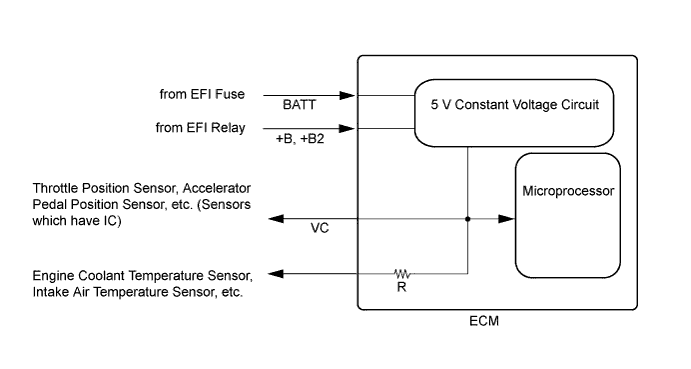
SFI SYSTEM > VC Output Circuit |
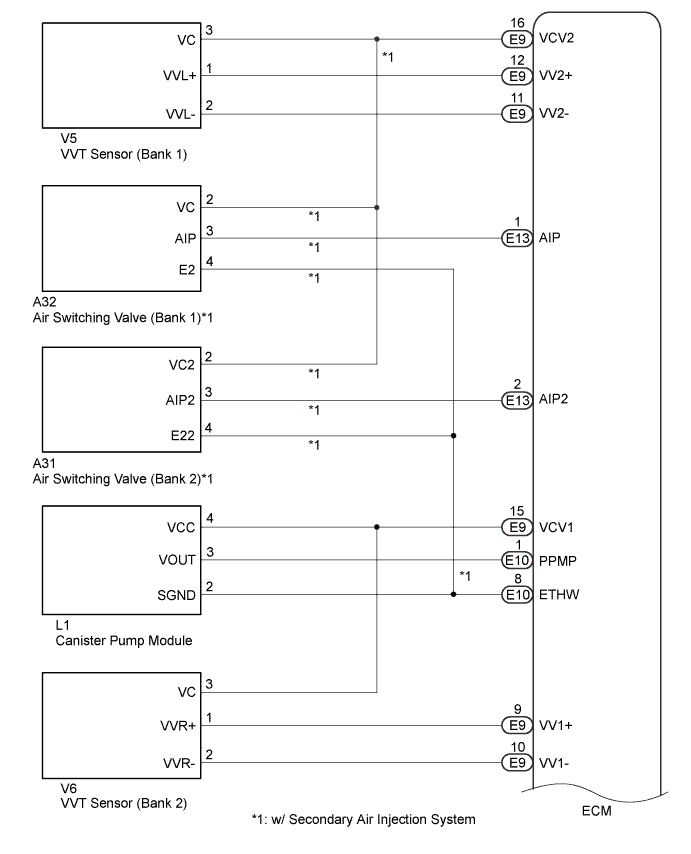
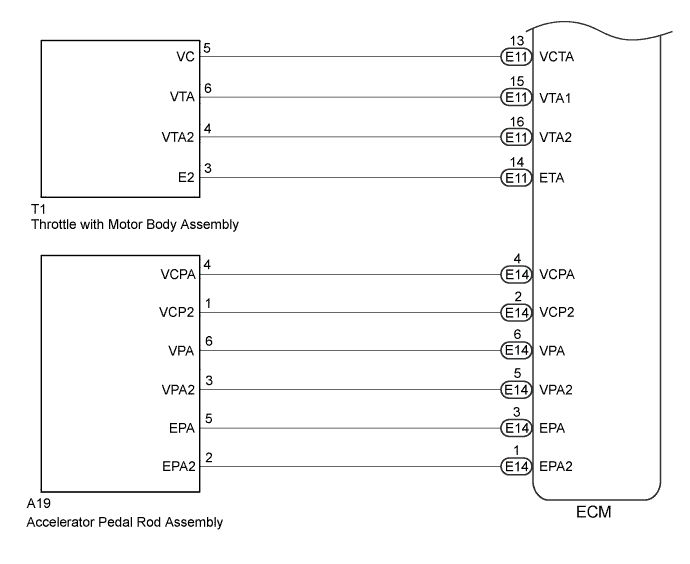
| 1.CHECK MIL |
Check that the Malfunction Indicator Lamp (MIL) illuminates when turning the ignition switch to ON.
|
| ||||
| OK | ||
 | ||
| ||
| 2.CHECK CONNECTION BETWEEN TECHSTREAM AND ECM |
Connect the Techstream to the DLC3.
Turn the ignition switch to ON.
Turn the Techstream on.
Check the communication between the Techstream and ECM.
| Result | Proceed to |
| Communication is not possible | A |
| Communication is possible | B |
|
| ||||
| A | |
 |
| 3.CHECK MIL (THROTTLE POSITION SENSOR) |
Disconnect the throttle with motor body assembly connector.
Turn the ignition switch to ON.
Check the MIL.
| Result | Proceed to |
| MIL does not illuminate | A |
| MIL illuminates | B |
|
| ||||
| A | |
|
| 4.CHECK MIL (ACCELERATOR PEDAL POSITION SENSOR) |
Disconnect the accelerator pedal rod assembly connector.
Turn the ignition switch to ON.
Check the MIL.
| Result | Proceed to |
| MIL does not illuminate | A |
| MIL illuminates | B |
|
| ||||
| A | |
|
| 5.CHECK MIL (CANISTER PUMP MODULE) |
Disconnect the canister pump module connector.
Turn the ignition switch to ON.
Check the MIL.
| Result | Proceed to |
| MIL does not illuminate | A |
| MIL illuminates | B |
|
| ||||
| A | |
|
| 6.CHECK MIL (VVT SENSOR (BANK 1)) |
Disconnect the VVT sensor (bank 1) connector.
Turn the ignition switch to ON.
Check the MIL.
| Result | Proceed to |
| MIL does not illuminate | A |
| MIL illuminates | B |
|
| ||||
| A | |
|
| 7.CHECK MIL (VVT SENSOR (BANK 2)) |
Disconnect the VVT sensor (bank 2) connector.
Turn the ignition switch to ON.
Check the MIL.
| Result | Proceed to |
| MIL does not illuminate (w/ Secondary air injection system) | A |
| MIL does not illuminate (w/o Secondary air injection system) | B |
| MIL illuminates | C |
|
| ||||
|
| ||||
| A | |
|
| 8.CHECK MIL (AIR SWITCHING VALVE (BANK 1)) |
Disconnect the air switching valve (bank 1) connector.
Turn the ignition switch to ON.
Check the MIL.
| Result | Proceed to |
| MIL does not illuminate | A |
| MIL illuminates | B |
|
| ||||
| A | |
|
| 9.CHECK MIL (AIR SWITCHING VALVE (BANK 2)) |
Disconnect the air switching valve (bank 2) connector.
Turn the ignition switch to ON.
Check the MIL.
| Result | Proceed to |
| MIL does not illuminate | A |
| MIL illuminates | B |
|
| ||||
| A | |
|
| 10.CHECK HARNESS AND CONNECTOR |
Disconnect the throttle with motor body assembly connector.
Disconnect the accelerator pedal rod assembly connector.
Disconnect the canister pump module connector.
Disconnect the VVT sensor (bank 1) connector.
Disconnect the VVT sensor (bank 2) connector.
Disconnect the air switching valve (bank 1) connector (w/ secondary air injection system).
Disconnect the air switching valve (bank 2) connector (w/ secondary air injection system).
Disconnect the ECM connector.
Measure the resistance according to the value(s) in the table below.
| Tester Connection | Condition | Specified Condition |
| E9-15 (VCV1) - Body ground | Always | 10 kΩ or higher |
| E9-16 (VCV2) - Body ground | Always | 10 kΩ or higher |
| E14-4 (VCPA) - Body ground | Always | 10 kΩ or higher |
| E14-2 (VCP2) - Body ground | Always | 10 kΩ or higher |
| E11-13 (VCTA) - Body ground | Always | 10 kΩ or higher |
|
| ||||
| OK | ||
| ||
| ||

