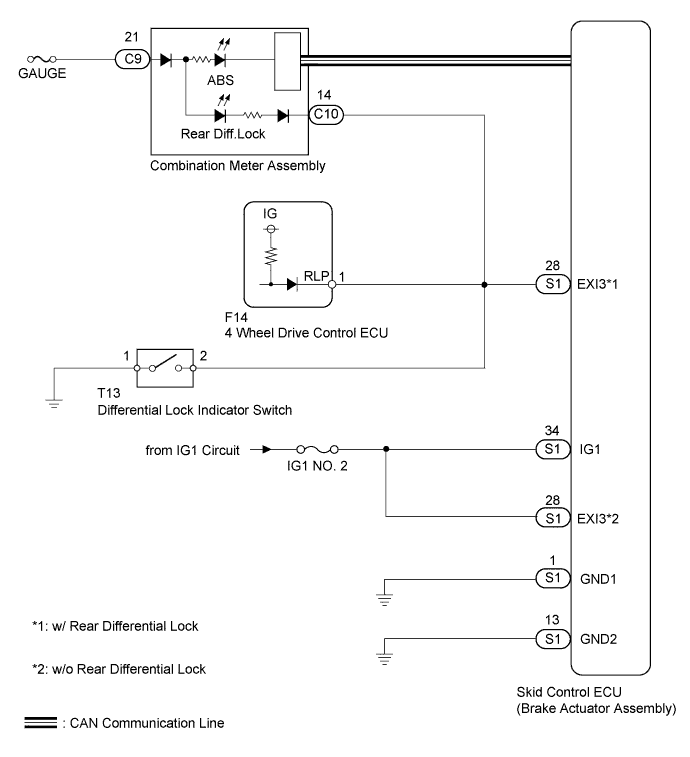
VEHICLE STABILITY CONTROL SYSTEM (for Vacuum Brake Booster) > ABS Warning Light Remains ON |
| 1.CHECK THAT SKID CONTROL ECU CONNECTOR IS SECURELY CONNECTED |
Check the skid control ECU (brake actuator assembly) connector connection.
|
| ||||
| OK | |
 |
| 2.CHECK DTC |
Check for DTCs (Click here).
| Result | Proceed to |
| DTC is not output | A |
| DTC is output | B |
|
| ||||
| A | |
|
| 3.INSPECT BATTERY |
Inspect the battery voltage.
| Result | Proceed to |
| OK | A |
| NG (for 1GR-FE) | B |
| NG (for 2TR-FE) | C |
|
| ||||
|
| ||||
| A | |
|
| 4.CHECK CAN COMMUNICATION LINE |
Turn the ignition switch off.
Connect the Techstream to the DLC3.
Turn the ignition switch to ON.
Turn the Techstream on.
Select CAN Bus Check from the System Selection Menu screen and follow the prompts on the screen to inspect the CAN bus (Click here).
|
| ||||
| OK | |
|
| 5.PERFORM ACTIVE TEST USING TECHSTREAM (Indicat. Lamp ABS) |
Turn the ignition switch off.
Connect the Techstream to the DLC3.
Turn the ignition switch to ON.
Turn the Techstream on.
Enter the following menus: Body Electrical / Combination Meter / Active Test.
According to the display on the Techstream, perform the Active Test.
| Tester Display | Test Part | Control Range | Diagnostic Note |
| Indicat. Lamp ABS | ABS warning light | OFF/ON | Perform the test with the vehicle stopped and the engine idling |
Check that the ABS warning light on the combination meter assembly turns on or off in accordance with the Techstream operation.
|
| ||||
| OK | |
|
| 6.CHECK HARNESS AND CONNECTOR (IG1 TERMINAL) |
Disconnect the S1 skid control ECU (brake actuator assembly) connector.
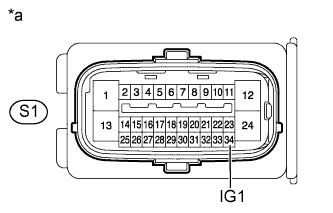 |
Measure the voltage according to the value(s) in the table below.
| Tester Connection | Switch Condition | Specified Condition |
| S1-34 (IG1) - Body ground | Ignition switch ON | 11 to 14 V |
| *a | Front view of wire harness connector (to Skid Control ECU (Brake Actuator Assembly)) |
|
| ||||
| OK | |
|
| 7.CHECK HARNESS AND CONNECTOR (GND TERMINAL) |
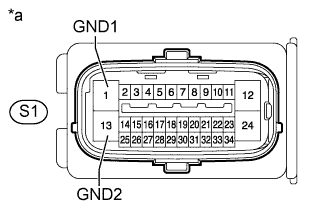 |
Measure the resistance according to the value(s) in the table below.
| Tester Connection | Condition | Specified Condition |
| S1-1 (GND1) - Body ground | Always | Below 1 Ω |
| S1-13 (GND2) - Body ground | Always | Below 1 Ω |
| *a | Front view of wire harness connector (to Skid Control ECU (Brake Actuator Assembly)) |
Reconnect the S1 skid control ECU (brake actuator assembly) connector.
|
| ||||
| OK | |
|
| 8.CHECK HARNESS AND CONNECTOR (EXI3 TERMINAL) |
w/ Rear Differential Lock
Set the vehicle in the rear differential free state using the differential lock switch.
Disconnect the S1 skid control ECU (brake actuator assembly) connector.
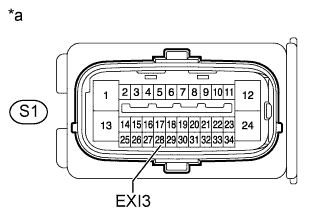 |
Measure the voltage according to the value(s) in the table below.
| Tester Connection | Switch Condition | Specified Condition |
| S1-28 (EXI3) - Body ground | Ignition switch ON Rear differential free | 11 to 14 V |
| *a | Front view of wire harness connector (to Skid Control ECU (Brake Actuator Assembly)) |
Reconnect the S1 skid control ECU (brake actuator assembly) connector.
w/o Rear Differential Lock
Disconnect the S1 skid control ECU (brake actuator assembly) connector.
|
Measure the voltage according to the value(s) in the table below.
| Tester Connection | Switch Condition | Specified Condition |
| S1-28 (EXI3) - Body ground | Ignition switch ON | 11 to 14 V |
| *a | Front view of wire harness connector (to Skid Control ECU (Brake Actuator Assembly)) |
| Result | Proceed to |
| OK | A |
| NG (w/ Rear Differential Lock) | B |
| NG (w/o Rear Differential Lock) | C |
Reconnect the S1 skid control ECU (brake actuator assembly) connector.
|
| ||||
|
| ||||
| A | ||
 | ||
| ||
| 9.CHECK HARNESS AND CONNECTOR (SKID CONTROL ECU EXI3 CIRCUIT) |
Disconnect the S1 skid control ECU (brake actuator assembly) connector.
Disconnect the F14 4 wheel drive control ECU connector.
Disconnect the C10 combination meter assembly connector.
Disconnect the T13 differential lock indicator switch connector.
Measure the resistance according to the value(s) in the table below.
| Tester Connection | Condition | Specified Condition |
| S1-28 (EXI3) - F14-1 (RLP) | Always | Below 1 Ω |
| S1-28 (EXI3) - C10-14 | Always | Below 1 Ω |
| S1-28 (EXI3) - T13-2 | Always | Below 1 Ω |
| T13-1 - Body ground | Always | Below 1 Ω |
| S1-28 (EXI3) - Body ground | Always | 10 kΩ or higher |
|
| ||||
| OK | |
|
| Go to step 11 |
| 10.INSPECT DIFFERENTIAL LOCK INDICATOR SWITCH |
Remove the differential lock indicator switch.
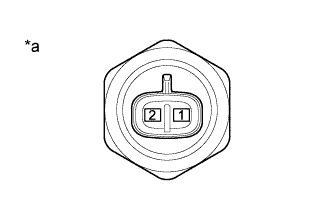 |
Measure the resistance according to the value(s) in the table below.
| Tester Connection | Switch Condition | Specified Condition |
| 2 - 1 | Pushed in | Below 1 Ω |
| Not pushed in | 10 kΩ or higher |
| *a | Component without harness connected (Differential Lock Indicator Switch) |
|
| ||||
| OK | |
|
| 11.REPLACE 4 WHEEL DRIVE CONTROL ECU |
Replace the 4 wheel drive control ECU.
Reconnect the S1 skid control ECU (brake actuator assembly) connector.
Turn the ignition switch to ON.
Check that the ABS warning light comes on when the ignition switch is turned to ON, and turns off in approximately 3 seconds.
|
| ||||
| OK | ||
| ||
| ||

