| NEXT | |
 |
CAN COMMUNICATION SYSTEM > HOW TO PROCEED WITH TROUBLESHOOTING |
| 1.VEHICLE BROUGHT TO WORKSHOP |
| |||||
| 2.INSPECT BATTERY VOLTAGE |
| |||||
| 3.CHECK AND CLEAR DTC* |
Using the Techstream, perform the Health Check (all DTCs check).
| |||||
| 4.CHECK INSTALLED SYSTEMS (ECU AND SENSOR) THAT USE CAN COMMUNICATION |
Based on the vehicle equipment and specifications, confirm the systems that use CAN communication (Click here).
| |||||
| 5.CHECK DLC3 BRANCH WIRE AND V BUS CIRCUIT MAIN WIRE (CANH - CANL) |
Disconnect the cable from the negative (-) battery terminal before measuring the resistances of the main wire and the branch wire.
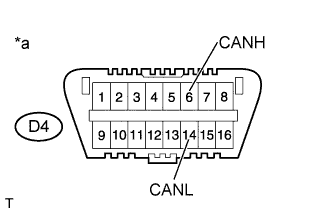 |
Measure the resistance according to the value(s) in the table below.
| Tester Connection | Switch Condition | Specified Condition | Proceed to |
| D4-6 (CANH) - D4-14 (CANL) | Ignition switch off | OK (54 to 69 Ω) | A |
| D4-6 (CANH) - D4-14 (CANL) | Ignition switch off | NG (70 Ω or higher) | B |
| D4-6 (CANH) - D4-14 (CANL) | Ignition switch off | NG (Below 54 Ω) | C |
| *a | DLC3 |
|
| ||||
|
| ||||
| |||||
| 6.CHECK V BUS CIRCUIT +B (CANH, CANL - BAT) |
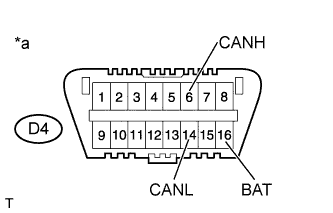 |
Measure the resistance according to the value(s) in the table below.
| Tester Connection | Switch Condition | Specified Condition |
| D4-6 (CANH) - D4-16 (BAT) | Ignition switch off | 6 kΩ or higher |
| D4-14 (CANL) - D4-16 (BAT) | Ignition switch off | 6 kΩ or higher |
| *a | DLC3 |
|
| ||||
| |||||
| 7.CHECK V BUS CIRCUIT GND (CANH, CANL - CG) |
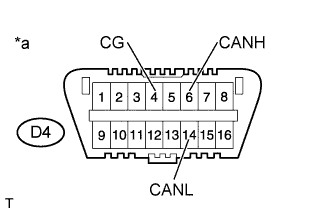 |
Measure the resistance according to the value(s) in the table below.
| Tester Connection | Switch Condition | Specified Condition |
| D4-6 (CANH) - D4-4 (CG) | Ignition switch off | 200 Ω or higher |
| D4-14 (CANL) - D4-4 (CG) | Ignition switch off | 200 Ω or higher |
| *a | DLC3 |
|
| ||||
| |||||
| 8.CHECK ECUS CONNECTED TO CAN BUS* |
Connect the cable to the negative (-) battery terminal.
Select "CAN Bus Check" from "System Select".
Wait 1 minute and then check the display of the connected ECUs and sensors.
| Inspection Result | Proceed to |
| All ECUs and sensors connected to the CAN communication system are displayed on the screen. | A |
| One ECU or sensor connected to the CAN communication system is displayed on the screen. | B |
| 2 or more ECUs and sensors connected to the CAN communication system are displayed on the screen. | C |
|
| ||||
|
| ||||
| |||||
| 9.CHECK COMMUNICATION MALFUNCTION DTC (PAST DTC CHECK)* |
Select "CAN Bus Check" from "System Select".
Write down all of the DTCs stored in each ECU.
| |||||
| 10.CHECK DTC COMBINATION TABLE (V BUS CIRCUIT BRANCH WIRE OPEN PAST MALFUNCTION) |
Based on the combination of stored CAN communication system DTCs, determine which ECUs and sensors have a communication stop malfunction (Click here).
| |||||
| 11.PERFORM MALFUNCTION SIMULATION TEST (V BUS CIRCUIT MAIN WIRE PAST MALFUNCTION)* |
Using the Techstream, clear all DTCs.
Perform a malfunction simulation test on all harnesses and connectors related to the V bus circuit main wire.
Check the DTCs that were stored as a result of the malfunction simulation test. Then determine the malfunctioning area.
| |||||
| 12.ADJUST, REPAIR AND REPLACE |
| |||||
| 13.CONFIRMATION TEST |
|
| ||||
|---|---|---|---|---|---|
