
DTC 01-DD Master Reset |
DTC 01-E1 Voice Processing Device ON Error |
| DTC Code | DTC Detection Condition | Trouble Area |
| 01-DD*1 | The device that should be the master has been disconnected after engine start. |
|
| 01-E1*2 | The AMP device records that the AMP output does not function even while the source device operates. |
| 1.CHECK RADIO RECEIVER POWER SOURCE CIRCUIT |
Refer to the radio receiver power source circuit (Click here).
If the power source circuit is operating normally, proceed to the next step.
| NEXT | |
|
| 2.INSPECT RADIO RECEIVER |
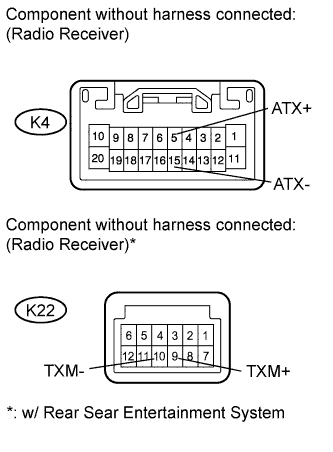 |
Disconnect the K4 and K22* receiver connectors.
Measure the resistance according to the value(s) in the table below.
| Tester Connection | Condition | Specified Condition |
| K4-5 (ATX+) - K4-15 (ATX-) | Always | 60 to 80 Ω |
| K22-9 (TXM+) - K22-10 (TXM-)* | Always | 60 to 80 Ω |
| Result | Proceed to |
| OK | A |
| NG (for Column Shift Type) | B |
| NG (for Floor Shift Type) | C |
|
| ||||
|
| ||||
| A | |
|
| 3.IDENTIFY COMPONENT WHICH HAS STORED THIS CODE |
Enter the diagnostic mode.
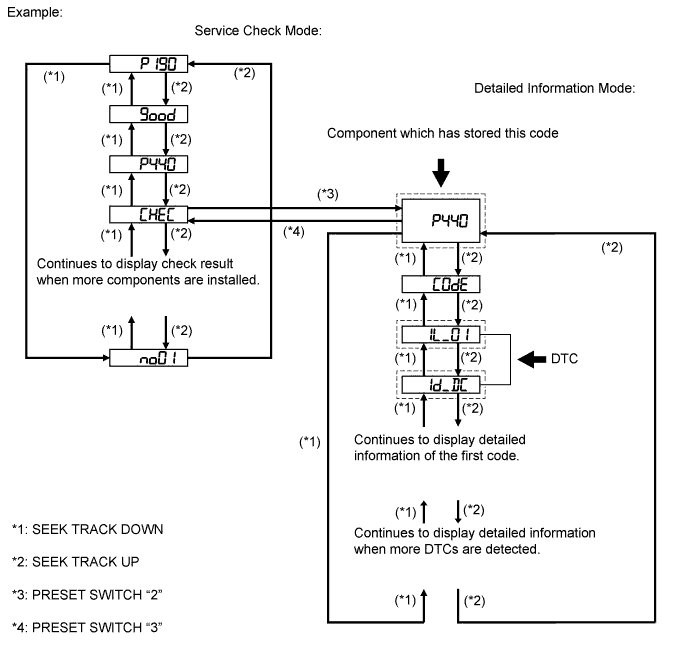
Press the preset switch "3" to change to "Detailed Information Mode".
Identify the component which has stored this code.
| Component | Physical address |
| Stereo component amplifier | 440 |
| "Bluetooth" handsfree module | 19D |
| Television display* | 1B0 |
| NEXT | |
|
| 4.CHECK COMPONENT WHICH HAS STORED THIS CODE |
Select the component which has stored this code.
| Component | Proceed to |
| "Bluetooth" handsfree module (for Column Shift Type) | A |
| "Bluetooth" handsfree module (for Floor Shift Type) | B |
| Except "Bluetooth" handsfree module | C |
|
| ||||
|
| ||||
| C | |
|
| 5.CHECK HARNESS AND CONNECTOR (RADIO RECEIVER - COMPONENT WHICH HAS STORED THIS CODE) |
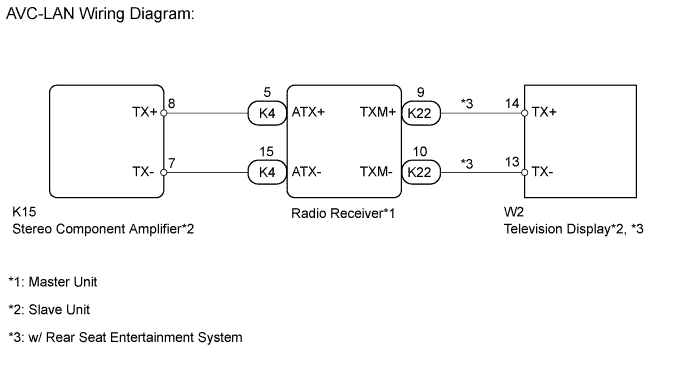
Referring to the AVC-LAN wiring diagram below, check the AVC-LAN circuit between the radio receiver and the component which has stored this code.
Disconnect all connectors between the radio receiver and the component which has stored this code.
Check for an open or short in the AVC-LAN circuit between the radio receiver and the component which has stored this code.
|
| ||||
| OK | |
|
| 6.REPLACE RADIO RECEIVER |
Replace the radio receiver for column shift type (Click here) or floor shift type (Click here).
|
| ||||
| OK | ||
 | ||
| ||
