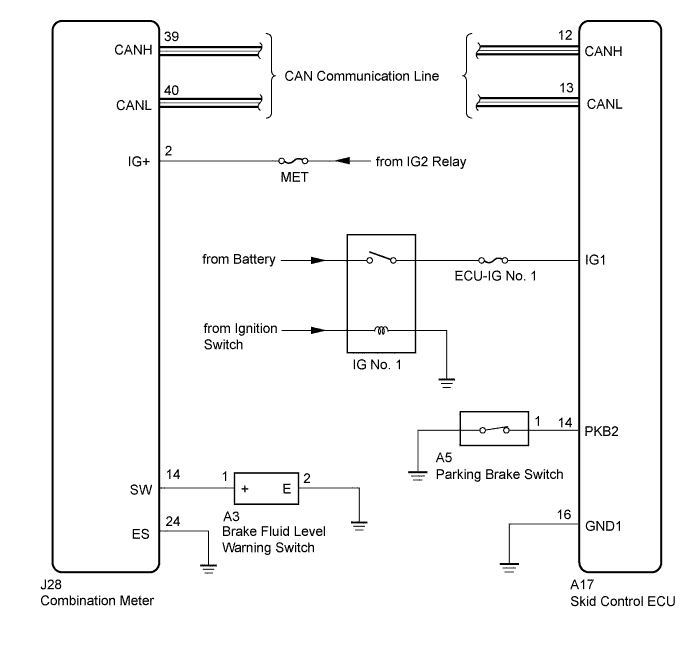
VEHICLE STABILITY CONTROL SYSTEM > Brake Warning Light Remains ON |
| 1.PREPARE FOR INSPECTION |
Check that both of the following conditions are satisfied.
| NEXT | |
 |
| 2.CHECK DTC |
Check if any ABS DTCs are output (Click here).
| Result | Proceed to |
| DTC is not output | A |
| DTC is output | B |
|
| ||||
| A | |
|
| 3.INSPECT CAN COMMUNICATION SYSTEM |
Check if a CAN communication system DTC is output (Click here).
| Result | Proceed to |
| DTC is not output | A |
| DTC is output | B |
|
| ||||
| A | |
|
| 4.CHECK CONNECTOR CONNECTION CONDITION |
Check if the skid control ECU connector is connected securely.
|
| ||||
| OK | |
|
| 5.CHECK PARKING BRAKE SWITCH ASSEMBLY |
Connect the Techstream to the DLC3.
Turn the ignition switch to ON.
Turn the Techstream on.
Select Data List mode and check the parking brake switch using the Techstream.
| Tester Display | Measurement Item/Range | Normal Condition | Diagnostic Note |
| Parking Brake SW | Parking brake switch / ON or OFF | ON: Parking brake applied OFF: Parking brake released | - |
Check that ON and OFF are properly indicated on the Techstream display when the parking brake lever is operated.
|
| ||||
| OK | |
|
| 6.INSPECT BRAKE FLUID LEVEL WARNING SWITCH |
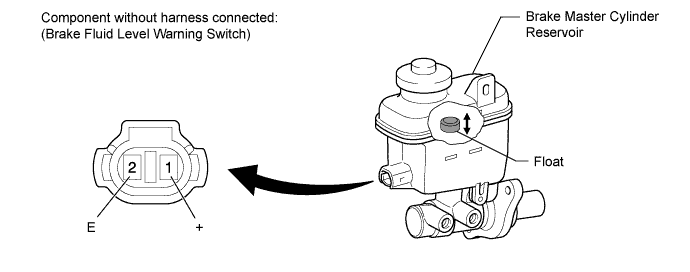
Remove the reservoir tank cap and strainer.
Disconnect the A3 switch connector.
Measure the resistance according to the value(s) in the table below.
| Tester Connection | Switch Condition | Specified Condition |
| 1 (+) - 2 (E) | Float up (Switch OFF) | 10 kΩ or higher |
| 1 (+) - 2 (E) | Float down (Switch ON) | Below 1 Ω |
|
| ||||
| OK | |
|
| 7.CHECK HARNESS AND CONNECTOR (COMBINATION METER - BRAKE FLUID LEVEL WARNING SWITCH) |
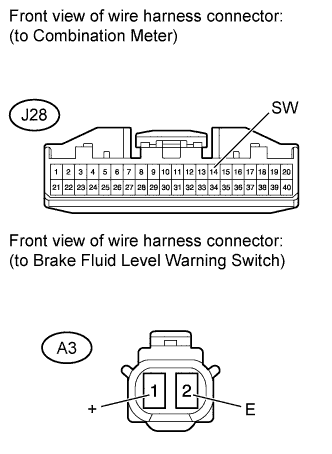 |
Disconnect the J28 meter connector.
Disconnect the A3 switch connector.
Measure the resistance according to the value(s) in the table below.
| Tester Connection | Condition | Specified Condition |
| J28-14 (SW) - A3-1 (+) | Always | Below 1 Ω |
| J28-14 (SW) - Body ground | Always | 10 kΩ or higher |
| A3-2 (E) - Body ground | Always | Below 1 Ω |
|
| ||||
| OK | |
|
| 8.INSPECT COMBINATION METER |
Connect the Techstream to the DLC3.
Turn the ignition switch to ON and the Techstream on.
Perform the Active Test of the combination meter (meter CPU) using the Techstream (Click here).
| Tester Display | Test Part | Control Range | Diagnostic Note |
| Indicat. Lamp Brake | Brake warning light | ON or OFF | Perform the test with the vehicle stopped and engine idling |
Check that the BRAKE warning light turns on and off in the combination meter using Techstream.
|
| ||||
| OK | ||
 | ||
| ||
| 9.INSPECT PARKING BRAKE SWITCH ASSEMBLY |
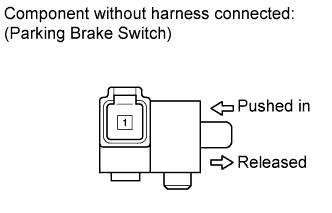 |
Disconnect the A5 switch connector.
Measure the resistance according to the value(s) in the table below.
| Tester Connection | Switch Condition | Specified Condition |
| 1 - Switch body ground | Parking brake switch ON (Switch pin released) | Below 1 Ω |
| 1 - Switch body ground | Parking brake switch OFF (Switch pin pushed in) | 10 kΩ or higher |
|
| ||||
| OK | |
|
| 10.CHECK HARNESS AND CONNECTOR (SKID CONTROL ECU - PARKING BRAKE SWITCH) |
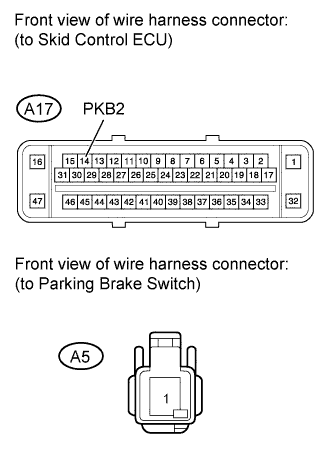 |
Disconnect the A17 ECU connector.
Disconnect the A5 switch connector.
Measure the resistance according to the value(s) in the table below.
| Tester Connection | Condition | Specified Condition |
| A17-14 (PKB2) - A5-1 | Always | Below 1 Ω |
| A17-14 (PKB2) - Body ground | Always | 10 kΩ or higher |
|
| ||||
| OK | ||
| ||
| ||

