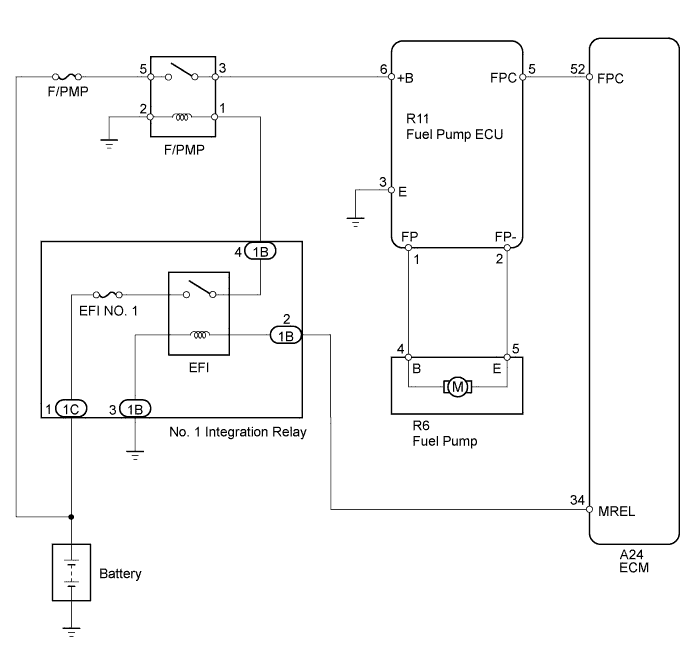
SFI SYSTEM > Fuel Pump Control Circuit |
| 1.PERFORM ACTIVE TEST USING TECHSTREAM (CONTROL THE FUEL PUMP/SPEED) |
Connect the Techstream to the DLC3.
Turn the ignition switch to ON.
Turn the Techstream on.
Enter the following menus: Powertrain / Engine and ECT / Active Test / Control the Fuel Pump/Speed.
Check whether operating sounds can be heard while operating the fuel pump using the Techstream.
| Result | Proceed to |
| NG | A |
| OK | B |
|
| ||||
| A | |
 |
| 2.INSPECT FUEL PUMP ECU (POWER SOURCE VOLTAGE) |
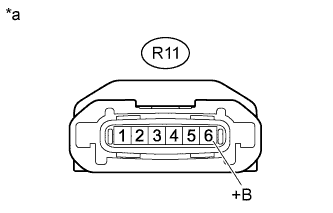 |
Disconnect the fuel pump ECU connector.
Turn the ignition switch to ON.
Measure the voltage according to the value(s) in the table below.
| Tester Connection | Switch Condition | Specified Condition |
| R11-6 (+B) - Body Ground | Ignition switch ON | 11 to 14 V |
| *a | Front view of wire harness connector (to Fuel Pump ECU) |
|
| ||||
| OK | |
|
| 3.CHECK HARNESS AND CONNECTOR (FUEL PUMP ECU - BODY GROUND) |
Disconnect the fuel pump ECU connector.
Measure the resistance according to the value(s) in the table below.
| Tester Connection | Condition | Specified Condition |
| R11-3 (E) - Body ground | Always | Below 1 Ω |
|
| ||||
| OK | |
|
| 4.CHECK HARNESS AND CONNECTOR (FUEL PUMP - FUEL PUMP ECU) |
Disconnect the fuel pump connector.
Disconnect the fuel pump ECU connector.
Measure the resistance according to the value(s) in the table below.
| Tester Connection | Condition | Specified Condition |
| R6-4 (B) - R11-1 (FP) | Always | Below 1 Ω |
| R6-5 (E) - R11-2 (FP-) | Always | Below 1 Ω |
| R6-4 (B) or R11-1 (FP) - Body ground | Always | 10 kΩ or higher |
| R6-5 (E) or R11-2 (FP-) - Body ground | Always | 10 kΩ or higher |
|
| ||||
| OK | |
|
| 5.INSPECT FUEL PUMP |
Inspect the fuel pump (Click here).
|
| ||||
| OK | |
|
| 6.CHECK HARNESS AND CONNECTOR (FUEL PUMP ECU - ECM) |
Disconnect the fuel pump ECU connector.
Disconnect the ECM connector.
Measure the resistance according to the value(s) in the table below.
| Tester Connection | Condition | Specified Condition |
| R11-5 (FPC) - A24-52 (FPC) | Always | Below 1 Ω |
| R11-5 (FPC) or A24-52 (FPC) - Body ground | Always | 10 kΩ or higher |
|
| ||||
| OK | |
|
| 7.REPLACE FUEL PUMP ECU |
Replace the fuel pump ECU (Click here).
| NEXT | |
|
| 8.CONFIRM WHETHER MALFUNCTION HAS BEEN SUCCESSFULLY REPAIRED |
Check the fuel pump operation.
|
| ||||
| OK | ||
 | ||
| ||
| 9.INSPECT FUEL PUMP RELAY (F/PMP) |
Inspect the fuel pump relay (F/PMP) (Click here).
|
| ||||
| OK | |
|
| 10.CHECK FUEL PUMP RELAY (F/PMP) (POWER SOURCE VOLTAGE) |
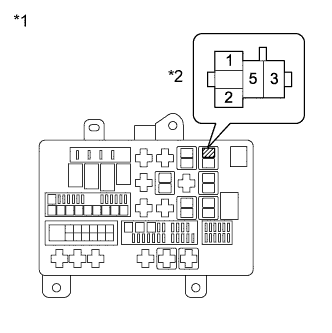 |
Remove the fuel pump relay (F/PMP) from the engine room relay block.
Turn the ignition switch to ON.
Measure the voltage according to the value(s) in the table below.
| Tester Connection | Condition | Specified Condition |
| F/PMP relay (1) - Body ground | Ignition switch ON | 11 to 14 V |
| F/PMP relay (5) - Body ground | Always | 11 to 14 V |
| *1 | Engine Room Relay Block |
| *2 | Fuel Pump Relay (F/PMP) |
|
| ||||
| OK | |
|
| 11.CHECK HARNESS AND CONNECTOR (FUEL PUMP RELAY - FUEL PUMP ECU) |
Remove the fuel pump relay (F/PMP) from the engine room relay block.
Disconnect the fuel pump ECU connector.
Measure the resistance according to the value(s) in the table below.
| Tester Connection | Condition | Specified Condition |
| F/PMP relay (3) - R11-6 (+B) | Always | Below 1 Ω |
| F/PMP relay (3) or R11-6 (+B) - Body ground | Always | 10 kΩ or higher |
|
| ||||
| OK | ||
| ||
| ||
| 12.CHECK HARNESS AND CONNECTOR (FUEL PUMP RELAY - NO. 1 INTEGRATION RELAY, BATTERY AND BODY GROUND) |
Disconnect the cable from the negative (-) battery terminal.
Disconnect the cable from the positive (+) battery terminal.
Remove the fuel pump relay (F/PMP) from the engine room relay block.
Remove the No. 1 integration relay from the engine room relay block.
Measure the resistance according to the value(s) in the table below.
| Tester Connection | Condition | Specified Condition |
| F/PMP relay (1) - 1B-4 | Always | Below 1 Ω |
| F/PMP relay (5) - Battery positive (+) terminal | Always | Below 1 Ω |
| F/PMP relay (2) - Body ground | Always | Below 1 Ω |
| F/PMP relay (1) or 1B-4 - Body ground | Always | 10 kΩ or higher |
| F/PMP relay (5) or battery positive (+) terminal - Body ground | Always | 10 kΩ or higher |
|
| ||||
| OK | ||
| ||
| ||
| 13.PERFORM ACTIVE TEST USING TECHSTREAM (CONTROL THE FUEL PUMP) |
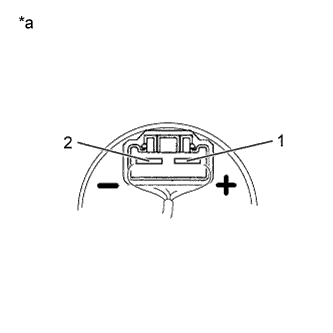 |
Remove the fuel tank assembly (Click here).
Remove the fuel pump from the fuel tank assembly.
Clean the fuel pump to completely remove any remaining fuel.
Connect the fuel pump connector.
Connect the Techstream to the DLC3.
Turn the ignition switch to ON.
Turn the Techstream on.
Enter the following menus: Powertrain / Engine and ECT / Active Test / Control the Fuel Pump Duty.
Operate the fuel pump using the Active Test function and measure the voltage according to the value(s) in the table below.
| Tester Connection | Techstream Operation | Specified Condition |
| 1 - 2 | FPC Duty: 25% | 3.2 to 4.05 V |
| FPC Duty: 80% | 8.8 to 12.5 V |
Enter the following menus: Powertrain / Engine and ECT / Active Test / Control the Fuel Pump/Speed.
Operate the fuel pump using the Active Test function and measure the voltage according to the value(s) in the table below.
| Tester Connection | Techstream Operation | Specified Condition |
| 1 - 2 | ON (FPC Duty: 90%) | 9.0 to 14.0 V |
| *a | Component with harness connected (Fuel Pump) |
|
| ||||
| OK | |
|
| 14.CHECK HARNESS AND CONNECTOR (FUEL PUMP ECU - ECM) |
Disconnect the fuel pump ECU connector.
Disconnect the ECM connector.
Measure the resistance according to the value(s) in the table below.
| Tester Connection | Condition | Specified Condition |
| R11-5 (FPC) - A24-52 (FPC) | Always | Below 1 Ω |
| R11-5 (FPC) or A24-52 (FPC) - Body ground | Always | 10 kΩ or higher |
|
| ||||
| OK | |
|
| 15.REPLACE FUEL PUMP |
Replace the fuel pump (Click here).
|
| ||||
| 16.REPLACE FUEL PUMP ECU |
Replace the fuel pump ECU (Click here).
| NEXT | |
|
| 17.CONFIRM WHETHER MALFUNCTION HAS BEEN SUCCESSFULLY REPAIRED |
Check the fuel pump operation.
|
| ||||
| OK | ||
| ||
| ||

