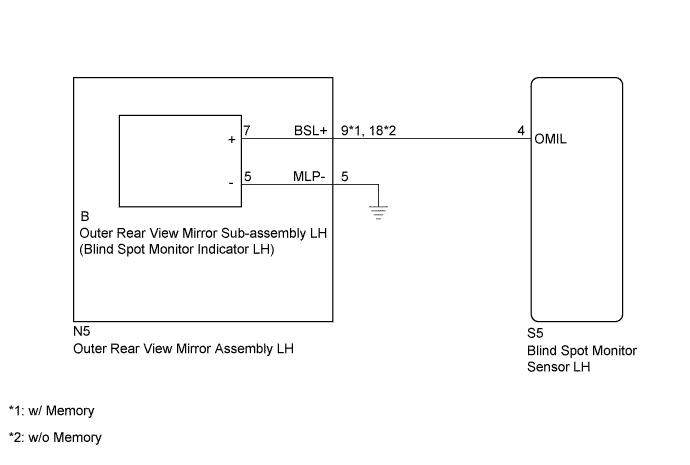
DTC C1AB5 Open in Outer Mirror Indicator(Slave) |
| DTC Code | DTC Detection Condition | Trouble Area |
| C1AB5 | With the blind spot monitor main switch assembly (warning canceling switch assembly) on, the current flowing to the indicator is below a specified value when indicator operation voltage is sent to the indicator. |
|
| 1.CHECK DTC |
Clear the DTCs (Click here).
Recheck for DTCs and check if the same DTC is output again (Click here).
|
| ||||
| OK | ||
 | ||
| ||
| 2.CHECK HARNESS AND CONNECTOR (OUTER REAR VIEW MIRROR ASSEMBLY LH - BLIND SPOT MONITOR SENSOR LH AND BODY GROUND) |
Disconnect the S5 blind spot monitor sensor LH connector.
Disconnect the N5 outer rear view mirror assembly LH connector.
Measure the resistance according to the value(s) in the table below.
| Tester Connection | Condition | Specified Condition |
| S5-4 (OMIL) - N5-9 (BSL+) | Always | Below 1 Ω |
| N5-5 (MLP-) - Body ground | Always | Below 1 Ω |
| Tester Connection | Condition | Specified Condition |
| S5-4 (OMIL) - N5-18 (BSL+) | Always | Below 1 Ω |
| N5-5 (MLP-) - Body ground | Always | Below 1 Ω |
|
| ||||
| OK | |
 |
| 3.INSPECT OUTER REAR VIEW MIRROR ASSEMBLY LH |
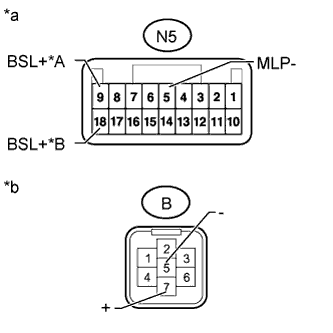 |
Remove the outer rear view mirror assembly LH (Click here).
Remove the outer rear view mirror sub-assembly LH (Click here).
Measure the resistance according to the value(s) in the table below.
| Tester Connection | Condition | Specified Condition |
| N5-9 (BSL+) - B-7 (+) | Always | Below 1 Ω |
| N5-5 (MLP-) - B-5 (-) | Always | Below 1 Ω |
| Tester Connection | Condition | Specified Condition |
| N5-18 (BSL+) - B-7 (+) | Always | Below 1 Ω |
| N5-5 (MLP-) - B-5 (-) | Always | Below 1 Ω |
| *A | w/ Memory |
| *B | w/o Memory |
| *a | Vehicle Side |
| *b | Outer Rear View Mirror Sub-assembly LH Side |
|
| ||||
| OK | |
|
| 4.CHECK OUTER REAR VIEW MIRROR SUB-ASSEMBLY LH |
Replace the outer rear view mirror sub-assembly LH with a new or normally functioning one (Click here).
Clear the DTCs (Click here).
Recheck for DTCs and check if the same DTC is output again (Click here).
|
| ||||
| OK | ||
| ||
| ||

