3UR-FE INTAKE INTAKE MANIFOLD INSTALLATION
PROCEDURE

 44774
1.INSTALL UNION TO CONNECTOR TUBE HOSE
Install the 2 wire harness clamp brackets with the 2 bolts.
- Torque:
- 8.0 N*m (82 kgf*cm, 71 in.*lbf)
Install the union to connector tube hose to the intake manifold, and slide the clamp to secure the hose.
25860
2.INSTALL PURGE VSV
Connect the purge line hose to the intake manifold, and slide the clamp to secure the hose.
Install the purge VSV with the bolt.
- Torque:
- 21 N*m (214 kgf*cm, 15 ft.*lbf)
17650
3.INSTALL VACUUM SWITCHING VALVE ASSEMBLY (for ACIS)
Install the vacuum switching valve assembly with the bolt.
- Torque:
- 9.0 N*m (92 kgf*cm, 80 in.*lbf)
Connect the 2 vacuum hoses to the vacuum switching valve assembly.
22030
4.INSTALL THROTTLE BODY ASSEMBLY
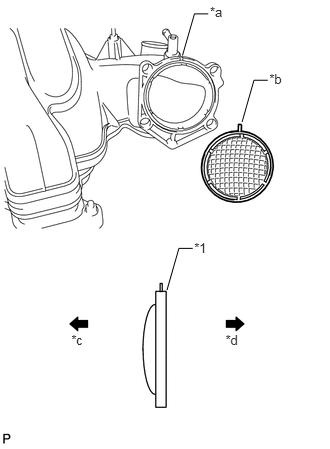
Align the protrusion of a new gasket with the groove of the intake manifold, and install the gasket.
| *1 | Gasket |
| *a | Groove |
| *b | Protrusion |
| *c | Intake Manifold Side |
| *d | Throttle Body Assembly Side |
Install the throttle body assembly with the 4 bolts.
- Torque:
- 10 N*m (102 kgf*cm, 7 ft.*lbf)
11254B
5.INSTALL V-BANK COVER BOLT
Install the 2 V-bank cover bolts to the intake manifold.
- Torque:
- 10 N*m (102 kgf*cm, 7 ft.*lbf)
11254
6.INSTALL NO. 1 V-BANK COVER BRACKET
Install the No. 1 V-bank cover bracket with the 2 bolts.
- Torque:
- 10 N*m (102 kgf*cm, 7 ft.*lbf)
12264
7.INSTALL VENTILATION HOSE ASSEMBLY
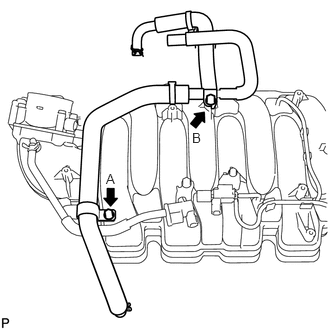
Install the ventilation hose assembly to the intake manifold with the 2 bolts.
- Torque:
- for bolt A : 21 N*m (214 kgf*cm, 15 ft.*lbf)
- for bolt B : 10 N*m (102 kgf*cm, 7 ft.*lbf)
17111
8.INSTALL INTAKE MANIFOLD
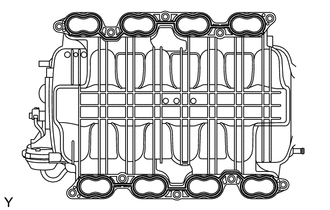
Place 2 new gaskets on the intake manifold.
Place the intake manifold on the cylinder head sub-assembly.
Install and uniformly tighten the 8 bolts and 2 nuts in several steps.
- Torque:
- 21 N*m (214 kgf*cm, 15 ft.*lbf)
Install the wire harness clamp bracket to the intake manifold with the bolt.
- Torque:
- 8.0 N*m (82 kgf*cm, 71 in.*lbf)
Attach the 3 wire harness clamps to the 3 wire harness clamp brackets.
Install the No. 1 tube with the 2 bolts.
- Torque:
- 8.2 N*m (84 kgf*cm, 73 in.*lbf)
Connect the union to connector tube hose to the No. 1 tube, and slide the clamp to secure the hose.
Connect the purge line hose to the purge VSV, and slide the clamp to secure the hose.
Connect the 2 vacuum switching valve connectors.
Connect the ventilation hose to the intake manifold, and slide the clamp to secure the hose.
Connect the 2 water by-pass hoses to the inlet water housing and front water by-pass joint, and slide the 2 clamps to secure the hose.
Connect the throttle body connector to the throttle body assembly.
Install the No. 3 engine cover.
Install the No. 1 engine cover sub-assembly.
12263
9.CONNECT VENTILATION HOSE ASSEMBLY
Connect the ventilation hose assembly to the ventilation pipe of the cylinder head cover sub-assembly and cylinder head cover sub-assembly LH, and slide the 2 clamps to secure the hose.
17880
10.INSTALL AIR CLEANER HOSE ASSEMBLY
Install the air cleaner hose assembly with the 2 hose clamps.
- Torque:
- 4.0 N*m (41 kgf*cm, 35 in.*lbf)
Connect the vacuum hose to the air cleaner hose assembly.
Connect the ventilation hose to the air cleaner hose assembly, and slide the clamp to secure the hose.
55701J
11.INSTALL COWL TOP OUTER PANEL SUB-ASSEMBLY
Install the cowl top outer panel sub-assembly with the 7 bolts.
- Torque:
- 7.5 N*m (76 kgf*cm, 66 in.*lbf)
Connect the washer hose and attach the 2 wire harness clamps.
12.INSTALL FRONT WIPER MOTOR AND LINK ASSEMBLY
13.ADD ENGINE COOLANT
14.INSPECT FOR COOLANT LEAK
11209
15.INSTALL V-BANK COVER SUB-ASSEMBLY
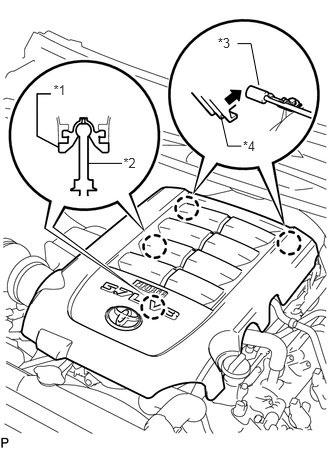
Attach the 2 V-bank cover hooks to the No. 1 V-bank cover bracket. Then align the 2 V-bank cover grommets with the 2 pins, and press down on the V-bank cover sub-assembly to attach the pins.
| *1 | V-bank Cover Grommet |
| *2 | Pin |
| *3 | No. 1 V-bank Cover Bracket |
| *4 | V-bank Cover Hook |
51441
16.INSTALL NO. 1 ENGINE UNDER COVER