SUSPENSION FRONT LOWER SUSPENSION ARM INSTALLATION
CAUTION / NOTICE / HINT
- HINT:
- ·
Use the same procedures for the RH side and LH side.
·The procedures listed below are for the LH side.
·A bolt without a torque specification is shown in the standard bolt chart (see page General>SPECIFICATIONS>STANDARD BOLT>SPECIFIED TORQUE FOR STANDARD BOLTS).
PROCEDURE

 48069
1.TEMPORARILY INSTALL FRONT NO. 1 SUSPENSION ARM LOWER SUB-ASSEMBLY LH
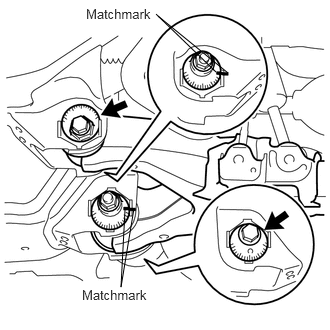
Install the lower suspension arm with the camber adjusting cam, No. 2 camber adjusting cam, No. 2 toe adjusting plate, toe adjusting cam, bolt, nut and washer.
Align the matchmarks on the No. 2 camber adjusting cam and No. 2 toe adjusting plate. Temporarily install the bolt and nut.
48626
2.CONNECT FRONT LOWER BALL JOINT ATTACHMENT LH
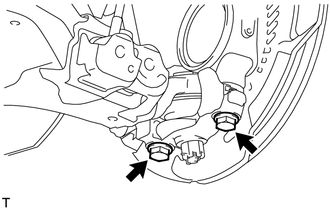
Connect the attachment to the steering knuckle with the 2 bolts.
- Torque:
- 300 N*m (3059 kgf*cm, 221 ft.*lbf)
3.CONNECT FRONT SHOCK ABSORBER WITH COIL SPRING LH
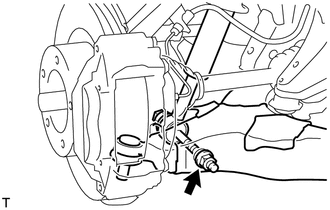
Connect the shock absorber with the bolt and nut.
48810
4.INSTALL FRONT STABILIZER LINK ASSEMBLY LH
5.STABILIZE SUSPENSION
48069
6.TIGHTEN FRONT NO. 1 SUSPENSION ARM LOWER SUB-ASSEMBLY LH
Tighten the bolt and nut.
- Torque:
- 280 N*m (2855 kgf*cm, 207 ft.*lbf)
7.TIGHTEN FRONT SHOCK ABSORBER WITH COIL SPRING
Tighten the nut.
- Torque:
- 195 N*m (1988 kgf*cm, 144 ft.*lbf)
8.INSTALL FRONT WHEEL
- Torque:
- for Aluminum Wheel : 131 N*m (1336 kgf*cm, 97 ft.*lbf)
- for Steel Wheel : 209 N*m (2131 kgf*cm, 154 ft.*lbf)
9.INSPECT AND ADJUST FRONT WHEEL ALIGNMENT
Inspect and adjust the front wheel alignment (see page Suspension>SUSPENSION>FRONT WHEEL ALIGNMENT>ADJUSTMENT).