M15A-FXE ENGINE MECHANICAL ENGINE UNIT INSPECTION
PROCEDURE

 13801
1.INSPECT NO. 1 VALVE ROCKER ARM SUB-ASSEMBLY
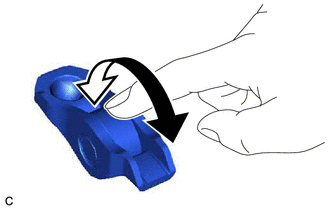
Turn the roller by hand to check that it turns smoothly.
- HINT:
-
If the roller does not turn smoothly, replace the No. 1 valve rocker arm sub-assembly.
13750
2.INSPECT VALVE LASH ADJUSTER ASSEMBLY
- NOTICE:
- ·
Keep the valve lash adjuster assembly free from dirt and foreign matter.
·Only use clean engine oil.
Pre-procedure1
Place the valve lash adjuster assembly into a container filled with engine oil.
Insert the tip of SST into the valve lash adjuster assembly plunger and use the tip to press down on the check ball inside the plunger.
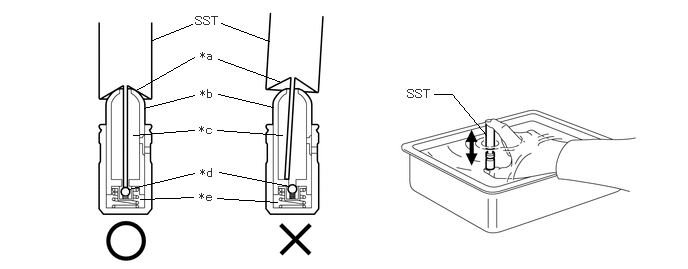
| *a | Tapered Path | *b | Plunger |
| *c | Low Pressure Chamber | *d | Check Ball |
| *e | High Pressure Chamber | - | - |
- SST
- 09276-75010
Squeeze SST and the valve lash adjuster assembly together to move the plunger up and down 5 to 6 times.
Procedure1
Check the movement of the plunger and bleed the air.
- OK:
Plunger moves up and down.
- NOTICE:
-
When bleeding air from the high-pressure chamber, make sure that the tip of SST is pressing the check ball as shown in the illustration. If the check ball is not pressed, air will not bleed.
Procedure2
After bleeding the air, remove SST. Then try to quickly and firmly press the plunger by hand.
- OK:
The plunger is very difficult to move.
- HINT:
-
If the plunger is easy to move, replace the valve lash adjuster assembly.
Post-procedure1
None
13501A
3.INSPECT INTAKE CAMSHAFT SUB-ASSEMBLY
Inspect the intake camshaft sub-assembly for runout.
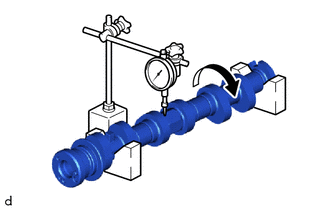
Place the intake camshaft sub-assembly on V-blocks.
Using a dial indicator, measure the runout at the center journal.
- Maximum Runout:
Specified Condition 0.03 mm
0.00118 in.
- HINT:
- ·
If the runout is more than the maximum, replace the intake camshaft sub-assembly.
·Check the intake camshaft sub-assembly oil clearance after replacing the intake camshaft sub-assembly.
Inspect the cam lobes.
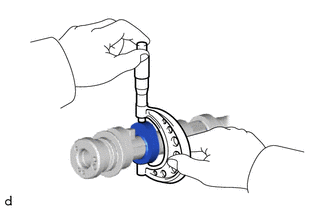
Using a micrometer, measure the cam lobe height.
- Standard Cam Lobe Height:
Minimum Cam Lobe Height Specified Condition 42.157 mm
1.660 in.42.267 to 42.367 mm
1.664 to 1.668 in.
- HINT:
-
If the cam lobe height is less than the minimum, replace the intake camshaft sub-assembly.
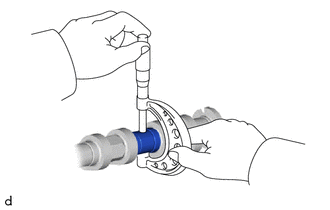
Inspect the intake camshaft sub-assembly journals.
Using a micrometer, measure the journal diameter.
- Standard Journal Diameter:
Item Specified Condition No. 1 journal 33.984 to 34.000 mm
1.33795 to 1.33858 in.Other journals 23.959 to 23.975 mm
0.94326 to 0.94389 in.
- HINT:
-
If the journal diameter is not as specified, check the intake camshaft sub-assembly oil clearance.
-
Click hereEngine / Hybrid System>M15A-FXE (ENGINE MECHANICAL)>ENGINE UNIT>INSPECTION
13502B
4.INSPECT EXHAUST CAMSHAFT SUB-ASSEMBLY
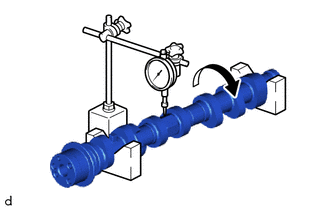
Inspect the exhaust camshaft sub-assembly for runout.
Place the exhaust camshaft sub-assembly on V-blocks.
Using a dial indicator, measure the runout at the center journal.
- Maximum Runout:
Specified Condition 0.03 mm
0.00118 in.
- HINT:
- ·
If the runout is more than the maximum, replace the exhaust camshaft sub-assembly.
·Check the camshaft oil clearance after replacing the exhaust camshaft sub-assembly.
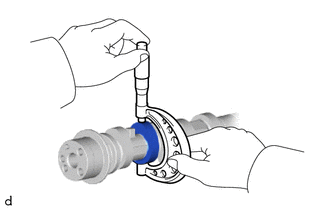
Inspect the cam lobes.
Using a micrometer, measure the cam lobeheight.
- Minimum Cam Lobe Height:
Standard Cam Lobe Height Specified Condition 42.051 mm
1.656 in.42.161 to 42.261 mm
1.660 to 1.664 in.
- HINT:
-
If the cam lobe height is less than the minimum, replace the exhaust camshaft sub-assembly.
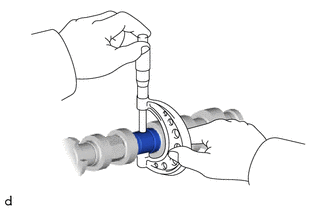
Inspect the exhaust camshaft sub-assembly journals.
Using a micrometer, measure the journal diameter.
- Standard Journal Diameter:
Item Specified Condition No. 1 journal 40.984 to 41.000 mm
1.61354 to 1.61417 in.Other journals 23.959 to 23.975 mm
0.94326 to 0.94389 in.
- HINT:
-
If the journal diameter is not as specified, check the camshaft oil clearance.
-
Click hereEngine / Hybrid System>M15A-FXE (ENGINE MECHANICAL)>ENGINE UNIT>INSPECTION
5.INSPECT CAMSHAFT OIL CLEARANCE
Pre-procedure1
Clean the No. 1 camshaft bearing cap, No. 2 camshaft bearing cap, 2 No. 3 camshaft bearing caps, camshaft housing sub-assembly and camshaft journals.
Place the intake camshaft sub-assembly and exhaust camshaft sub-assembly on the camshaft housing sub-assembly.
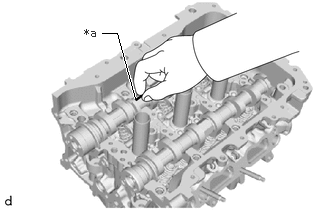
| *a | Plastigage |
Lay a strip of Plastigage across each of the camshaft journals.
Install the camshaft bearing caps.
- NOTICE:
-
Do not turn the camshafts.
Remove the camshaft bearing caps.
Procedure1
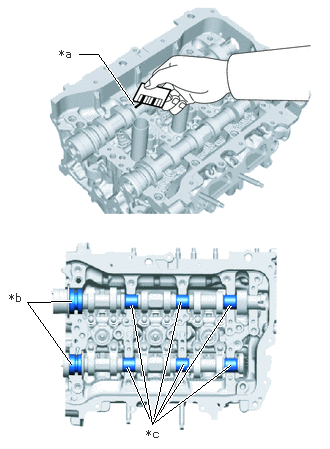
| *a | Plastigage |
| *b | No. 1 Journal |
| *c | Other Journal |
Measure the Plastigage at its widest point.
- Standard Oil Clearance (for intake camshaft sub-assembly):
Item Specified Condition No. 1 journal 0.035 to 0.072 mm
0.00138 to 0.00283 in.Other journals 0.025 to 0.062 mm
0.00098 to 0.00244 in.
- Standard Oil Clearance (for exhaust camshaft sub-assembly):
Item Specified Condition No. 1 journal 0.027 to 0.064 mm
0.00098 to 0.00244 in.Other journals 0.025 to 0.062 mm
0.00098 to 0.00244 in.
- Maximum Oil Clearance (for intake camshaft sub-assembly):
Item Specified Condition No. 1 journal 0.085 mm
0.00335 in.Other journals 0.085 mm
0.00335 in.
- Maximum Oil Clearance (for exhaust camshaft sub-assembly):
Item Specified Condition No. 1 journal 0.085 mm
0.00335 in.Other journals 0.085 mm
0.00335 in.
- NOTICE:
-
Completely remove the Plastigage after the inspection.
- HINT:
-
If the oil clearance is more than the maximum, replace the intake camshaft sub-assembly or exhaust camshaft sub-assembly. If necessary, replace the camshaft housing sub-assembly.
Post-procedure1
None
13506
6.INSPECT CHAIN SUB-ASSEMBLY
Pre-procedure1
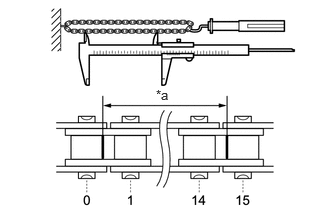
| *a | Measurement Length |
Using a spring scale, pull the chain sub-assembly with a force of 147 N (15 kgf, 33.0 lbf) as shown in the illustration.
Procedure1
Using a vernier caliper, measure the length of 15 links.
- Maximum Chain Elongation:
Specified Condition 116.30 mm
4.58 in.
- NOTICE:
-
Perform the measurement at 3 random places. Use the average of the measurements.
- HINT:
-
If the average elongation is more than the maximum, replace the chain sub-assembly.
Post-procedure1
None
13050
7.INSPECT CAMSHAFT TIMING GEAR ASSEMBLY
Pre-procedure1
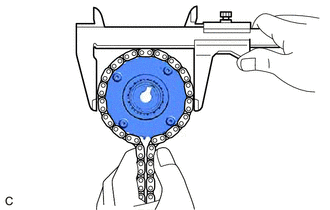
Place the chain sub-assembly around the camshaft timing gear assembly.
Procedure1
Using a vernier caliper, measure the diameter of the camshaft timing gear assembly and chain sub-assembly.
- Minimum Gear Diameter (with Chain Sub-assembly):
Specified Condition 100.01 mm
3.94 in.
- NOTICE:
-
The vernier caliper must be in contact with the chain rollers when measuring.
- HINT:
-
If the diameter is less than the minimum, replace the chain sub-assembly and camshaft timing gear assembly.
Post-procedure1
None
13070A
8.INSPECT CAMSHAFT TIMING EXHAUST GEAR ASSEMBLY
Pre-procedure1
Place the chain sub-assembly around the camshaft timing exhaust gear assembly.
Procedure1
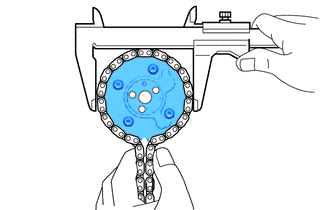
Using a vernier caliper, measure the diameter of the camshaft timing exhaust gear assembly and chain sub-assembly.
- Minimum Gear Diameter (with Chain Sub-assembly):
Specified Condition 100.01 mm
3.94 in.
- NOTICE:
-
The vernier caliper must be in contact with the chain rollers when measuring.
- HINT:
-
If the diameter is less than the minimum, replace the chain sub-assembly and camshaft timing exhaust gear assembly.
Post-procedure1
None
13521
9.INSPECT CRANKSHAFT TIMING SPROCKET
Pre-procedure1
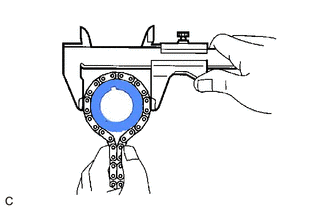
Place the chain sub-assembly around the crankshaft timing sprocket.
Procedure1
Using a vernier caliper, measure the diameter of the crankshaft timing sprocket and chain sub-assembly.
- Minimum Sprocket Diameter (with Chain Sub-assembly):
Specified Condition 51.35 mm
2.02 in.
- NOTICE:
-
The vernier caliper must be in contact with the chain rollers when measuring.
- HINT:
-
If the diameter is less than the minimum, replace the chain sub-assembly and crankshaft timing sprocket.
Post-procedure1
None
13540
10.INSPECT NO. 1 CHAIN TENSIONER ASSEMBLY
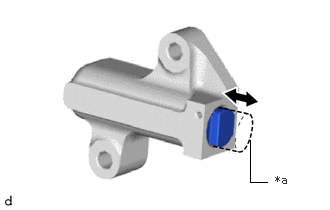
| *a | Plunger |
Push the plunger and check that it moves smoothly.
- HINT:
-
If the plunger does not move smoothly, replace the No. 1 chain tensioner assembly.
13559
11.INSPECT CHAIN TENSIONER SLIPPER
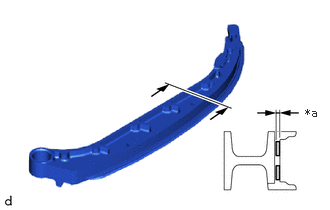
| *a | Depth |
Using a vernier caliper, measure the wear depth of the chain tensioner slipper.
- Maximum Depth:
Specified Condition 1.0 mm
0.0394 in.
- HINT:
-
If the depth is more than the maximum, replace the chain tensioner slipper.
13561
12.INSPECT NO. 1 CHAIN VIBRATION DAMPER
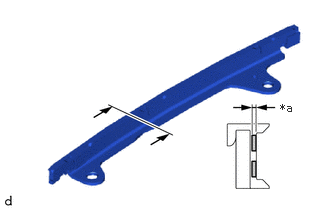
| *a | Depth |
Using a vernier caliper, measure the wear depth of the No. 1 chain vibration damper.
- Maximum Depth:
Specified Condition 1.0 mm
0.0394 in.
- HINT:
-
If the depth is more than the maximum, replace the No. 1 chain vibration damper.
11101A
13.INSPECT CYLINDER HEAD SET BOLT
for 140 mm cylinder head set bolt:
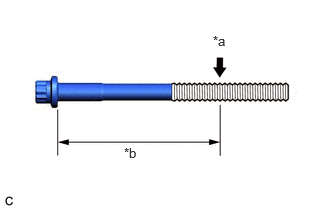
| *a | Measurement Point |
| *b | 105 mm (4.134 in.) |
Using a vernier caliper, measure the diameter of the threads at the measurement point.
- Standard Diameter:
Minimum Diameter Specified Condition 10.6 mm
0.417 in.10.7 to 10.9 mm
0.421 to 0.429 in.
- HINT:
- ·
If the diameter is less than the minimum, replace the cylinder head set bolt with a new one. Failure to do so may lead to engine damage.
·If there is any thread deformation, replace the cylinder head set bolt with a new one.
for 130 mm cylinder head set bolt:
| *a | Measurement Point |
| *b | 115 mm (4.528 in.) |
Using a vernier caliper, measure the diameter of the threads at the measurement point.
- Standard Diameter:
Minimum Diameter Specified Condition 9.6 mm
0.378 in.9.7 to 9.9 mm
0.382 to 0.390 in.
- HINT:
- ·
If the diameter is less than the minimum, replace the cylinder head set bolt with a new one. Failure to do so may lead to engine damage.
·If there is any thread deformation, replace the cylinder head set bolt with a new one.