P910 HYBRID TRANSMISSION / TRANSAXLE OIL COOLER INSTALLATION
CAUTION / NOTICE / HINT
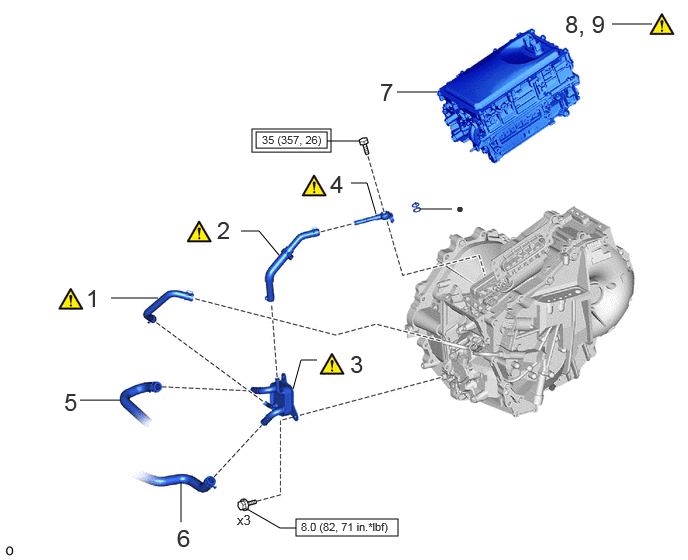
| Procedure | Part Name Code | 
|

|

|
|
|---|---|---|---|---|---|
| 1 | NO. 1 MOTOR COOLING HOSE | G1271C | ( ) |
- | - |
| 2 | NO. 2 MOTOR COOLING HOSE | G1272C | ()
|
- | - |
| 3 | MOTOR COOLING COOLER | G125A | ()
|
- | - |
| 4 | NO.2 MOTOR COOLING PIPE | G1252A | ()
|
- | - |
| 5 | OUTLET NO. 1 HYBRID WATER PUMP HOSE | G922F | - | - | - |
| 6 | INLET HYBRID RADIATOR HOSE | G922H | - | - | - |
| 7 | HYBRID MOTOR CONTROL INVERTER ASSEMBLY | G92A0 | - | - | - |
| 8 | INSPECT HYBRID TRANSAXLE FLUID | - | ()
|
- | - |
| 9 | INSPECT FOR HYBRID TRANSAXLE FLUID LEAK | - | ()
|
- | - |

|
Tightening torque for "Major areas involving basic vehicle performance such as moving/turning/stopping" : N*m (kgf*cm, ft.*lbf) | 
|
N*m (kgf*cm, ft.*lbf): Specified torque |
| ● | Non-reusable part | - | - |
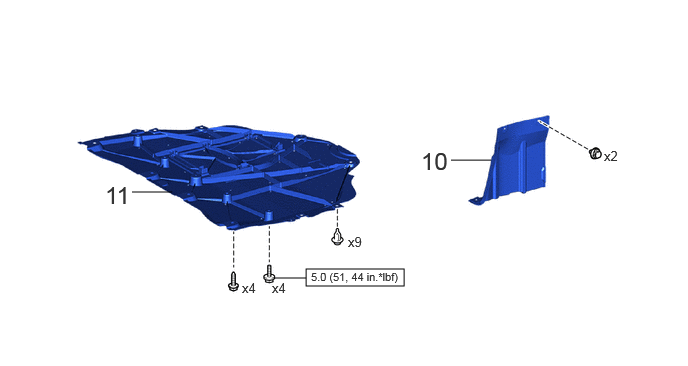
| Procedure | Part Name Code |
|
|
|
|
|---|---|---|---|---|---|
| 10 | ENGINE UNDER COVER LH | 51442C | - | - | - |
| 11 | NO. 1 ENGINE UNDER COVER ASSEMBLY | 51410 | - | - | - |
|
|
N*m (kgf*cm, ft.*lbf): Specified torque | - | - |
PROCEDURE

 G1271C
1.INSTALL NO. 1 MOTOR COOLING HOSE
|
|
|
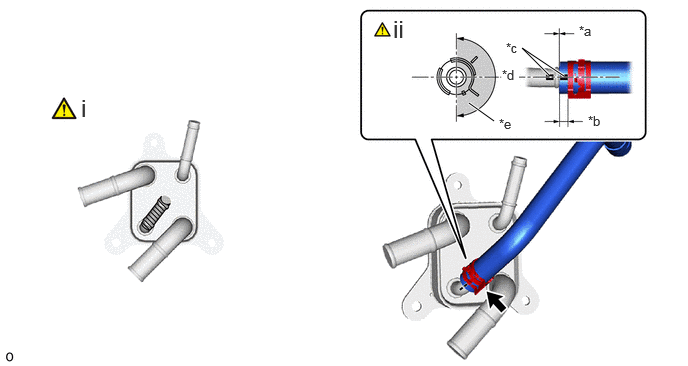
| *a | 0 to 3 mm (0 to 0.118 in.) | *b | 2 to 7 mm (0.0787 to 0.276 in.) |
| *c | Paint Mark | *d | Center of Paint Mark |
| *e | 180° | - | - |

|
Claw of Clip Location | 
|
ATF Application Area |
Coat a small amount of ATF as shown in the illustration.
Install the No. 1 motor cooling hose to the motor cooling cooler and slide the clip to secure it.
- NOTICE:
- ·
Be careful not to deform the motor cooling cooler.
·Make sure to align the paint mark on the No. 1 motor cooling hose with the paint mark on the motor cooling cooler.
·Make sure that the claws of the clip are positioned within the area shown in the illustration.
G1272C
2.INSTALL NO. 2 MOTOR COOLING HOSE
|
|
|
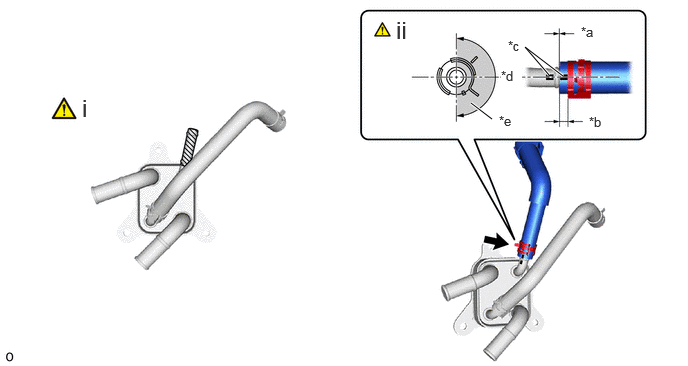
| *a | 0 to 3 mm (0 to 0.118 in.) | *b | 2 to 7 mm (0.0787 to 0.276 in.) |
| *c | Paint Mark | *d | Center of Paint Mark |
| *e | 180° | - | - |
|
|
Claw of Clip Location |
|
ATF Application Area |
Coat a small amount of ATF as shown in the illustration.
Install the No. 2 motor cooling hose to the motor cooling cooler and slide the clip to secure it.
- NOTICE:
- ·
Be careful not to deform the motor cooling cooler.
·Make sure to align the paint mark on the No. 2 motor cooling hose with the paint mark on the motor cooling cooler.
·Make sure that the claws of the clip are positioned within the area shown in the illustration.
G125A
3.INSTALL MOTOR COOLING COOLER
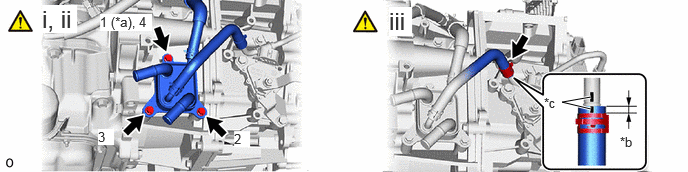
| *a | Temporarily Tighten | *b | 2 to 7 mm (0.0787 to 0.276 in.) |
| *c | Paint Mark | - | - |
Temporarily install the motor cooling cooler to the hybrid vehicle transaxle assembly with the 3 bolts.
Tighten the 3 bolts in the order shown in the illustration.
- Torque:
- 8.0 N*m (82 kgf*cm, 71 in.*lbf)
Connect the No. 1 motor cooling hose to the No. 1 motor cooling pipe and slide the clip to secure it.
- NOTICE:
-
Make sure to align the paint mark on the No. 1 motor cooling pipe with the paint mark on the No. 1 motor cooling hose.
G1252A
4.INSTALL NO.2 MOTOR COOLING PIPE
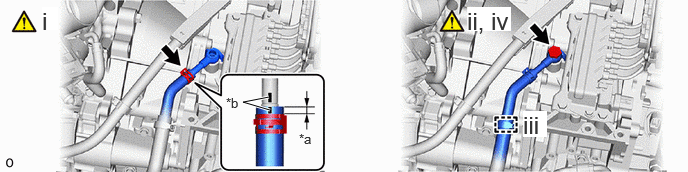
| *a | 2 to 7 mm (0.0787 to 0.276 in.) | *b | Paint Mark |
Install the No. 2 motor cooling pipe to the No. 2 motor cooling hose and slide the clip to secure it.
- NOTICE:
-
Make sure to align the paint mark on the No. 2 motor cooling pipe with the paint mark on the No. 2 motor cooling hose.
Temporarily install the No. 2 motor cooling pipe to the hybrid vehicle transaxle assembly with the oil cooler union bolt and a new gasket.
Engage the clamp.
Tighten the oil cooler union bolt to install the No. 2 motor cooling pipe.
- Torque:
- 35 N*m (357 kgf*cm, 26 ft.*lbf)
G922F
5.CONNECT OUTLET NO. 1 HYBRID WATER PUMP HOSE
G922H
6.CONNECT INLET HYBRID RADIATOR HOSE
G92A0
7.INSTALL HYBRID MOTOR CONTROL INVERTER ASSEMBLY
8.INSPECT HYBRID TRANSAXLE FLUID
9.INSPECT FOR HYBRID TRANSAXLE FLUID LEAK
51442C
10.INSTALL ENGINE UNDER COVER LH
51410
11.INSTALL NO. 1 ENGINE UNDER COVER ASSEMBLY