M15A-FXE ENGINE MECHANICAL ENGINE ASSEMBLY INSTALLATION
CAUTION / NOTICE / HINT
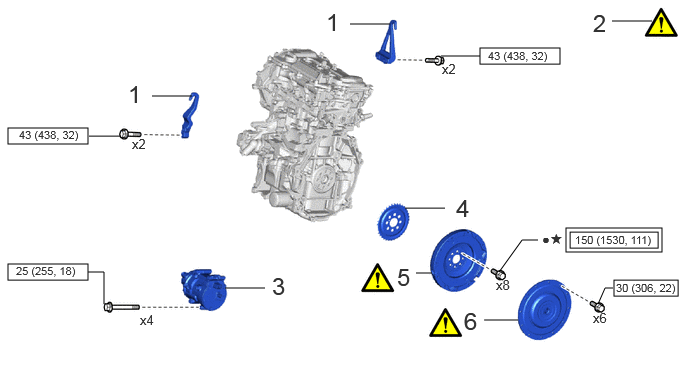
| Procedure | Part Name Code | 
|

|

|
|
|---|---|---|---|---|---|
| 1 | ENGINE HANGER | - | - | - | - |
| 2 | ENGINE FROM ENGINE STAND | - | ( ) |
- | - |
| 3 | COMPRESSOR WITH MOTOR ASSEMBLY | 88370 | - | - | - |
| 4 | NO. 1 CRANKSHAFT POSITION SENSOR PLATE | 19315 | - | - | - |
| 5 | FLYWHEEL SUB-ASSEMBLY | 13405 | ()
|
- | - |
| 6 | TRANSMISSION INPUT DAMPER ASSEMBLY | 31270 | ()
|
- | - |

|
Tightening torque for "Major areas involving basic vehicle performance such as moving/turning/stopping" : N*m (kgf*cm, ft.*lbf) | 
|
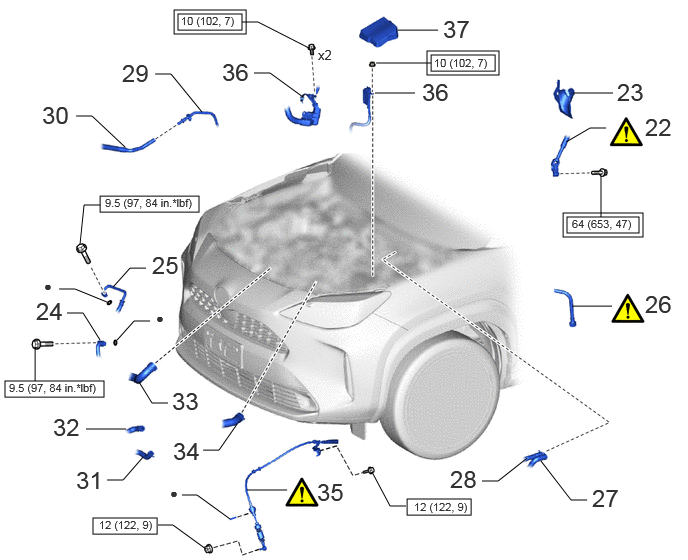
N*m (kgf*cm, ft.*lbf): Specified torque |
| ● | Non-reusable part | ★ | Precoated part |
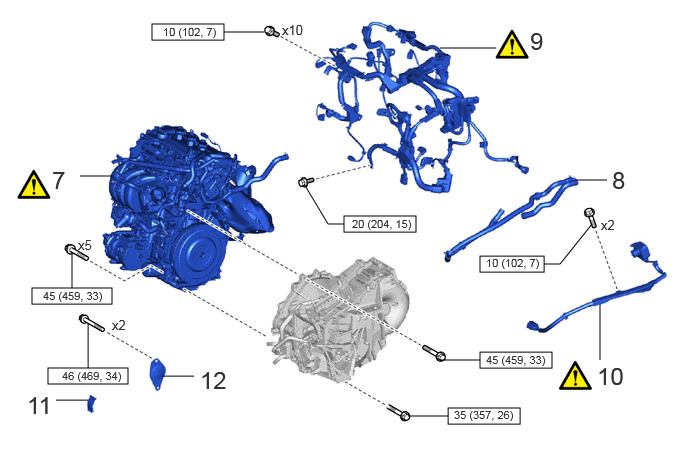
| Procedure | Part Name Code |
|
|
|
|
|---|---|---|---|---|---|
| 7 | ENGINE ASSEMBLY | - | ()
|
- | - |
| 8 | WATER HOSE | - | - | - | - |
| 9 | ENGINE WIRE | 82121 | ()
|
- | - |
| 10 | HV AIR CONDITIONING WIRE | 821H2 | ()
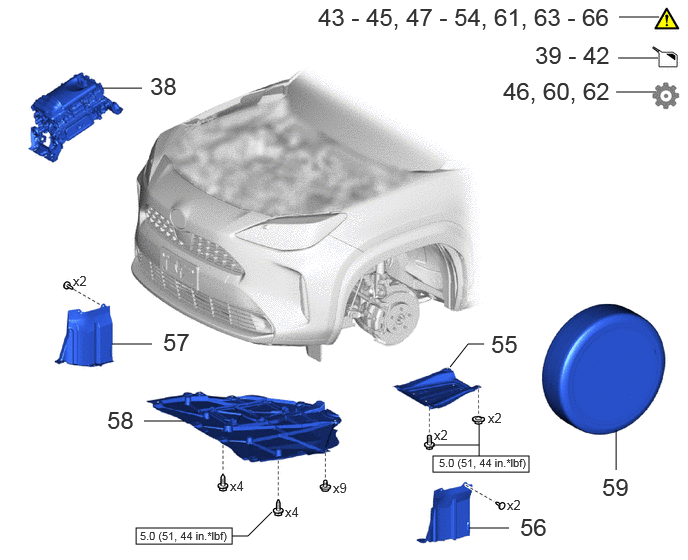
|
- | - |
| 11 | FLYWHEEL HOUSING SIDE COVER | 11363A | - | - | - |
| 12 | STARTER HOLE INSULATOR | 28193 | - | - | - |
|
|
N*m (kgf*cm, ft.*lbf): Specified torque | - | - |
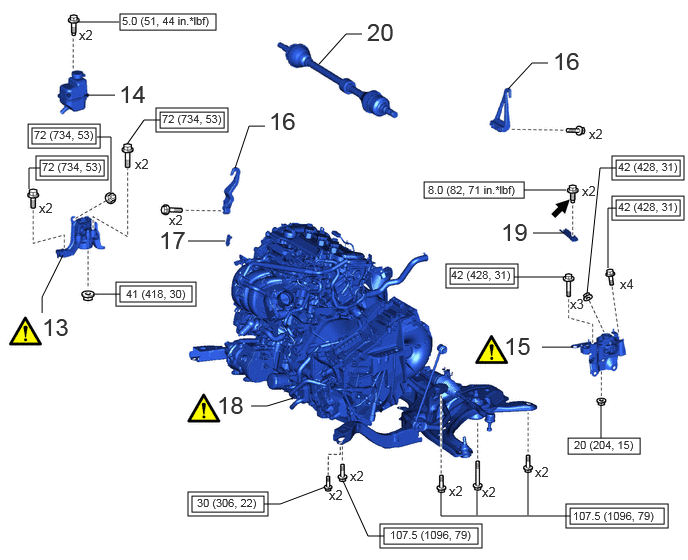
| Procedure | Part Name Code |
|
|
|
|
|---|---|---|---|---|---|
| 13 | ENGINE MOUNTING INSULATOR SUB-ASSEMBLY RH | 12305 | ()
|
- | - |
| 14 | INVERTER RESERVE TANK ASSEMBLY | G92A0A | - | - | - |
| 15 | ENGINE MOUNTING INSULATOR LH | 12372A | ()
|
- | - |
| 16 | ENGINE HANGER | - | - | - | - |
| 17 | ENGINE MOUNTING BRACKET CAP | 12353 | - | - | - |
| 18 | ENGINE ASSEMBLY WITH TRANSAXLE | - | ()
|
- | - |
| 19 | ENGINE MOUNTING STAY LH | 12318 | - | - | - |
| 20 | DRIVE SHAFT ASSEMBLY | - | - | - | - |
|
|
Tightening torque for "Major areas involving basic vehicle performance such as moving/turning/stopping" : N*m (kgf*cm, ft.*lbf) |
|
N*m (kgf*cm, ft.*lbf): Specified torque |

|
Adhesive 1324 | - | - |
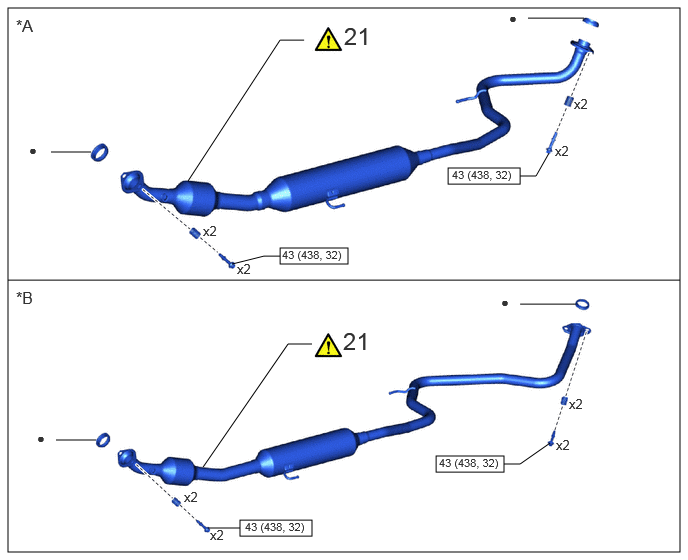
| Procedure | Part Name Code |
|
|
|
|
|---|---|---|---|---|---|
| 21 | FRONT EXHAUST PIPE ASSEMBLY | 17410 | ()
|
- | - |
| *A | for 2WD | *B | for AWD |
|
|
N*m (kgf*cm, ft.*lbf): Specified torque | ● | Non-reusable part |
| Procedure | Part Name Code |
|
|
|
|
|---|---|---|---|---|---|
| 22 | NO. 2 STEERING INTERMEDIATE SHAFT ASSEMBLY | 45260 | ()
|
- | - |
| 23 | COLUMN HOLE COVER SILENCER SHEET | 45259A | - | - | - |
| 24 | SUCTION HOSE SUB-ASSEMBLY | 88704 | - | - | - |
| 25 | NO. 1 COOLER REFRIGERANT DISCHARGE HOSE | 88711 | - | - | - |
| 26 | FUEL TUBE SUB-ASSEMBLY | 23901 | ()
|
- | - |
| 27 | INLET HEATER WATER HOSE | 87245 | - | - | - |
| 28 | NO.3 WATER BY-PASS HOSE ASSEMBLY | 16290F | - | - | - |
| 29 | FUEL TANK TO CANISTER TUBE | 77261D | - | - | - |
| 30 | NO. 1 FUEL VAPOR FEED HOSE | 23826 | - | - | - |
| 31 | OUTLET NO. 1 HYBRID WATER PUMP HOSE | G922F | - | - | - |
| 32 | INLET HYBRID RADIATOR HOSE | G922H | - | - | - |
| 33 | NO. 2 RADIATOR HOSE | 16572D | - | - | - |
| 34 | NO. 1 RADIATOR HOSE | 16571C | - | - | - |
| 35 | TRANSMISSION CONTROL CABLE ASSEMBLY | 33820B | ()
|
- | - |
| 36 | ENGINE WIRE | - | - | - | - |
| 37 | NO. 1 RELAY BLOCK COVER | 82662A | - | - | - |
|
|
Tightening torque for "Major areas involving basic vehicle performance such as moving/turning/stopping" : N*m (kgf*cm, ft.*lbf) |
|
N*m (kgf*cm, ft.*lbf): Specified torque |
| ● | Non-reusable part | - | - |
| Procedure | Part Name Code |
|
|
|
|
|---|---|---|---|---|---|
| 38 | HYBRID MOTOR CONTROL INVERTER ASSEMBLY | G92A0 | - | - | - |
| 39 | ADD ENGINE OIL | - | - | ()
|
- |
| 40 | ADD ENGINE COOLANT | - | - | ()
|
- |
| 41 | ADD HYBRID TRANSAXLE FLUID | - | - | ()
|
- |
| 42 | CHARGE AIR CONDITIONING SYSTEM WITH REFRIGERANT | - | - | ()
|
- |
| 43 | WARM UP COMPRESSOR | - | ()
|
- | - |
| 44 | INSPECT HYBRID TRANSAXLE FLUID | - | ()
|
- | - |
| 45 | INSPECT SHIFT LEVER POSITION | - | ()
|
- | - |
| 46 | ADJUST SHIFT LEVER POSITION | - | - | - | ()
|
| 47 | INSPECT FOR ENGINE OIL LEAK | - | ()
|
- | - |
| 48 | INSPECT FOR COOLANT LEAK (for Inverter) | - | ()
|
- | - |
| 49 | INSPECT FOR COOLANT LEAK (for Engine) | - | ()
|
- | - |
| 50 | INSPECT FOR REFRIGERANT LEAK | - | ()
|
- | - |
| 51 | INSPECT FOR FUEL LEAK | - | ()
|
- | - |
| 52 | INSPECT FOR EXHAUST GAS LEAK | - | ()
|
- | - |
| 53 | CHECK ENGINE OIL LEVEL | - | ()
|
- | - |
| 54 | INSPECT ENGINE COOLANT LEVEL IN RESERVOIR TANK | - | ()
|
- | - |
| 55 | CENTER NO. 4 ENGINE UNDER COVER | 51447D | - | - | - |
| 56 | ENGINE UNDER COVER LH | 51442C | - | - | - |
| 57 | ENGINE UNDER COVER RH | 51441C | - | - | - |
| 58 | NO. 1 ENGINE UNDER COVER ASSEMBLY | 51410 | - | - | - |
| 59 | FRONT WHEELS | - | - | - | - |
| 60 | ALIGN FRONT WHEELS FACING STRAIGHT AHEAD | - | - | - | ()
|
| 61 | INSPECT AND ADJUST FRONT WHEEL ALIGNMENT | - | ()
|
- | - |
| 62 | INITIALIZATION AFTER RECONNECTING AUXILIARY BATTERY TERMINAL | - | - | - | ()
|
| 63 | INSPECT IGNITION TIMING | - | ()
|
- | - |
| 64 | INSPECT ENGINE IDLE SPEED | - | ()
|
- | - |
| 65 | INSPECT CO/HC | - | ()
|
- | - |
| 66 | CHECK SPEED SENSOR SIGNAL | - | ()
|
- | - |
|
|
N*m (kgf*cm, ft.*lbf): Specified torque | - | - |
CAUTION / NOTICE / HINT
- CAUTION:
-
The engine assembly with transaxle is very heavy. Be sure to follow the procedure described in the repair manual, or the engine lifter may suddenly drop.
- NOTICE:
-
This procedure includes the removal of small-head bolts. Refer to Small-Head Bolts of Basic Repair Hint to identify the small-head bolts.
-
Click hereGeneral>INTRODUCTION>REPAIR INSTRUCTION>PRECAUTION
- HINT:
-
Perform "Inspection After Repair" after replacing the engine assembly.
- ·
w/ Canister Pump Module:
Click hereEngine / Hybrid System>M15A-FXE (ENGINE CONTROL)>SFI SYSTEM>INITIALIZATION
·w/o Canister Pump Module:
Click hereEngine / Hybrid System>M15A-FXE (ENGINE CONTROL)>SFI SYSTEM>INITIALIZATION
PROCEDURE

 1.INSTALL ENGINE HANGER
|
|
Click here()
|
2.REMOVE ENGINE FROM ENGINE STAND
88370
3.INSTALL COMPRESSOR WITH MOTOR ASSEMBLY
19315
4.INSTALL NO. 1 CRANKSHAFT POSITION SENSOR PLATE
13405
5.INSTALL FLYWHEEL SUB-ASSEMBLY
|
|
Click here()
|
31270
6.INSTALL TRANSMISSION INPUT DAMPER ASSEMBLY
|
|
Click here()
|
7.INSTALL ENGINE ASSEMBLY
|
|
Click here()
|
8.INSTALL WATER HOSE
82121
9.INSTALL ENGINE WIRE
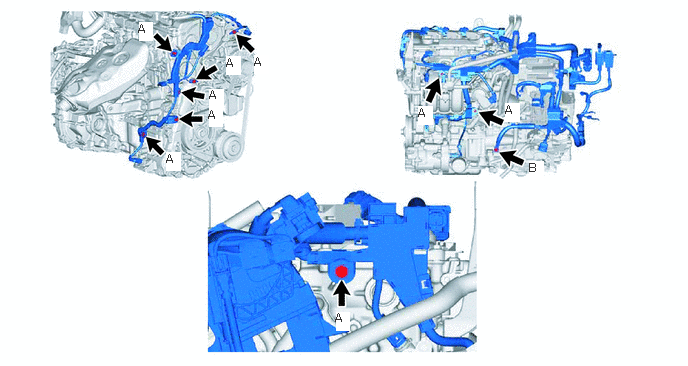
- Torque:
- Bolt (A) : 10 N*m (102 kgf*cm, 7 ft.*lbf)
- Bolt (B) : 20 N*m (204 kgf*cm, 15 ft.*lbf)
821H2
10.INSTALL HV AIR CONDITIONING WIRE
|
|
Click here()
|
11363A
11.INSTALL FLYWHEEL HOUSING SIDE COVER
28193
12.INSTALL STARTER HOLE INSULATOR
12305
13.INSTALL ENGINE MOUNTING INSULATOR SUB-ASSEMBLY RH
|
|
|
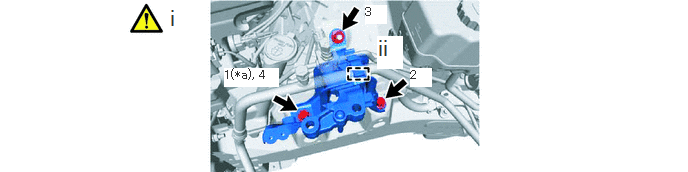
| *a | Temporarily Tighten | - | - |
Install the 2 bolts and nut in the order shown in the illustration.
- Torque:
- 72 N*m (734 kgf*cm, 53 ft.*lbf)
Engage the clamp.
G92A0A
14.INSTALL INVERTER RESERVE TANK ASSEMBLY
- Torque:
- 5.0 N*m (51 kgf*cm, 44 in.*lbf)
12372A
15.INSTALL ENGINE MOUNTING INSULATOR LH
|
|
|

| *a | Temporarily Tighten | - | - |
- Torque:
- 42 N*m (428 kgf*cm, 31 ft.*lbf)
16.REMOVE ENGINE HANGER
12353
17.INSTALL ENGINE MOUNTING BRACKET CAP
18.INSTALL ENGINE ASSEMBLY WITH TRANSAXLE
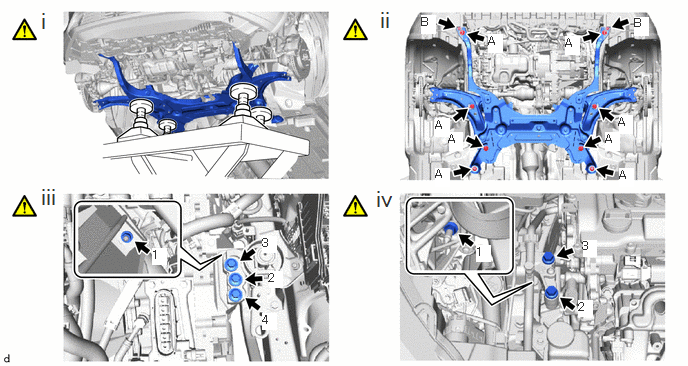
Using height adjustment attachments and plate lift attachments to keep the engine assembly with transaxle and front suspension crossmember sub-assembly level, set an engine lifter underneath the engine assembly with transaxle and front suspension crossmember sub-assembly.
- NOTICE:
- ·
Using height adjustment attachments and plate lift attachments, keep the engine assembly with transaxle horizontal.
·Do not perform any procedures while the engine assembly is suspended because doing so may cause the engine assembly to drop, resulting in injury. However, the engine assembly needs to be suspended when it is installed to or removed from an engine stand.
·To prevent the oil pan sub-assembly from deforming, do not place any attachments under the oil pan sub-assembly of the engine assembly with transaxle.
1. Operate the engine lifter and install the engine assembly with transaxle to the vehicle.
- CAUTION:
-
Do not raise the engine assembly with transaxle more than necessary. If the engine is raised excessively, the vehicle may also be lifted up.
- NOTICE:
- ·
Make sure that the engine assembly with transaxle is clear of all wiring and hoses.
·While raising the engine assembly with transaxle into the vehicle, do not allow it to contact the vehicle.
Connect the front suspension crossmember sub-assembly to the vehicle with the 10 bolts.
- Torque:
- Bolt (A) : 107.5 N*m (1096 kgf*cm, 79 ft.*lbf)
- Bolt (B) : 30 N*m (306 kgf*cm, 22 ft.*lbf)
Install the engine mounting insulator LH to the engine mounting bracket LH with the 3 bolts and nut in the order shown illustration.
- Torque:
- Bolt : 42 N*m (428 kgf*cm, 31 ft.*lbf)
- Nut : 20 N*m (204 kgf*cm, 15 ft.*lbf)
Install the engine mounting insulator sub-assembly RH to the engine mounting bracket RH with the 2 bolts and nut in the order shown illustration.
- Torque:
- Bolt : 72 N*m (734 kgf*cm, 53 ft.*lbf)
- Nut : 41 N*m (418 kgf*cm, 30 ft.*lbf)
12318
19.INSTALL ENGINE MOUNTING STAY LH
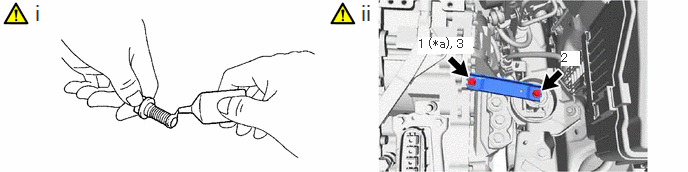
| *a | Temporarily Tighten | - | - |
Apply adhesive to the 2 or 3 threads at the tip of each of the 2 bolts.
- Adhesive:
Toyota Genuine Adhesive 1324, Three Bond 1324 or equivalent
- NOTICE:
-
To prevent contamination by foreign matter, install immediately after applying adhesive.
Install the 2 bolts in the order shown in the illustration.
- Torque:
- 8.0 N*m (82 kgf*cm, 71 in.*lbf)
20.INSTALL DRIVE SHAFT ASSEMBLY
17410
21.INSTALL FRONT EXHAUST PIPE ASSEMBLY
|
|
Click here()
|
45260
22.CONNECT NO. 2 STEERING INTERMEDIATE SHAFT ASSEMBLY
|
|
Click here()
|
45259A
23.INSTALL COLUMN HOLE COVER SILENCER SHEET
88704
24.CONNECT SUCTION HOSE SUB-ASSEMBLY
88711
25.CONNECT NO. 1 COOLER REFRIGERANT DISCHARGE HOSE
23901
26.CONNECT FUEL TUBE SUB-ASSEMBLY
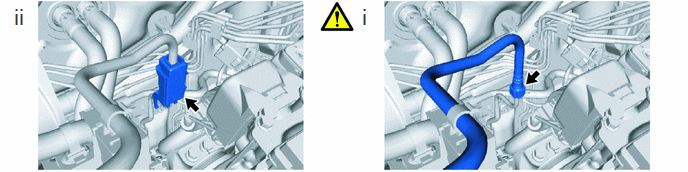
Connect the fuel tube sub-assembly to the fuel pump assembly.
Click hereEngine / Hybrid System>M15A-FXE (FUEL)>FUEL SYSTEM>PRECAUTION
Install the No. 1 fuel pipe clamp to the fuel tube sub-assembly.
87245
27.CONNECT INLET HEATER WATER HOSE
16290F
28.CONNECT NO.3 WATER BY-PASS HOSE ASSEMBLY
77261D
29.CONNECT FUEL TANK TO CANISTER TUBE
23826
30.CONNECT NO. 1 FUEL VAPOR FEED HOSE
G922F
31.CONNECT OUTLET NO. 1 HYBRID WATER PUMP HOSE
G922H
32.CONNECT INLET HYBRID RADIATOR HOSE
16572D
33.CONNECT NO. 2 RADIATOR HOSE
16571C
34.CONNECT NO. 1 RADIATOR HOSE
33820B
35.CONNECT TRANSMISSION CONTROL CABLE ASSEMBLY
- Torque:
- Bolt : 12 N*m (122 kgf*cm, 9 ft.*lbf)
- Nut : 12 N*m (122 kgf*cm, 9 ft.*lbf)
36.CONNECT ENGINE WIRE
- Torque:
- Bolt : 10 N*m (102 kgf*cm, 7 ft.*lbf)
- Nut : 10 N*m (102 kgf*cm, 7 ft.*lbf)
82662A
37.INSTALL NO. 1 RELAY BLOCK COVER
G92A0
38.INSTALL HYBRID MOTOR CONTROL INVERTER ASSEMBLY
39.ADD ENGINE OIL
|
|
Click here()
|
40.ADD ENGINE COOLANT
|
|
Click here()
|
41.ADD HYBRID TRANSAXLE FLUID
|
|
Click here()
|
42.CHARGE AIR CONDITIONING SYSTEM WITH REFRIGERANT
|
|
Click here()
|
43. WARM UP COMPRESSOR
|
|
Click here()
|
44.INSPECT HYBRID TRANSAXLE FLUID
|
|
Click here()
|
45.INSPECT SHIFT LEVER POSITION
|
|
Click here()
|
46.ADJUST SHIFT LEVER POSITION
|
|
Click here()
|
47.INSPECT FOR ENGINE OIL LEAK
|
|
Click here()
|
48.INSPECT FOR COOLANT LEAK (for Inverter)
|
|
Click here()
|
49.INSPECT FOR COOLANT LEAK (for Engine)
|
|
Click here()
|
50.INSPECT FOR REFRIGERANT LEAK
|
|
Click here()
|
51.INSPECT FOR FUEL LEAK
|
|
Click here()
|
52.INSPECT FOR EXHAUST GAS LEAK
|
|
Click here()
|
53.CHECK ENGINE OIL LEVEL
|
|
Click here()
|
54.INSPECT ENGINE COOLANT LEVEL IN RESERVOIR TANK
|
|
Click here()
|
51447D
55.INSTALL CENTER NO. 4 ENGINE UNDER COVER
51442C
56.INSTALL ENGINE UNDER COVER LH
51441C
57.INSTALL ENGINE UNDER COVER RH
51410
58.INSTALL NO. 1 ENGINE UNDER COVER ASSEMBLY
59.INSTALL FRONT WHEELS
60. ALIGN FRONT WHEELS FACING STRAIGHT AHEAD
61.INSPECT AND ADJUST FRONT WHEEL ALIGNMENT
|
|
Click here()
|
62. INITIALIZATION AFTER RECONNECTING AUXILIARY BATTERY TERMINAL
Click hereGeneral>MAINTENANCE>M15A-FXE AUXILIARY BATTERY>INSTALLATION
|
|
|
63.INSPECT IGNITION TIMING
|
|
Click here()
|
64.INSPECT ENGINE IDLE SPEED
|
|
Click here()
|
65.INSPECT CO/HC
|
|
Click here()
|
66.CHECK SPEED SENSOR SIGNAL
|
|
Click here()
|