BRAKE SYSTEM (OTHER) BRAKE BOOSTER(for Gasoline Model) INSTALLATION
CAUTION / NOTICE / HINT
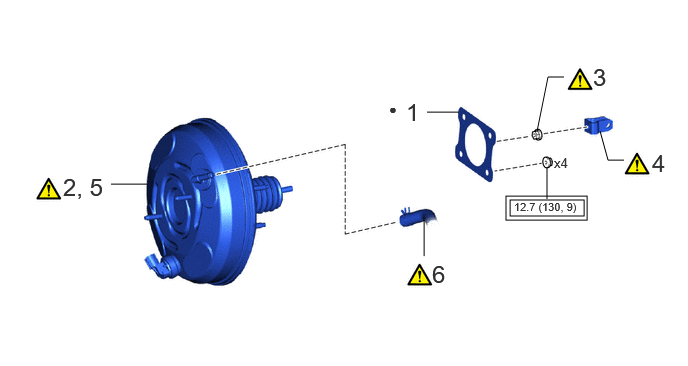
| Procedure | Part Name Code | 
|

|

|
|
|---|---|---|---|---|---|
| 1 | BRAKE BOOSTER GASKET | 44785 | - | - | - |
| 2 | TEMPORARILY INSTALL BRAKE BOOSTER ASSEMBLY | 44610 | ( ) |
- | - |
| 3 | TEMPORARILY INSTALL CLEVIS LOCK NUT | - | ()
|
- | - |
| 4 | TEMPORARILY INSTALL BRAKE MASTER CYLINDER PUSH ROD CLEVIS | 47264D | ()
|
- | - |
| 5 | BRAKE BOOSTER ASSEMBLY | 44610 | ()
|
- | - |
| 6 | CHECK VALVE TO CONNECTOR TUBE HOSE | - | ()
|
- | - |

|
Tightening torque for "Major areas involving basic vehicle performance such as moving/turning/stopping" : N*m (kgf*cm, ft.*lbf) | ● | Non-reusable part |
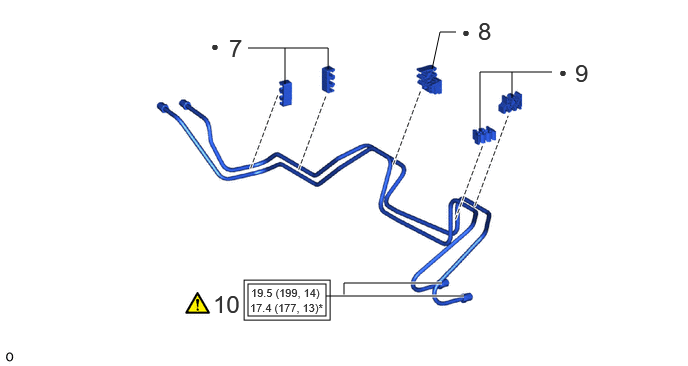
| Procedure | Part Name Code |
|
|
|
|
|---|---|---|---|---|---|
| 7 | NO. 1 BRAKE TUBE CLAMP | 47371A | - | - | - |
| 8 | NO. 2 BRAKE TUBE CLAMP | 47372 | - | - | - |
| 9 | NO. 4 BRAKE TUBE CLAMP | 47374B | - | - | - |
| 10 | BRAKE LINE | - | ()
|
- | - |
|
|
Tightening torque for "Major areas involving basic vehicle performance such as moving/turning/stopping" : N*m (kgf*cm, ft.*lbf) | * | For use with a union nut wrench |
| ● | Non-reusable part | - | - |
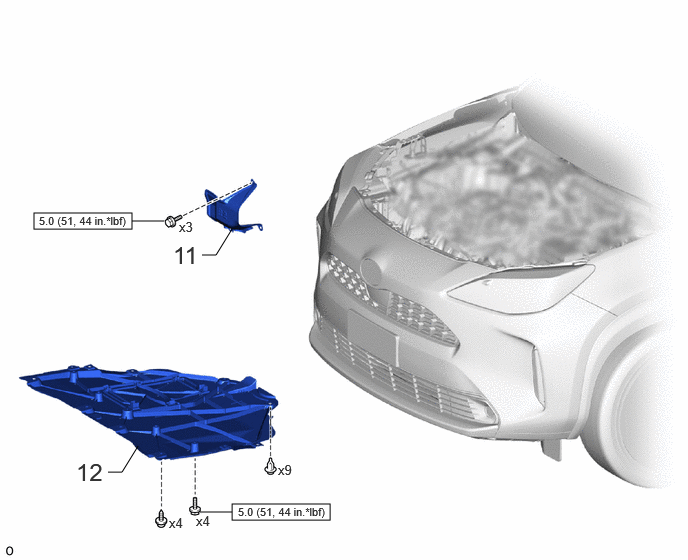
| Procedure | Part Name Code |
|
|
|
|
|---|---|---|---|---|---|
| 11 | DASH PANEL HEAT INSULATOR | 55225C | - | - | - |
| 12 | NO. 1 ENGINE UNDER COVER ASSEMBLY | 51410 | - | - | - |

|
N*m (kgf*cm, ft.*lbf): Specified torque | - | - |
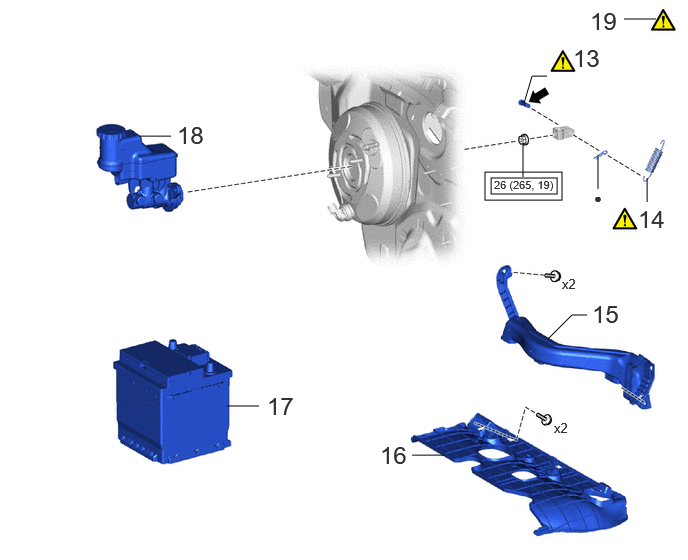
| Procedure | Part Name Code |
|
|
|
|
|---|---|---|---|---|---|
| 13 | PUSH ROD PIN | 47264A | ()
|
- | - |
| 14 | BRAKE PEDAL RETURN SPRING | 47101A | ()
|
- | - |
| 15 | NO. 1 AIR DUCT | 87211 | - | - | - |
| 16 | NO. 1 INSTRUMENT PANEL UNDER COVER SUB-ASSEMBLY | 55606 | - | - | - |
| 17 | BATTERY | - | - | - | - |
| 18 | BRAKE MASTER CYLINDER SUB-ASSEMBLY | 47201 | - | - | - |
| 19 | INSPECT AND ADJUST BRAKE PEDAL | - | ()
|
- | - |
|
|
Tightening torque for "Major areas involving basic vehicle performance such as moving/turning/stopping" : N*m (kgf*cm, ft.*lbf) | ● | Non-reusable part |

|
Lithium soap base glycol grease | - | - |
PROCEDURE

 44785
1.INSTALL BRAKE BOOSTER GASKET
44610
2.TEMPORARILY INSTALL BRAKE BOOSTER ASSEMBLY
- NOTICE:
-
Do not apply excessive force to the brake lines or refrigerant lines.
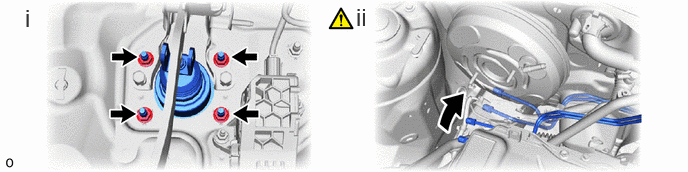
Temporarily install the brake booster assembly to the vehicle.
Return the front No. 1 brake tube and front No. 2 brake tube to their original positions.
3.TEMPORARILY INSTALL CLEVIS LOCK NUT
|
|
|
47264D
4.TEMPORARILY INSTALL BRAKE MASTER CYLINDER PUSH ROD CLEVIS
|
|
|
44610
5.INSTALL BRAKE BOOSTER ASSEMBLY
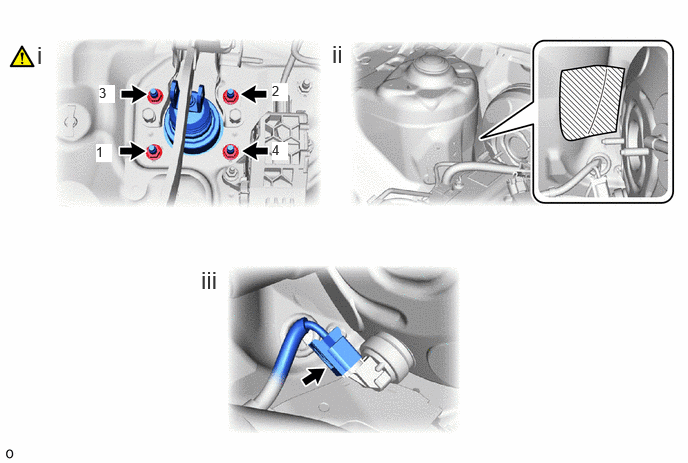

|
Protective Tape | - | - |
Install the 4 nuts to secure the brake booster assembly.
- Torque:
- 12.7 N*m (130 kgf*cm, 9 ft.*lbf)
- NOTICE:
-
Tighten the 4 nuts in the order shown in the illustration.
Remove the protective tape.
Connect the connector.
6.CONNECT CHECK VALVE TO CONNECTOR TUBE HOSE
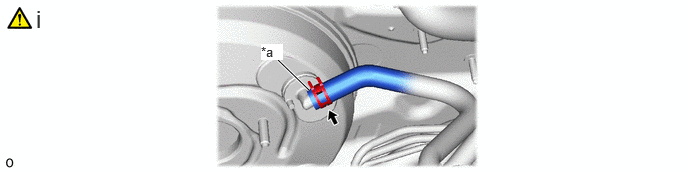
| *a | Paint Mark | - | - |
Connect the check valve to connector tube hose to the brake booster assembly and slide the clip to secure it.
- NOTICE:
- ·
When connecting the check valve to connector tube hose, face the paint mark up.
·Make sure that the tabs of the clip are facing upward.
47371A
7.INSTALL NO. 1 BRAKE TUBE CLAMP
47372
8.INSTALL NO. 2 BRAKE TUBE CLAMP
47374B
9.INSTALL NO. 4 BRAKE TUBE CLAMP
10.INSTALL BRAKE LINE
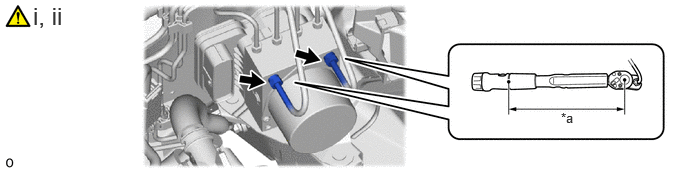
| *a | Torque Wrench Fulcrum Length | - | - |
Temporarily install front No. 1 brake tube and front No. 2 brake tube to the correct position on the brake actuator assembly.
Using a 12 mm union nut wrench, tighten the front No. 1 brake tube and front No. 2 brake tube.
- Torque:
- Specified tightening torque : 19.5 N*m (199 kgf*cm, 14 ft.*lbf)
- NOTICE:
- ·
Do not kink or damage the brake lines.
·Do not allow the brake lines to twist or interfere with other parts or the vehicle body during tightening.
·Do not allow any foreign matter such as dirt or dust to enter the brake lines from the connecting parts.
- HINT:
- ·
Calculate the torque wrench reading when changing the fulcrum length of the torque wrench.
Click hereGeneral>INTRODUCTION>REPAIR INSTRUCTION>PRECAUTION
·When using a union nut wrench (fulcrum length of 20 mm (0.787 in.)) + torque wrench (fulcrum length of 162 mm (6.38 in.)): 17.4 N*m (177 kgf*cm, 13 ft.*lbf)
55225C
11.INSTALL DASH PANEL HEAT INSULATOR
- Torque:
- 5.0 N*m (51 kgf*cm, 44 in.*lbf)
51410
12.INSTALL NO. 1 ENGINE UNDER COVER ASSEMBLY
47264A
13.INSTALL PUSH ROD PIN
|
|
Click here()
|
47101A
14.INSTALL BRAKE PEDAL RETURN SPRING
|
|
Click here()
|
87211
15.INSTALL NO. 1 AIR DUCT
55606
16.INSTALL NO. 1 INSTRUMENT PANEL UNDER COVER SUB-ASSEMBLY
17.INSTALL BATTERY
47201
18.INSTALL BRAKE MASTER CYLINDER SUB-ASSEMBLY
19.INSPECT AND ADJUST BRAKE PEDAL