STOP AND START STOP AND START SYSTEM Starter Signal Circuit
DESCRIPTION
The engine stop and start ECU uses its internal starter circuit to drive the starter drive relay (ST No. 1 relay) and operate the starter.
WIRING DIAGRAM
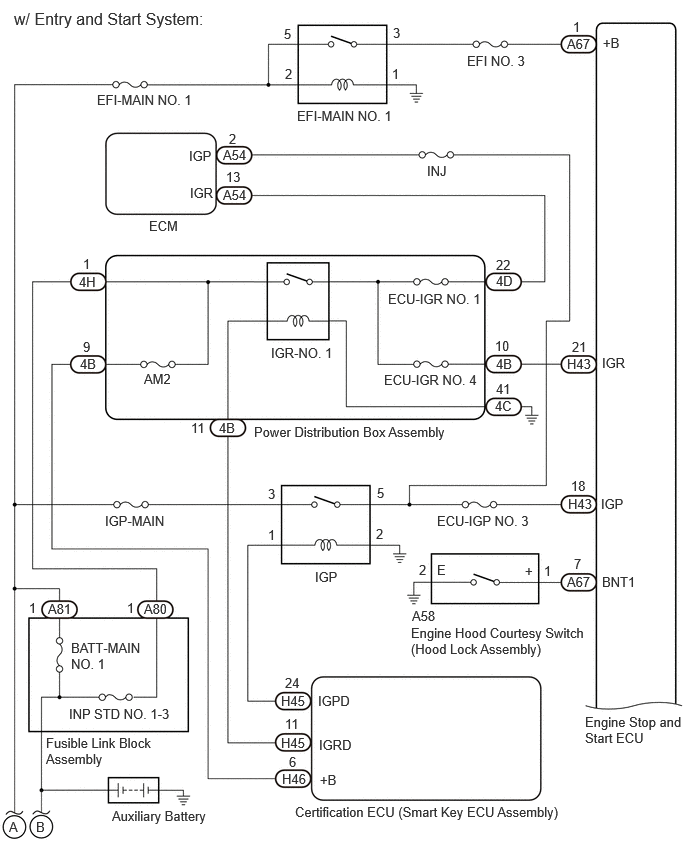
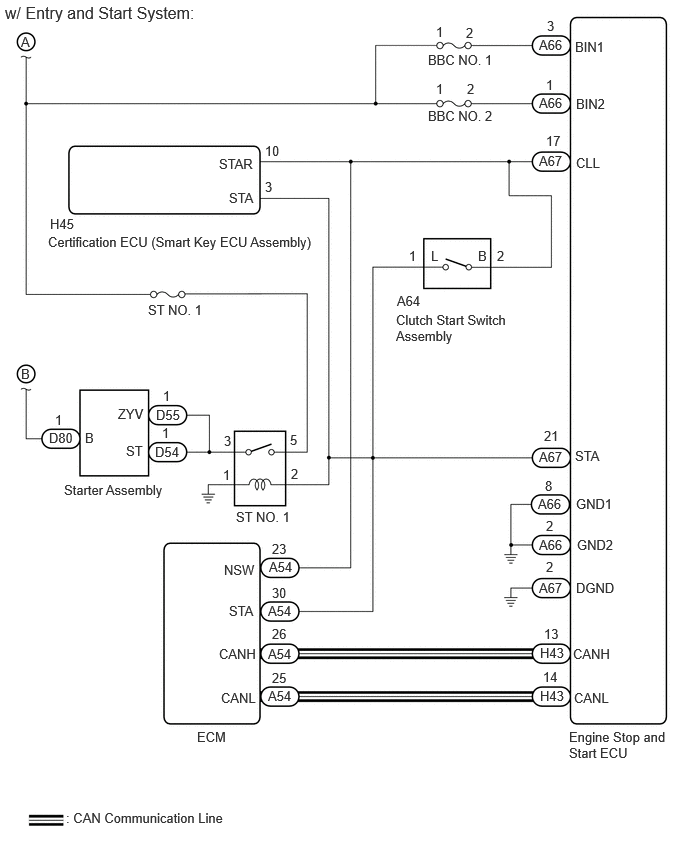
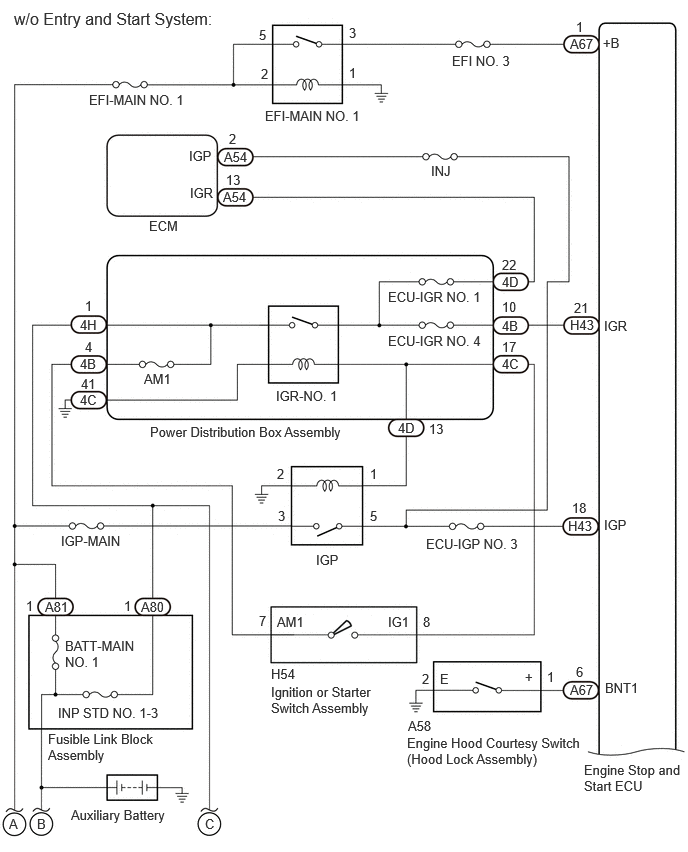
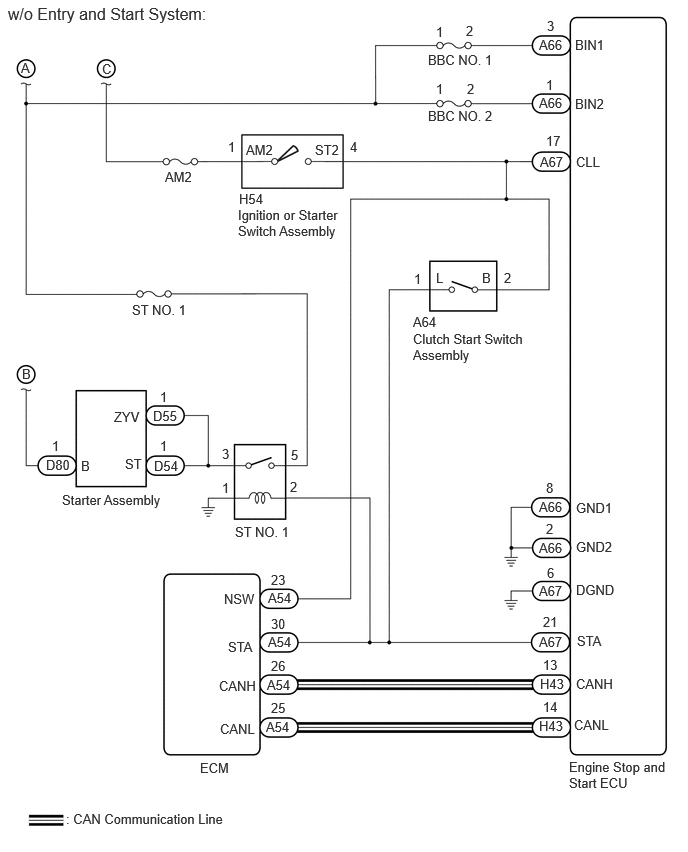
CAUTION / NOTICE / HINT
When the engine stop and start ECU is replaced, read the number of starter operations before replacement and record this number to the new engine stop and start ECU after replacement.
Click hereEngine / Hybrid System>STOP AND START>STOP AND START SYSTEM>REGISTRATION
When the engine stop ECU has been replaced, perform external backup boost converter (Eco run vehicle converter assembly) existence learning.
Click hereEngine / Hybrid System>STOP AND START>STOP AND START SYSTEM>REGISTRATION
After replacing the engine stop and start ECU or air conditioner amplifier assembly, perform initialization/learning of the air conditioner information for the engine stop and start ECU.
Click hereEngine / Hybrid System>STOP AND START>STOP AND START SYSTEM>REGISTRATION
When the starter assembly is replaced, the number of starter operations stored in the engine stop and start ECU must be reset.
Click hereEngine / Hybrid System>STOP AND START>STOP AND START SYSTEM>REGISTRATION
When the starter assembly is replaced, "ST NO. 1 relay" must be also replaced.
Inspect the fuses for circuits related to this system before performing the following procedure.
- HINT:
-
For wire harness and connector inspection procedures and precautions, refer toGeneral>INTRODUCTION>HOW TO TROUBLESHOOT ECU CONTROLLED SYSTEMS>ELECTRONIC CIRCUIT INSPECTION PROCEDURE
PROCEDURE
Turn the ignition switch to ON and check that the engine cranks.
- Result:
Result Proceed to Engine cranks A Engine does not crank B
A
B
- Powertrain > Stop and Start > Active Test
-
Tester Display Starter(Hood Close) - 50004 392 42017
Check whether the engine cranks while the Active Test "Starter(Hood Close)" is being performed.
- NOTICE:
-
The Active Test "Starter(Hood Close)" is stopped automatically 3 seconds after the starter assembly begins operating.
- Standard:
Engine cranks
- Result:
Proceed to OK NG
OK
NG
Enter the following menus.
- Powertrain > Engine > Trouble Codes
- 50001 372
- Result:
Result Proceed to SFI system DTCs are not output A SFI system DTC (poor startability detected) output, and starter does not rotate SFI system DTC (poor startability detected) output, and starter rotates B DTCs other than SFI system DTC (poor startability detected) are output
- HINT:
- ·
According to the display on the GTS, check the freeze frame data item [Cranking Time] in the sets of freeze frame data.
·If the value of [Cranking Time] is approximately 3 seconds, the stop and start control system or starter system may be malfunctioning.
·If the value of [Cranking Time] is small (approximately 0.5 seconds or less: the minimum value varies depending on the model), the SFI system may be malfunctioning.
·The Data List item [Cranking Time] indicates the length of time starter operation is requested by the engine stop and start ECU. If the engine speed exceeds the specified value, the engine stop and start ECU cancels its start request.
A
B
- NOTICE:
-
The freeze frame data is cleared when DTCs are cleared. Be sure to make a note of necessary data in advance.
- HINT:
-
Using the time-series freeze frame data, confirm the freeze frame data recorded the moment the DTC was stored and after the DTC was stored. This information can be useful when troubleshooting.
According to the prompts on the GTS screen, read the time-series freeze frame data to confirm the vehicle conditions when an engine stall occurred while stop and start control was operating.
Click hereEngine / Hybrid System>STOP AND START>STOP AND START SYSTEM>FREEZE FRAME DATA
Check the freeze frame data for engine stall history and engine start failure.
- Result:
GTS Display Result Proceed to Engine Stall History during Stop&Start (Hood Open) Yes A Engine Stall History during Stop&Start (Collision or Battery Voltage Low) Yes B Engine Stall History during Engine Starting (Collision) Engine Start Fail Yes C
A
B
C
- NOTICE:
-
Before performing this step, check that the engine hood can be opened by pulling the hood lock control cable.
Enter the following menus.
- Powertrain > Stop and Start > Data List
-
Tester Display Hood Courtesy Switch - 50003 392 207
Check the Data List when the hood is opened and closed.
- OK:
Condition Normal Condition Engine hood closed ON Engine hood open OFF
- Result:
Proceed to OK NG
OK
Click hereGeneral>INTRODUCTION>HOW TO TROUBLESHOOT ECU CONTROLLED SYSTEMS>HOW TO PROCEED WITH TROUBLESHOOTING
NG
Inspect the engine hood courtesy switch (hood lock assembly).
Click hereVehicle Interior>THEFT DETERRENT / KEYLESS ENTRY>ENGINE HOOD COURTESY SWITCH>INSPECTION
- Result:
Proceed to OK NG
OK
NG
Disconnect the A58 engine hood courtesy switch (hood lock assembly) connector.
Measure the resistance according to the value(s) in the table below.
- Standard Resistance:
Tester Connection Condition Specified Condition Click Location & Routing(A58)Location & Routingewd_type=routing;type=c;code=A58
Click Connector(A58)Engine Compartment>Engine Room Main Wire>Hood Lock Assemblyewd_type=component;type=c;code=A58;pinno=1
A58-1 (E) - Body ground Always Below 1 Ω
- Result:
Proceed to OK NG
OK
NG
Disconnect the A67 engine stop and start ECU connector.
Disconnect the A58 engine hood courtesy switch (hood lock assembly) connector.
Measure the resistance according to the value(s) in the table below.
Click hereEngine / Hybrid System>STOP AND START>STOP AND START SYSTEM>TERMINALS OF ECU
- Standard Resistance:
Tester Connection Condition Specified Condition Click Location & Routing(A67,A58)Location & Routingewd_type=routing;type=c,c;code=A67,A58
Click Connector(A67)Instrument Panel>Engine Room Main Wire>Engine Stop and Start ECUewd_type=component;type=c;code=A67;pinno=7
Click Connector(A58)Engine Compartment>Engine Room Main Wire>Hood Lock Assemblyewd_type=component;type=c;code=A58;pinno=1
A67-7 (BNT1) - A58-1 (+) Always Below 1 Ω A67-7 (BNT1) - Body ground Always 10 kΩ or higher A58-1 (+) - Body ground Always 10 kΩ or higher
- Result:
Proceed to OK NG
OK
Click hereEngine / Hybrid System>STOP AND START>ENGINE STOP AND START ECU>REMOVAL
- HINT:
-
If arriving at this item from the item "Drive command is being sent from the engine stop and start ECU but the starter itself is not moving" of "After Engine Stops due to Stop and Start System, Engine does not Restart" in Stop and Start / Stop and Start System / Problem Symptoms Table, go to SIMULATION METHOD.
NG
Check if the vehicle was in a collision when the engine stalled.
- Result:
Result Proceed to Vehicle was in collision when engine stalled A Vehicle was not in collision when engine stalled B
- HINT:
-
When "Engine Stall History during Stop & Start (Collision or Battery Voltage Low)" or "Engine Stall History during Engine Starting (Collision)" is stored: This may have been stored because the vehicle was in a collision or a collision detection signal was input while stop and start control was operating.
A
B
Click hereVehicle Interior>SUPPLEMENTAL RESTRAINT SYSTEMS>AIRBAG SYSTEM>HOW TO PROCEED WITH TROUBLESHOOTING
Disconnect the H45 certification ECU (smart key ECU assembly) connector.*1
*1: w/ Entry and Start System
Disconnect the A54 ECM connector.
Disconnect the H45 engine stop and start ECU connector.
Remove the ST NO. 1 relay from the No. 1 engine room relay block.
Measure the resistance according to the value(s) in the table below.
- Standard Resistance:
Tester Connection Condition Specified Condition Click Location & Routing(H45)Location & Routingewd_type=routing;type=c;code=H45
Click Connector(H45)Instrument Panel>Instrument Panel Wire / Speaker Wire>Certification ECUewd_type=component;type=c;code=H45;pinno=21
H45-21 (STA) - 2 (ST NO. 1 relay holder) Always Below 1 Ω H45-21 (STA) - Body ground Always 10 kΩ or higher 2 (ST NO. 1 relay holder) - Body ground Always 10 kΩ or higher
- Result:
Proceed to OK NG
OK
NG
Remove the ST NO. 1 relay from the No. 1 engine room relay block.
Measure the resistance according to the value(s) in the table below.
- Standard Resistance:
Tester Connection Condition Specified Condition 1 (ST NO. 1 relay holder) - Body ground Always Below 1 Ω
- Result:
Proceed to OK NG
OK
NG
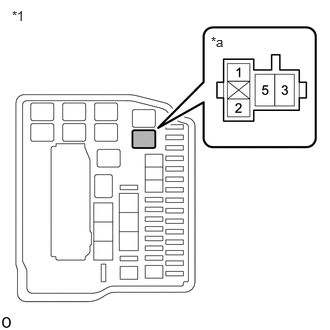
| *1 | No. 1 Engine Room Relay Block |
| *a | ST NO. 1 Relay Holder |
Remove the ST NO. 1 relay from the No. 1 engine room relay block.
Measure the resistance according to the value(s) in the table below.
- Standard Resistance:
Tester Connection Condition Specified Condition 5 (ST NO. 1 relay holder) - Body ground Always 9.5 to 14 V
- Result:
Proceed to OK NG
OK
NG
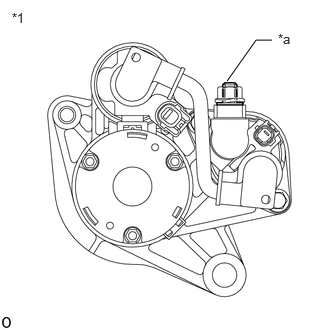
| *1 | Starter Assembly |
| *a | D80-1 (B) |
Measure the resistance according to the value(s) in the table below.
- Standard Resistance:
Tester Connection Condition Specified Condition Click Location & Routing(D80)Location & Routingewd_type=routing;type=c;code=D80
Click Connector(D80)Engine Compartment>Engine Wire>Starter Assemblyewd_type=component;type=c;code=D80;pinno=1
D80-1 (B) - Body ground Always 9.5 to 14 V
- CAUTION:
-
Before performing this step, check that the starter assembly connector F1 is not disconnected or loose.
- Result:
Proceed to OK NG
OK
NG
Remove the ST NO. 1 relay from the No. 1 engine room relay block.
Disconnect the D54 starter assembly connectors.
Measure the resistance according to the value(s) in the table below.
- Standard Resistance:
Tester Connection Condition Specified Condition Click Location & Routing(D54,D55)Location & Routingewd_type=routing;type=c,c;code=D54,D55
Click Connector(D54)Engine Compartment>Engine Wire>Starter Assemblyewd_type=component;type=c;code=D54;pinno=1
Click Connector(D55)Engine Compartment>Engine Wire>Starter Assemblyewd_type=component;type=c;code=D55;pinno=1
3 (ST NO. 1 relay holder) - D54-1 (ST) Always Below 1 Ω 3 (ST NO. 1 relay holder) - D55-1 (ZYV) Always Below 1 Ω
- Result:
Proceed to OK NG
OK
NG
OK
NG
Click hereEngine / Hybrid System>M15A-FKS (STARTING)>STARTER (w/ Stop And Start System)>INSPECTION
- Result:
Proceed to OK NG
OK
Click hereEngine / Hybrid System>STOP AND START>ENGINE STOP AND START ECU>REMOVAL
- HINT:
-
If arriving at this item from the item "Drive command is being sent from the engine stop and start ECU but the starter itself is not moving" of "After Engine Stops due to Stop and Start System, Engine does not Restart" in Stop and Start / Stop and Start System / Problem Symptoms Table, go to SIMULATION METHOD.
NG
Disconnect the A66, A67 and H43 engine stop and start ECU connectors.
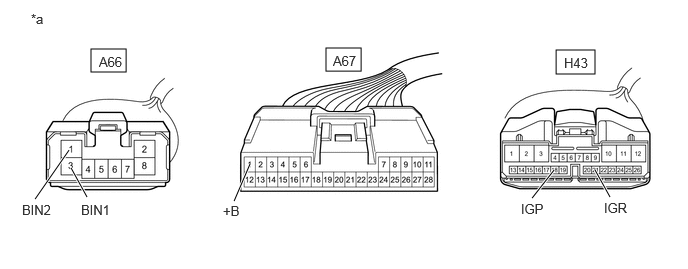
| *a | Front view of wire harness connector
(to Engine Stop and Start ECU) |
- | - |
Measure the resistance according to the value(s) in the table below.
Click hereEngine / Hybrid System>STOP AND START>STOP AND START SYSTEM>TERMINALS OF ECU
- Standard Resistance:
Tester Connection Condition Specified Condition Click Location & Routing(A66)Location & Routingewd_type=routing;type=c;code=A66
Click Connector(A66)Instrument Panel>Engine Room Main Wire>Engine Stop and Start ECUewd_type=component;type=c;code=A66;pinno=3,1
A66-3 (BIN1) - Body ground Always 9.5 to 14 V A66-1 (BIN2) - Body ground Always 9.5 to 14 V
Turn the ignition switch to ON.
Measure the voltage according to the value(s) in the table below.
Click hereEngine / Hybrid System>STOP AND START>STOP AND START SYSTEM>TERMINALS OF ECU
- Standard Resistance:
Tester Connection Switch Condition Specified Condition Click Location & Routing(A67,H43)Location & Routingewd_type=routing;type=c,c;code=A67,H43
Click Connector(A67)Instrument Panel>Engine Room Main Wire>Engine Stop and Start ECUewd_type=component;type=c;code=A67;pinno=1
Click Connector(H43)Instrument Panel>Instrument Panel Wire / Speaker Wire>Engine Stop and Start ECUewd_type=component;type=c;code=H43;pinno=18,21
A67-1 (+B) - Body ground Ignition switch ON 9.5 to 14 V H43-18 (IGP) - Body ground Ignition switch ON 9.5 to 14 V H43-21 (IGR) - Body ground Ignition switch ON 9.5 to 14 V
- Result:
Proceed to OK NG
OK
NG
Disconnect the A66 and A67 engine stop and start ECU connectors.
Measure the voltage according to the value(s) in the table below.
Click hereEngine / Hybrid System>STOP AND START>STOP AND START SYSTEM>TERMINALS OF ECU
- Standard Resistance:
Tester Connection Condition Specified Condition Click Location & Routing(A66,A67)Location & Routingewd_type=routing;type=c,c;code=A66,A67
Click Connector(A66)Instrument Panel>Engine Room Main Wire>Engine Stop and Start ECUewd_type=component;type=c;code=A66;pinno=2,8
Click Connector(A67)Instrument Panel>Engine Room Main Wire>Engine Stop and Start ECUewd_type=component;type=c;code=A67;pinno=6
A66-2 (GND2) - Body ground Always Below 1 Ω A67-6 (DGND) - Body ground Always Below 1 Ω A66-8 (GND1) - Body ground Always Below 1 Ω
- Result:
Proceed to OK NG
OK
NG
Disconnect the certification ECU (smart key ECU assembly) connector.*1
*1: w/ Entry and Start System
Disconnect the clutch start switch assembly connector.
Disconnect the A106 ECM connector.
Disconnect the A67 engine stop and start ECU connector.
Remove the ST NO. 1 relay from the No. 1 engine room relay block.
Measure the resistance according to the value(s) in the table below.
- Standard Resistance:
Tester Connection Condition Specified Condition Click Location & Routing(A67)Location & Routingewd_type=routing;type=c;code=A67
Click Connector(A67)Instrument Panel>Engine Room Main Wire>Engine Stop and Start ECUewd_type=component;type=c;code=A67;pinno=21
A67-21 (STA) - 2 (ST NO. 1 relay holder) Always Below 1 Ω A67-21 (STA) - Body ground Always 10 kΩ or higher 2 (ST NO. 1 relay holder) - Body ground Always 10 kΩ or higher
- Result:
Proceed to OK NG
OK
Click hereEngine / Hybrid System>STOP AND START>ENGINE STOP AND START ECU>REMOVAL
- HINT:
-
If arriving at this item from the item "Drive command is being sent from the engine stop and start ECU but the starter itself is not moving" of "After Engine Stops due to Stop and Start System, Engine does not Restart" in Stop and Start / Stop and Start System / Problem Symptoms Table, go to SIMULATION METHOD.
NG
Enter the following menus.
- Powertrain > Stop and Start > Active Test
-
Tester Display Starter(Hood Close) - 50004 392 42017
Check whether the engine cranks while the Active Test "Starter(Hood Close)" is being performed.
- NOTICE:
-
The Active Test "Starter(Hood Close)" is stopped automatically 3 seconds after the starter assembly begins operating.
- Standard:
Engine cranks
- Result:
Result Proceed to Engine cranks A Engine does not crank B
A
B
- Powertrain > Stop and Start > Data List
-
Tester Display Clutch Lower Switch - 50003 392 594
Depress the clutch pedal and read the values displayed on the GTS.
- Result:
Tester Display Result Proceed to Clutch Lower Switch Fully Depressed ON Clutch Lower Switch Fully Released OFF
- Result:
Result Proceed to OK A NG (w/ Entry and Start System) B NG (w/o Entry and Start System) C
A
B
C
Click hereDrivetrain>CLUTCH>CLUTCH PEDAL SWITCH>INSPECTION
- Result:
Result Proceed to OK (w/ Entry and Start System) A OK (w/o Entry and Start System) B NG C
A
B
C
Disconnect the H45 certification ECU (smart key ECU assembly) connector.
Remove the ST NO. 1 relay from the No. 2 engine room relay block.
Measure the resistance according to the value(s) in the table below.
- Standard Resistance:
Tester Connection Condition Specified Condition Click Location & Routing(H45)Location & Routingewd_type=routing;type=c;code=H45
Click Connector(H45)Instrument Panel>Instrument Panel Wire / Speaker Wire>Certification ECUewd_type=component;type=c;code=H45;pinno=3
H45-3 (STA) - 2 (ST NO. 1 relay holder) Shift lever is in neutral Below 1 Ω H45-3 (STA) - Body ground Shift lever is in any position other than neutral 10 kΩ or higher
- Result:
Proceed to OK NG
OK
NG
Disconnect the H45 ignition or starter switch assembly connector
Remove the ST NO. 1 relay from the No. 2 engine room relay block.
Measure the resistance according to the value(s) in the table below.
- Standard Resistance:
Tester Connection Condition Specified Condition Click Location & Routing(H45)Location & Routingewd_type=routing;type=c;code=H45
Click Connector(H45)Instrument Panel>Instrument Panel Wire / Speaker Wire>Certification ECUewd_type=component;type=c;code=H45;pinno=3
H45-3 (STA) - 2 (ST NO. 1 relay holder) Shift lever is in neutral Below 1 Ω H45-3 (STA) - Body ground Shift lever is in any position other than neutral 10 kΩ or higher
- Result:
Proceed to OK NG
OK
NG
Disconnect the A64 clutch start switch assembly connector.
Disconnect the H45 certification ECU (smart key ECU assembly) connector.
Disconnect the A67 engine stop and start ECU connector.
Measure the resistance according to the value(s) in the table below.
- Standard Resistance:
Tester Connection Condition Specified Condition Click Location & Routing(H45,A67,A64)Location & Routingewd_type=routing;type=c,c,c;code=H45,A67,A64
Click Connector(H45)Instrument Panel>Instrument Panel Wire / Speaker Wire>Certification ECUewd_type=component;type=c;code=H45;pinno=10
Click Connector(A67)Instrument Panel>Engine Room Main Wire>Engine Stop and Start ECUewd_type=component;type=c;code=A67;pinno=17
Click Connector(A64)Instrument Panel>Engine Room Main Wire>Clutch Start Switch Assemblyewd_type=component;type=c;code=A64;pinno=2
H45-10 (STAR) - A67-17 (CLL) Always Below 1 Ω H45-10 (STAR) - A64-2 (B) Always Below 1 Ω H45-10 (STAR) - Body ground Always 10 kΩ or higher A67-17 (CLL) - Body ground Always 10 kΩ or higher A64-2 (B) - Body ground Always 10 kΩ or higher
- Result:
Proceed to OK NG
OK
NG
Disconnect A67 the engine stop and start ECU connector.
Measure the voltage according to the value(s) in the table below.
- Standard Voltage:
Tester Connection Switch Condition Specified Condition Click Location & Routing(A67)Location & Routingewd_type=routing;type=c;code=A67
Click Connector(A67)Instrument Panel>Engine Room Main Wire>Engine Stop and Start ECUewd_type=component;type=c;code=A67;pinno=17
A67-17 (CLL) - Body ground Engine started using push start switch assembly (engine start) 9.5 to 14 V
- Result:
Proceed to OK NG
OK
NG
Click hereEngine / Hybrid System>M15A-FKS (STARTING)>IGNITION SWITCH>INSPECTION
- Result:
Proceed to OK NG
OK
NG
Disconnect the H54 ignition or starter switch assembly connector.
Measure the resistance according to the value(s) in the table below.
- Standard Resistance:
Tester Connection Condition Specified Condition Click Location & Routing(H54)Location & Routingewd_type=routing;type=c;code=H54
Click Connector(H54)Instrument Panel>Instrument Panel Wire / Speaker Wire>Ignition Or Starter Switch Assemblyewd_type=component;type=c;code=H54;pinno=1
H54-1 (AM2) - Body ground Always 11 to 14 V
- Result:
Proceed to OK NG
OK
NG
Disconnect the H54 ignition or starter switch assembly connector.
Disconnect the A64 clutch start switch assembly connector.
Measure the resistance according to the value(s) in the table below.
- Standard Resistance:
Tester Connection Condition Specified Condition Click Location & Routing(H54,A64)Location & Routingewd_type=routing;type=c,c;code=H54,A64
Click Connector(H54)Instrument Panel>Instrument Panel Wire / Speaker Wire>Ignition Or Starter Switch Assemblyewd_type=component;type=c;code=H54;pinno=4
Click Connector(A64)Instrument Panel>Engine Room Main Wire>Clutch Start Switch Assemblyewd_type=component;type=c;code=A64;pinno=2
H54-4 (ST2) - A64-2 (B) Always Below 1 Ω H54-4 (ST2) - Body ground Always 10 kΩ or higher A64-2 (B) - Body ground Always 10 kΩ or higher
- Result:
Proceed to OK NG
OK
NG
Disconnect the A66, A67 and H43 engine stop and start ECU connectors.
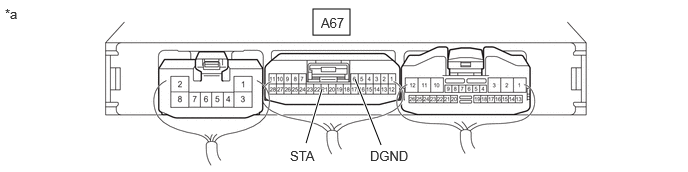
| *a | Front view of wire harness connector
(to Engine Stop and Start ECU) |
- | - |
Measure the resistance according to the value(s) in the table below.
Click hereEngine / Hybrid System>STOP AND START>STOP AND START SYSTEM>TERMINALS OF ECU
Check the waveform immediately after starting.
- Standard Resistance:
Tester Connection Condition Specified Condition Click Location & Routing(A67)Location & Routingewd_type=routing;type=c;code=A67
Click Connector(A67)Instrument Panel>Engine Room Main Wire>Engine Stop and Start ECUewd_type=component;type=c;code=A67;pinno=21,6
A67-21 (STA) - A67-6 (DGND) Ignition switch ON 6 to 14 V Cranking commanded via Active Test item Starter(Hood Close)*1
*1: In the case of stop and start inspection procedure.
- Result:
Result Proceed to OK A NG B NG*1 C
*1: In the case of stop and start inspection procedure.
A
B
C
Click hereEngine / Hybrid System>M15A-FKS (ENGINE CONTROL)>RELAY>INSPECTION
- Result:
Proceed to OK NG
OK
NG
Disconnect the A66, A67 and H43 engine stop and start ECU connectors.
| *a | Front view of wire harness connector
(to Engine Stop and Start ECU) |
- | - |
Measure the resistance according to the value(s) in the table below.
Click hereEngine / Hybrid System>STOP AND START>STOP AND START SYSTEM>TERMINALS OF ECU
- Standard Resistance:
Tester Connection Condition Specified Condition Click Location & Routing(A66)Location & Routingewd_type=routing;type=c;code=A66
Click Connector(A66)Instrument Panel>Engine Room Main Wire>Engine Stop and Start ECUewd_type=component;type=c;code=A66;pinno=3,1
A66-3 (BIN1) - Body ground Always 9.5 to 14 V A66-1 (BIN2) - Body ground Always 9.5 to 14 V
Turn the ignition switch to ON.
Measure the voltage according to the value(s) in the table below.
Click hereEngine / Hybrid System>STOP AND START>STOP AND START SYSTEM>TERMINALS OF ECU
- Standard Resistance:
Tester Connection Switch Condition Specified Condition Click Location & Routing(A67,H43)Location & Routingewd_type=routing;type=c,c;code=A67,H43
Click Connector(A67)Instrument Panel>Engine Room Main Wire>Engine Stop and Start ECUewd_type=component;type=c;code=A67;pinno=1
Click Connector(H43)Instrument Panel>Instrument Panel Wire / Speaker Wire>Engine Stop and Start ECUewd_type=component;type=c;code=H43;pinno=18,21
A67-1 (+B) - Body ground Ignition switch ON 9.5 to 14 V H43-18 (IGP) - Body ground Ignition switch ON 9.5 to 14 V H43-21 (IGR) - Body ground Ignition switch ON 9.5 to 14 V
- Result:
Proceed to OK NG
OK
NG
Disconnect the A66 and A67 engine stop and start ECU connectors.
Measure the voltage according to the value(s) in the table below.
Click hereEngine / Hybrid System>STOP AND START>STOP AND START SYSTEM>TERMINALS OF ECU
- Standard Resistance:
Tester Connection Condition Specified Condition Click Location & Routing(A66,A67)Location & Routingewd_type=routing;type=c,c;code=A66,A67
Click Connector(A66)Instrument Panel>Engine Room Main Wire>Engine Stop and Start ECUewd_type=component;type=c;code=A66;pinno=2,8
Click Connector(A67)Instrument Panel>Engine Room Main Wire>Engine Stop and Start ECUewd_type=component;type=c;code=A67;pinno=6
A66-2 (GND2) - Body ground Always Below 1 Ω A67-6 (DGND) - Body ground Always Below 1 Ω A66-8 (GND1) - Body ground Always Below 1 Ω
- Result:
Proceed to OK NG
OK
NG
Disconnect the H45 certification ECU (smart key ECU assembly) connector.*1
*1: w/ Entry and Start System
Disconnect the A64 clutch switch assembly connector.
Disconnect the A54 ECM connector.
Disconnect the A67 engine stop and start ECU connector.
Remove the ST NO. 1 relay from the No. 2 engine room relay block.
Measure the resistance according to the value(s) in the table below.
- Standard Resistance:
Tester Connection Condition Specified Condition Click Location & Routing(A67)Location & Routingewd_type=routing;type=c;code=A67
Click Connector(A67)Instrument Panel>Engine Room Main Wire>Engine Stop and Start ECUewd_type=component;type=c;code=A67;pinno=21
A67-21 (STA) - 2 (ST NO. 1 relay holder) Always Below 1 Ω A67-21 (STA) - Body ground Always 10 kΩ or higher 2 (ST NO. 1 relay holder) - Body ground Always 10 kΩ or higher
- Result:
Proceed to OK NG
OK
Click hereEngine / Hybrid System>STOP AND START>ENGINE STOP AND START ECU>REMOVAL
- HINT:
-
If arriving at this item from the item "Drive command is being sent from the engine stop and start ECU but the starter itself is not moving" of "After Engine Stops due to Stop and Start System, Engine does not Restart" in Stop and Start / Stop and Start System / Problem Symptoms Table, go to SIMULATION METHOD.
NG
Disconnect the A66, A67 and H43 engine stop and start ECU connectors.
| *a | Front view of wire harness connector
(to Engine Stop and Start ECU) |
- | - |
Measure the resistance according to the value(s) in the table below.
Click hereEngine / Hybrid System>STOP AND START>STOP AND START SYSTEM>TERMINALS OF ECU
- Standard Resistance:
Tester Connection Condition Specified Condition Click Location & Routing(A66)Location & Routingewd_type=routing;type=c;code=A66
Click Connector(A66)Instrument Panel>Engine Room Main Wire>Engine Stop and Start ECUewd_type=component;type=c;code=A66;pinno=3,1
A66-3 (BIN1) - Body ground Always 9.5 to 14 V A66-1 (BIN2) - Body ground Always 9.5 to 14 V
Turn the ignition switch to ON.
Measure the voltage according to the value(s) in the table below.
Click hereEngine / Hybrid System>STOP AND START>STOP AND START SYSTEM>TERMINALS OF ECU
- Standard Resistance:
Tester Connection Switch Condition Specified Condition Click Location & Routing(A67,H43)Location & Routingewd_type=routing;type=c,c;code=A67,H43
Click Connector(A67)Instrument Panel>Engine Room Main Wire>Engine Stop and Start ECUewd_type=component;type=c;code=A67;pinno=1
Click Connector(H43)Instrument Panel>Instrument Panel Wire / Speaker Wire>Engine Stop and Start ECUewd_type=component;type=c;code=H43;pinno=18,21
A67-1 (+B) - Body ground Ignition switch ON 9.5 to 14 V H43-18 (IGP) - Body ground Ignition switch ON 9.5 to 14 V H43-21 (IGR) - Body ground Ignition switch ON 9.5 to 14 V
- Result:
Proceed to OK NG
OK
NG
Disconnect the A66 and A67 engine stop and start ECU connectors.
Measure the voltage according to the value(s) in the table below.
Click hereEngine / Hybrid System>STOP AND START>STOP AND START SYSTEM>TERMINALS OF ECU
- Standard Resistance:
Tester Connection Condition Specified Condition Click Location & Routing(A66,A67)Location & Routingewd_type=routing;type=c,c;code=A66,A67
Click Connector(A66)Instrument Panel>Engine Room Main Wire>Engine Stop and Start ECUewd_type=component;type=c;code=A66;pinno=2,8
Click Connector(A67)Instrument Panel>Engine Room Main Wire>Engine Stop and Start ECUewd_type=component;type=c;code=A67;pinno=6
A66-2 (GND2) - Body ground Always Below 1 Ω A67-6 (DGND) - Body ground Always Below 1 Ω A66-8 (GND1) - Body ground Always Below 1 Ω
- Result:
Proceed to OK NG
OK
NG
Disconnect the H45 certification ECU (smart key ECU assembly) connector.*1
*1: w/ Entry and Start System
Disconnect the A64 clutch switch assembly connector.
Disconnect the A54 ECM connector.
Disconnect the A67 engine stop and start ECU connector.
Remove the ST NO. 1 relay from the No. 2 engine room relay block.
Measure the resistance according to the value(s) in the table below.
- Standard Resistance:
Tester Connection Condition Specified Condition Click Location & Routing(A67)Location & Routingewd_type=routing;type=c;code=A67
Click Connector(A67)Instrument Panel>Engine Room Main Wire>Engine Stop and Start ECUewd_type=component;type=c;code=A67;pinno=21
A67-21 (STA) - 2 (ST NO. 1 relay holder) Always Below 1 Ω A67-21 (STA) - Body ground Always 10 kΩ or higher 2 (ST NO. 1 relay holder) - Body ground Always 10 kΩ or higher
- Result:
Proceed to OK NG
OK
Click hereEngine / Hybrid System>STOP AND START>ENGINE STOP AND START ECU>REMOVAL
- HINT:
-
If arriving at this item from the item "Drive command is being sent from the engine stop and start ECU but the starter itself is not moving" of "After Engine Stops due to Stop and Start System, Engine does not Restart" in Stop and Start / Stop and Start System / Problem Symptoms Table, go to SIMULATION METHOD.
NG