Home › Vehicle Exterior › WINDOW / GLASS › ROOF WINDOW FIX GLASS › from 2021.07
RM3700E _59 Vehicle Exterior _092998 WINDOW / GLASS _0482096 ROOF WINDOW FIX GLASS A

WINDOW / GLASS  ROOF WINDOW FIX GLASS  REMOVAL  


CAUTION / NOTICE / HINT
COMPONENTS (REMOVAL)
B623359N01
0.167,2 7,3.667 6.833,1.667 1.781,3.167 1.781,2.802 false 1.906,0.958 1.573,0.958 false 5.375,3.167 5.375,2.875 false 3.583,3.667 3.583,2 false 5.396,3.146 5.677,3.5 0.281,0.354 18 false 3 1.813,3.146 2.094,3.5 0.281,0.354 18 false 2 1.396,0.792 1.677,1.146 0.281,0.354 18 false 1 0.208,2.042 0.583,2.281 0.375,0.24 12 false *A 3.625,2.042 4,2.281 0.375,0.24 12 false *B

Procedure Part Name Code
Z101186

Z101188

Z101187

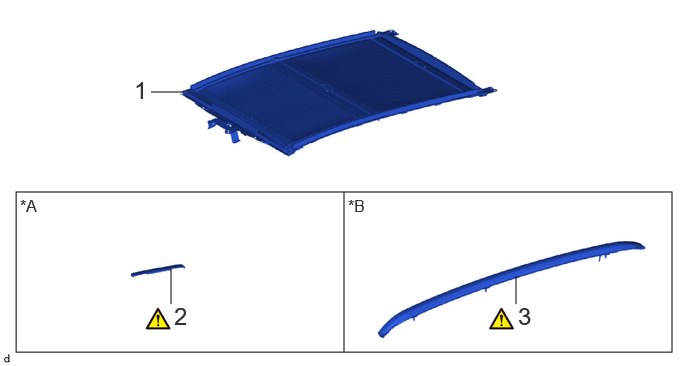
1 SUNSHADE TRIM BRACKET SUB-ASSEMBLY 63306 - - -
2 REAR ROOF DRIP SIDE FINISH MOULDING 75554A (Click here) - -
3 ROOF RACK ASSEMBLY 63470B (Click here) - -

*A w/o Roof Rack *B w/ Roof Rack

B620912N03
1.333,1.917 6,3.667 4.667,1.75 1.333,0.167 6,1.833 4.667,1.667 4.875,0.948 5.25,0.948 false 4.896,2.677 5.25,2.677 false 5.719,0.729 6,1.083 0.281,0.354 18 false 4 5.729,2.458 6.01,2.813 0.281,0.354 18 false 5 1.417,0.219 1.792,0.458 0.375,0.24 12 false *A 1.417,1.979 1.792,2.219 0.375,0.24 12 false *B 5.594,2.521 5.75,2.719 0.156,0.198 10 false ● 5.583,0.802 5.74,1 0.156,0.198 10 false ●

Procedure Part Name Code
Z101186

Z101188

Z101187

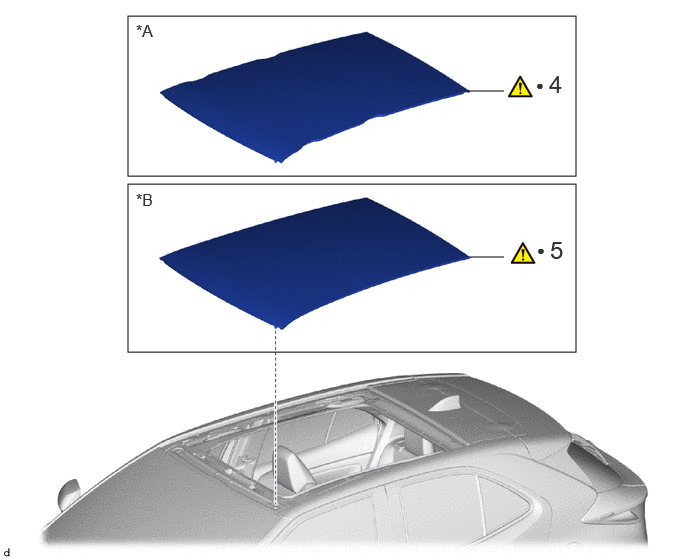
4 NO. 1 ROOF WINDOW GLASS SUB-ASSEMBLY 63201M (Click here) - -
5 NO. 1 ROOF WINDOW GLASS SUB-ASSEMBLY 63201M (Click here) - -

*A w/ Roof Rack *B w/o Roof Rack
● Non-reusable part - -

PROCEDURE

Hide 63306 1.REMOVE SUNSHADE TRIM BRACKET SUB-ASSEMBLY

Hide 75554A 2.REMOVE REAR ROOF DRIP SIDE FINISH MOULDING (w/o Roof Rack)

Z101186

Click here(Click here)

Hide 63470B 3.REMOVE ROOF RACK ASSEMBLY (w/ Roof Rack)

Z101186

Click here(Click here)

Hide 63201M 4.REMOVE NO. 1 ROOF WINDOW GLASS SUB-ASSEMBLY (w/ Roof Rack)

Z101186

NOTICE:

Be careful not to damage the No. 1 roof window glass sub-assembly as the roof window clips are installed to the No. 1 roof window glass sub-assembly.


a.
B622651C01
0.448,0.073 0.729,0.427 0.281,0.354 18 false i
V100155

Protective Tape - -


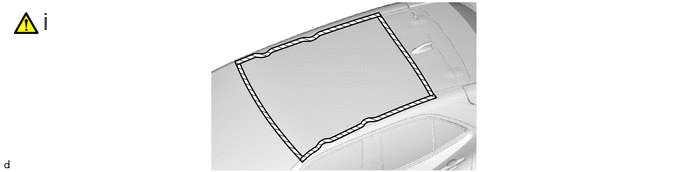
i.

Apply protective tape to the area around the installation position of the No. 1 roof window glass sub-assembly on the vehicle body to prevent it from being scratched.


b.
B620913C01
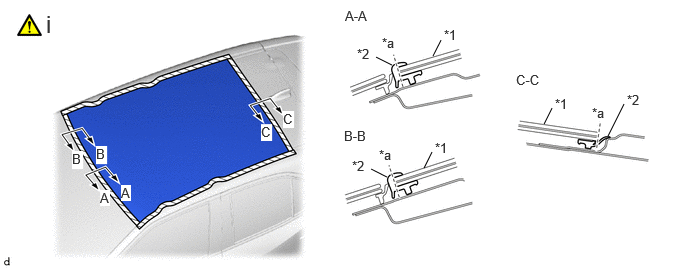
4.417,1.75 4.5,1.583 false 4.51,0.583 4.594,0.417 false 5.667,1.292 5.75,1.125 false 6.333,1.417 6.5,1.083 false 3.917,0.594 4.083,0.677 false 3.865,1.76 4.031,1.844 false 4.625,0.281 4.938,0.438 0.313,0.156 10 false *1 3.719,0.479 4.031,0.635 0.313,0.156 10 false *2 4.531,1.458 4.844,1.615 0.313,0.156 10 false *1 5.781,1 6.094,1.156 0.313,0.156 10 false *1 3.667,1.646 3.875,1.823 0.208,0.177 10 false *2 6.531,0.958 6.844,1.115 0.313,0.156 10 false *2 1.042,1.979 1.146,2.146 0.104,0.167 10 true A 1,1.521 1.115,1.708 0.115,0.188 10 true B 2.948,1.156 3.063,1.333 0.115,0.177 10 true C 1.26,1.927 1.365,2.094 0.104,0.167 10 true A 0.75,1.573 0.865,1.76 0.115,0.188 10 true B 2.719,1.292 2.833,1.469 0.115,0.177 10 true C 3.979,0.365 4.198,0.552 0.219,0.188 10 false *a 3.948,1.531 4.167,1.719 0.219,0.188 10 false *a 6.167,1.094 6.385,1.281 0.219,0.188 10 false *a 3.594,0.083 3.885,0.26 0.292,0.177 10 false A-A 5.375,0.75 5.75,1 0.375,0.25 10 false C-C 3.583,1.333 3.958,1.583 0.375,0.25 10 false B-B 0.479,0.104 0.76,0.458 0.281,0.354 18 false i
*1 No. 1 Roof Window Glass Sub-assembly *2 Roof Window Upper Moulding
*a Cut Area - -


i.

Using a knife, cut off the roof window upper moulding as shown in the illustration.

NOTICE:

Do not damage the body with the knife.


HINT:

After partially disconnecting the part, pull by hand to finish removing it.


c.
B622652C01
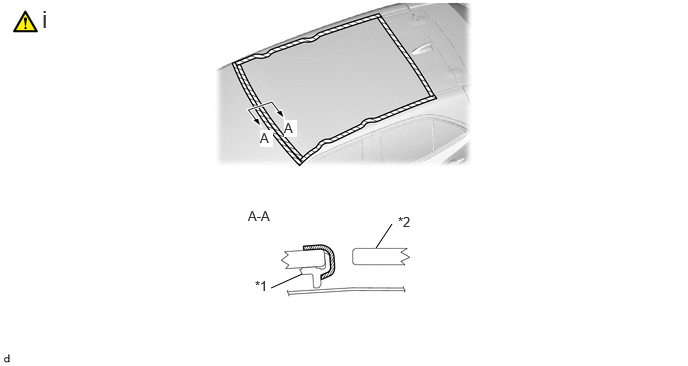
3.917,2.583 4.083,2.333 false 2.823,3 3.146,2.854 false 2.656,2.896 2.969,3.052 0.313,0.156 10 false *1 4.146,2.229 4.458,2.385 0.313,0.156 10 false *2 2.958,1.25 3.094,1.427 0.135,0.177 10 true A 2.708,1.354 2.844,1.531 0.135,0.177 10 true A 2.583,2.167 2.979,2.417 0.396,0.25 10 false A-A 0.438,0.052 0.719,0.406 0.281,0.354 18 false i
*1 Windshield Outside Moulding *2 No. 1 Roof Window Glass Sub-assembly
V100155

Protective Tape - -


i.

Turn back the windshield outside moulding lip and hold it with protective tape.


d.
B620914C02
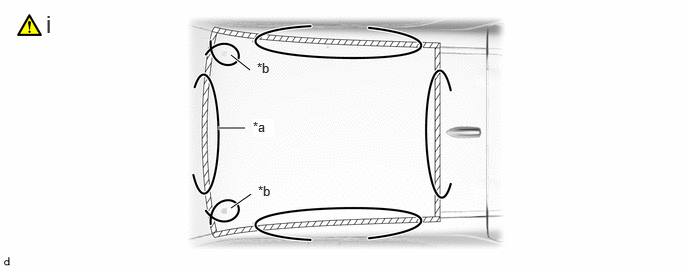
2.604,0.729 2.406,0.573 true 2.552,1.333 2.271,1.333 true 2.615,2.021 2.406,2.167 true 2.677,0.625 2.885,0.792 0.208,0.167 10 false *b 2.635,1.24 2.854,1.427 0.219,0.188 10 true *a 2.688,1.906 2.875,2.073 0.188,0.167 10 false *b 0.479,0.104 0.76,0.458 0.281,0.354 18 false i
*a Piano Wire *b Roof Window Clip


i.

Cut the adhesive by the below procedure.

1. Pass a piano wire between the vehicle body and No. 1 roof window glass sub-assembly from the interior.

2. Tie both wire ends to wooden blocks or similar objects that can serve as handles.

3. Cut the adhesive by pulling the piano wire around the No. 1 roof window glass sub-assembly.

NOTICE:

When separating the No. 1 roof window glass sub-assembly, be careful not to damage the paint or interior and exterior ornaments.


e.
B620915N01
0.479,0.115 0.76,0.469 0.281,0.354 18 false i

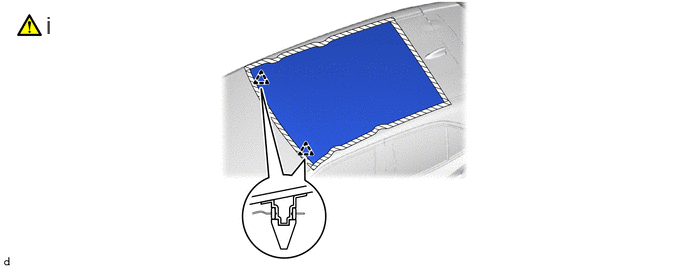
i.

Using suction cups, disengage the roof window clips to remove the No. 1 roof window glass sub-assembly.

NOTICE:
·

Be careful not to drop the No. 1 roof window glass sub-assembly.

·

Leave as much adhesive on the vehicle body as possible when removing the No. 1 roof window glass sub-assembly.


Hide 63201M 5.REMOVE NO. 1 ROOF WINDOW GLASS SUB-ASSEMBLY (w/o Roof Rack)

Z101186

NOTICE:

Be careful not to damage the No. 1 roof window glass sub-assembly as the roof window clips are installed to the No. 1 roof window glass sub-assembly.


a.
B622653C01
0.448,0.073 0.729,0.427 0.281,0.354 18 false i
V100155

Protective Tape - -


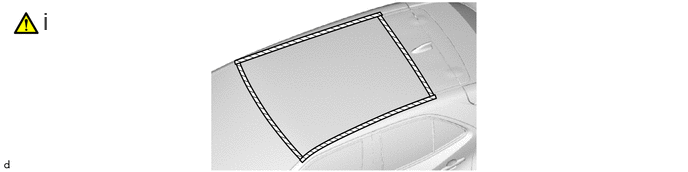
i.

Apply protective tape to the area around the installation position of the No. 1 roof window glass sub-assembly on the vehicle body to prevent it from being scratched.


b.
B620916C01
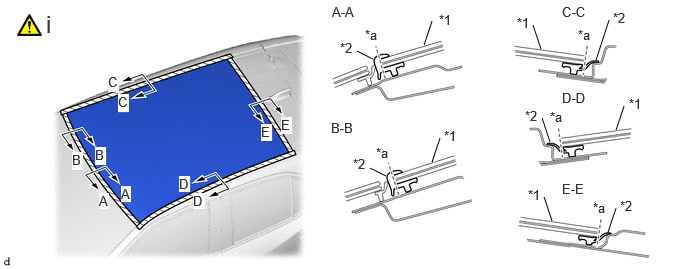
6.417,1.354 6.5,1.104 false 6.333,2.417 6.417,2.167 false 6.208,0.625 6.344,0.208 false 4.417,0.469 4.5,0.219 false 4.5,1.688 4.583,1.438 false 3.854,1.75 4.021,1.833 false 3.719,0.531 3.885,0.615 false 5.646,1.229 5.729,1.479 false 5.552,0.26 5.635,0.51 false 5.667,2.052 5.75,2.302 false 4.573,0.125 4.885,0.281 0.313,0.156 10 false *1 3.542,0.417 3.854,0.573 0.313,0.156 10 false *2 5.385,0.156 5.698,0.313 0.313,0.156 10 false *1 4.625,1.333 4.938,1.49 0.313,0.156 10 false *1 5.5,1.948 5.813,2.104 0.313,0.156 10 false *1 6.385,0.104 6.698,0.26 0.313,0.156 10 false *2 3.677,1.625 3.885,1.802 0.208,0.177 10 false *2 6.458,2.063 6.771,2.219 0.313,0.156 10 false *2 1.031,2.01 1.135,2.177 0.104,0.167 10 true A 0.99,1.531 1.104,1.719 0.115,0.188 10 true B 2.927,1.219 3.042,1.396 0.115,0.177 10 true E 1.865,1.833 1.979,2 0.115,0.167 10 true D 1.26,1.938 1.365,2.104 0.104,0.167 10 true A 1.125,0.771 1.24,0.958 0.115,0.188 10 true C 2.01,2.01 2.135,2.177 0.125,0.167 10 true D 2.719,1.292 2.833,1.469 0.115,0.177 10 true E 3.802,0.281 4.021,0.469 0.219,0.188 10 false *a 3.917,1.51 4.135,1.698 0.219,0.188 10 false *a 6.177,2.083 6.396,2.271 0.219,0.188 10 false *a 6.021,0.281 6.24,0.469 0.219,0.188 10 false *a 3.458,0.042 3.75,0.219 0.292,0.177 10 false A-A 5.854,0.042 6.146,0.219 0.292,0.177 10 false C-C 3.448,1.25 3.823,1.5 0.375,0.25 10 false B-B 5.854,0.938 6.229,1.188 0.375,0.25 10 false D-D 5.854,1.885 6.229,2.135 0.375,0.25 10 false E-E 5.729,1.135 5.948,1.323 0.219,0.188 10 false *a 5.469,1.125 5.781,1.281 0.313,0.156 10 false *2 6.552,1 6.865,1.156 0.313,0.156 10 false *1 0.75,1.583 0.865,1.771 0.115,0.188 10 true B 1.229,0.979 1.344,1.167 0.115,0.188 10 true C 0.479,0.104 0.76,0.458 0.281,0.354 18 false i
*1 No. 1 Roof Window Glass Sub-assembly *2 Roof Window Upper Moulding
*a Cut Area - -


i.

Using a knife, cut off the roof window upper moulding as shown in the illustration.

NOTICE:

Do not damage the body with the knife.


HINT:

After partially disconnecting the part, pull by hand to finish removing it.


c.
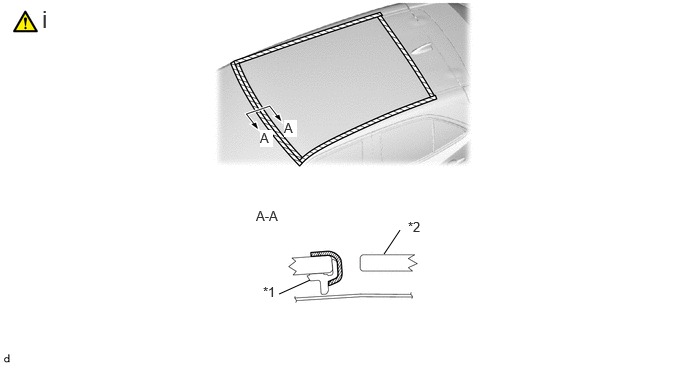
B622654C01
4,2.646 4.167,2.396 false 2.906,3.063 3.229,2.917 false 2.74,2.958 3.052,3.115 0.313,0.156 10 false *1 4.25,2.281 4.563,2.438 0.313,0.156 10 false *2 2.958,1.25 3.094,1.427 0.135,0.177 10 true A 2.708,1.354 2.844,1.531 0.135,0.177 10 true A 2.667,2.167 3.063,2.417 0.396,0.25 10 false A-A 0.438,0.052 0.719,0.406 0.281,0.354 18 false i
*1 Windshield Outside Moulding *2 No. 1 Roof Window Glass Sub-assembly
V100155

Protective Tape - -


i.

Turn back the windshield outside moulding lip and hold it with protective tape.


d.
B620917C01
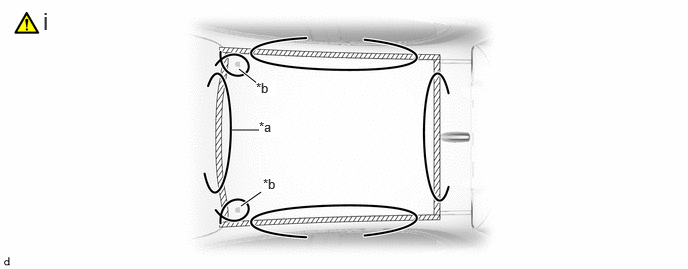
2.688,0.875 2.49,0.719 true 2.698,1.354 2.417,1.354 true 2.719,2 2.51,2.146 true 2.667,0.833 2.875,1 0.208,0.167 10 true *b 2.698,1.24 2.917,1.427 0.219,0.188 10 true *a 2.74,1.833 2.927,2 0.188,0.167 10 true *b 0.448,0.073 0.635,0.396 0.188,0.323 18 false i
*a Piano Wire *b Roof Window Clip


i.

Cut the adhesive by the below procedure.

1. Pass a piano wire between the vehicle body and No. 1 roof window glass sub-assembly from the interior.

2. Tie both wire ends to wooden blocks or similar objects that can serve as handles.

3. Cut the adhesive by pulling the piano wire around the No. 1 roof window glass sub-assembly.

NOTICE:

When separating the No. 1 roof window glass sub-assembly, be careful not to damage the paint or interior and exterior ornaments.


e.
B620918N01
0.479,0.115 0.76,0.469 0.281,0.354 18 false i

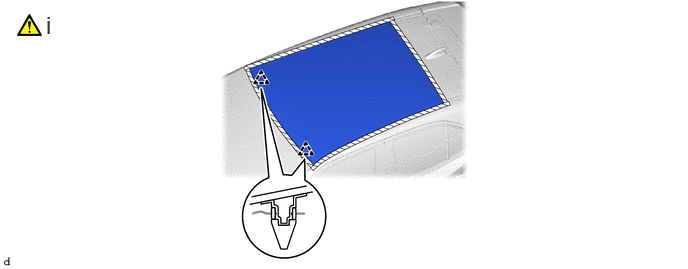
i.

Using suction cups, disengage the roof window clips to remove the No. 1 roof window glass sub-assembly.

NOTICE:
·

Be careful not to drop the No. 1 roof window glass sub-assembly.

·

Leave as much adhesive on the vehicle body as possible when removing the No. 1 roof window glass sub-assembly.