2NZ-FE ENGINE MECHANICAL REAR CRANKSHAFT OIL SEAL INSTALLATION
PROCEDURE

 11401L
1.INSTALL REAR ENGINE OIL SEAL
Apply MP grease to the lip of a new oil seal.
- NOTICE:
-
Keep the lip free of foreign matter.
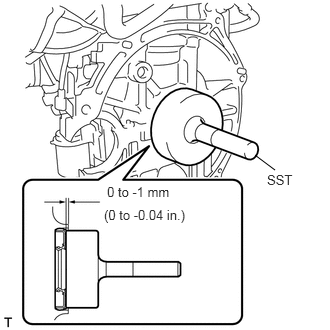
Using SST and hammer, tap in the oil seal until its surface is flush with the cylinder block and oil pan.
- SST
- 09223-56010
- CAUTION:
- ·
Do not tap the oil seal at an angle.
- ·
Wipe off extra grease from the crankshaft.
32101B
2.INSTALL DRIVE PLATE AND RING GEAR SUB-ASSEMBLY (for Automatic Transaxle)
Hold the crankshaft with SST.
- SST
- 09960-10010 (09962-01000, 09963-01000)
Clean the 6 bolts and their holes.
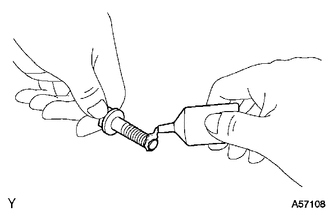
Apply adhesive to the 2 or 3 end threads of the bolt.
| *1 | Adhesive |
- NOTICE:
-
Do not start the engine for at least 1 hour after installation, the drive plate.
- Adhesive:
Toyota Genuine Adhesive 1324, Three Bond 1324 or equivalent
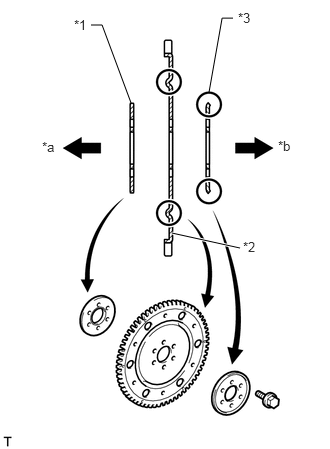
Install the rear drive plate spacer, drive plate and ring gear sub-assembly, and front drive plate spacer with the 6 bolts.
| *1 | Front Drive Plate Spacer |
| *2 | Drive Plate and Ring Gear |
| *3 | Rear Drive Plate Spacer |
| *a | Engine Side |
| *b | Transaxle Side |
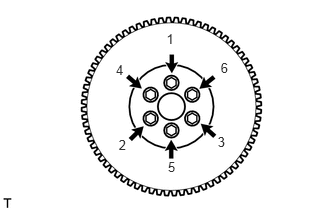
Install and uniformly tighten the 6 bolts in several steps, in the sequence shown in the illustration.
- Torque:
- 88 N*m (897 kgf*cm, 65 ft.*lbf)
13405
3.INSTALL FLYWHEEL SUB-ASSEMBLY (for Manual Transaxle)
Hold the crankshaft with SST.
- SST
- 09960-10010 (09962-01000, 09963-01000)
Clean the 6 bolts and their holes.
Apply adhesive to the 2 or 3 end threads of bolt.
| *1 | Adhesive |
- NOTICE:
-
Do not start the engine for at least 1 hour after installation.
- Adhesive:
Toyota Genuine Adhesive 1324, Three Bond 1324 or equivalent
Install the flywheel with the 6 bolts.
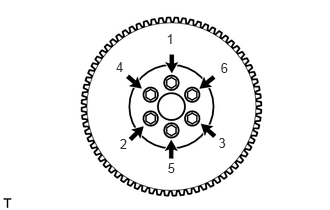
Install the flywheel with the 6 bolts in the order shown in the illustration.
- Torque:
- 49 N*m (500 kgf*cm, 38 ft.*lbf)
Mark paint marks on the bolt heads on the engine upper side.
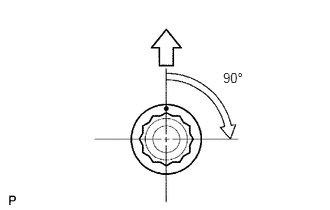
Tighten the bolts 90° in the sequence order shown in the illustration.
31250
4.INSTALL CLUTCH DISC ASSEMBLY (for Manual Transaxle)
31210
5.INSTALL CLUTCH COVER ASSEMBLY (for Manual Transaxle)
31210
6.INSPECT AND ADJUST CLUTCH COVER ASSEMBLY (for Manual Transaxle)
30300
7.INSTALL MANUAL TRANSAXLE ASSEMBLY (for Manual Transaxle)
8.INSTALL AUTOMATIC TRANSAXLE ASSEMBLY (for Automatic Transaxle)
9.INSPECT FOR OIL LEAK